The New Year is getting closer, and for those who know how to do DIY Christmas toys, the time for fruitful work is coming. Making toys is a tradition that arose at a time when mass production of Christmas tree decorations had not yet been established. Today, there are plenty of factory-made toys in stores, but the tradition of making them yourself has not disappeared. This is explained simply - handmade jewelry and toys give off a special warmth; they look homely and cozy. A nice bonus is that you can be proud that the toy you made yourself exists in a single copy.

How to make New Year's toys with your own hands?
New Year's outfits for the green beauty have undergone changes many times during the existence of the tradition of decorating the Christmas tree. In stores you can still buy standard decorations - glass balls of various colors and sizes, stars reminiscent of the Soviet past, glass cones, fruits and other traditional products. You can also add an element of creativity to the Christmas and New Year holidays and try to make New Year's toys for 2017 with your own hands.

DIY New Year's toys from scrap materials
The choice for work is almost limitless - any available material can be used. Christmas tree decorations are sometimes made from the most unexpected materials. New Year’s creativity also has its own “leaders” - materials that are used most often:
- Wood, plywood;
- Paper;
- Beads;
- Felt;
- Textile;
- Beads;
- Natural materials - branches, vines, cones, etc.

Christmas tree toys made from salt dough
You can even make DIY New Year's toys for the New Year 2017 from flour. One of the simplest and most inexpensive materials for making New Year's toys is salt dough. There is flour in every home, the process is interesting (especially for children), and the result is a completely worthy replacement for ceramic and glass toys.
To work you will need:
- Wheat flour;
- Water;
- Salt (fine);
- Paints;
- Varnish (optional);
- Leg-split;
- Oil;
- PVA glue.
Important! To make the dough more flexible, you can add a little baby oil (can be replaced with vegetable oil or olive oil).
Dissolve salt in warm water, add flour, knead the dough. To get a variety of figures, you can use dough molds. The lack of shapes is not a problem; figures from salt dough can be sculpted by hand. To add texture, you can use anything - pencils, plastic bottle caps, lace. While the dough is still wet, you need to make holes for the rope holder.

After drying (1-3 days, depending on the thickness of the product), the toy can be painted, a pattern applied, small photos pasted and coated with acrylic varnish.
Christmas decorations made from branches
DIY New Year's toys are often made from scrap materials. A simple but effective way to decorate a Christmas tree or home for the New Year is to make toys from natural materials - for example, from branches. To make a stylish toy “Ball in eco-style” you will need wire and branches.

Lifehack! It is better to collect branches in October or November, when they still contain a sufficient amount of moisture. Later collected vines and branches may be brittle and unsuitable for making toys.
Make several (5-6) circles from the wire. Form a ball “skeleton” from them, fasten the circles together with hot glue or wire. Carefully twist small diameter branches or vines over the base. To keep the branches tightly, they can also be secured with hot glue. It is easy to thread a ring of twine or ribbon into the finished ball. The stylish eco-ball is ready!
New Year toys made of beads
You can also make spectacular New Year's toys from beads. It will not be easy for beginners to make jewelry that is massive or has a complex shape. But without any problems you can make hearts, Christmas trees, and stars. To make such a toy you will need wire and beads. First you need to string the beads onto the wire, and then form the desired shape, tightly securing the ends of the wire. You can use ribbons for hanging.

New Year's toys made from light bulbs
For those who are still puzzling over the question “How to make New Year’s toys with your own hands?” An option using items that previously had a utilitarian function is perfect. New Year is coming soon, so don’t rush to throw away burnt out light bulbs. They make charming Christmas tree decorations. A little imagination, and you won’t have to settle for the usual glass balls.

Attention! For the first (background) layer, it is better to use spray paint. It is easier to apply, and this paint goes on evenly. It is much more difficult to create an even coating with a brush or sponge.
DIY New Year's toys made of paper
Paper is a universal material, and Christmas tree toys and decorations made from it are cheap, practical and simple. To begin with, you can choose flat (not voluminous) jewelry. These can be snowflakes, Christmas trees, and other themed figures.


Important! You should not take too thick paper or high-density cardboard: when cutting, the edges of these materials become “shaggy” and the product does not look neat.

Another accessible method is to use paper to decorate ready-made toys - for example, balls. An ordinary glass ball will look much more original if you stick decorations cut out of paper on it. Or, for example, a small collage of photos.
A more complex way is to make toys using the origami technique. Using separate paper blocks, you can assemble a variety of decorations - for example, a Christmas tree.

Even children can make New Year's toys out of paper with their own hands. Most of the diagrams and patterns are simple; it will not be difficult for a child to cut out a snowflake, a Christmas tree or the silhouette of a bird. And from individual paper figures and silhouettes you can make a New Year's garland to decorate a Christmas tree or room. To do this, you can use a ready-made diagram from the Internet or come up with a design yourself. Christmas garlands can be decorated with snowmen, balls, patterns, Christmas trees, and animals.


From felt
Felt is a soft, fairly dense felt. This material is perfect for making New Year's toys. It’s easy to work with – you don’t need to process the edges; you can buy felt in almost any color and shade in the store. To make a stylish New Year's toy, only two or three colors of felt are enough. For example, a combination of red and white - classic New Year's colors - is perfect for creating simple decorations. It is not necessary to choose complex patterns; it is enough to cut out simplified silhouettes from paper. For example, these:

You can transfer the pattern to felt using chalk or a bar of soap. Then each type of figurine must be cut out in duplicate. Large DIY New Year's toys can also be made from felt, as it is sold in sheets of different formats.

Attention! Felt lends itself well to cutting, but you need to choose sharp scissors for the job. It is better to secure the pattern on the fabric with pins to get a neat silhouette.
In the photo: DIY felt Christmas toys:


It is better to sew felt parts with contrasting threads - if the toy is red, then you can use white or beige threads. If the toy is white, the decoration with red, green, and brown threads will look harmonious.
And don't forget the buttons!
Small felt toys can be used both to decorate the Christmas tree and to make interior garlands. Bright ribbons, regular white clothesline, and twine can be used as a base.

Christmas trees, hearts and houses are traditional details of New Year's design. Recently, toys in the form of animals with which the New Year is associated - deer and elk - have become increasingly popular.


DIY felt Christmas toys look bright and festive without any additional decor. If desired, you can give them additional flavor by decorating them with buttons, sequins, ribbons, or, for example, embroidery.


The advantage of a homemade garland is that it can be made taking into account the size and color scheme of the room that needs to be decorated. To make a garland you do not need a sewing machine - the felt parts are sewn by hand.

Thanks to the pliability and softness of the material, making toys takes very little time - about half an hour for each. If there is a need to make the toy voluminous, it is stuffed with cotton wool or holofiber.
Important! For stuffing, you can use either cotton wool or holofiber, but you need to take into account that when washed, the cotton wool inside the toy gets knocked down and the product loses its shape. If you are going to use toys in the future, it is advisable to use holofiber for stuffing - it tolerates moisture well and the product does not lose its shape.
From fabric
To make a New Year's toy from fabric with your own hands, it is not at all necessary to have sewing skills. For example, such a ball can be made using scraps of fabric. An ordinary Christmas ball or a foam blank is used as a base.

The fabric can be tightly wrapped around the base or glued. To work with fabric, you can use any glue available, but:
Important! When drying, PVA can leave a yellowish mark on light-colored fabric. The craft glue will hold the fabric to the backing, but since it is not designed to work with textiles, the product may not last long. Hot melt adhesive is a good option for working with fabric, but it must be applied in as thin a layer as possible.


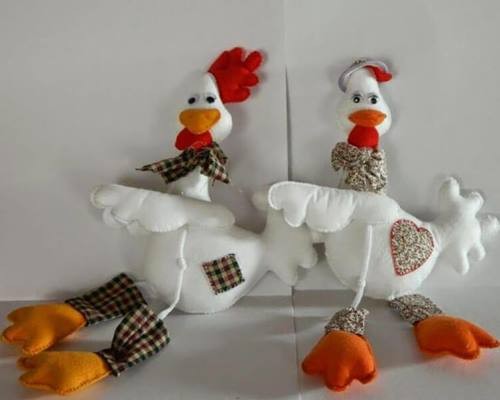
DIY New Year's toy Cockerel
The coming 2017 is the year of the Fire Rooster, so toys in the shape of birds will be especially relevant. A DIY rooster Christmas tree toy is easy to make - just draw or copy your favorite sketch from the Internet.

The easiest way is to make a rooster out of felt or paper. To do this you will need a piece of felt, a pattern, threads, and scissors. The toy can be flat or voluminous. From thick felt you can make parts for a garland, or toys - pendants.

You can use beads for decoration, and suede or waxed cord or twine to make a pendant.
There are many manufacturing options, and the approach of the New Year is the best way to inspire creativity. It is advisable to start preparing for this holiday in a good mood - toys made with a positive attitude emit special warmth.

The New Year is approaching, which means that a magical time of miracles is coming, in which not only children, but also adults believe. A tradition has taken root that if you decorate a Christmas tree with beautiful decorations made with your own hands, and at the same time make a wish, then when the chimes strike, it will certainly come true. In this article we will tell you how make a Christmas tree decoration with your own hands.
Paper is a universal material for needlework. You can use it to make extraordinary New Year’s decorations not only for the Christmas tree, but also for your home.
The modern market offers us many options for handmade paper materials. These include:
- Cardboard
- Corrugated paper
- Self-adhesive paper
- Colored paper of different weights
In addition to decorative paper materials, you can also use old postcards, newspapers, and magazine sheets to make New Year's decor. You just have to show your imagination and creativity to make original ones DIY Christmas tree decorations made of paper, We’ll tell you later what techniques are best to use.
Toy made from paper tubes using scrapbooking technique
We invite you to decorate your Christmas tree this year with this beautiful snowflake:

To make it you will need the following material:
- Several varieties of colored cardboard (two sheets will be enough)
- Scrapbooking paper (you will also need 2 sheets)
- Scissors, high-quality glue (preferably quick-drying or heat gun)
- Braid of any color and fastening from an old chain (in the form of a ring)
When you have all the materials for work in your hands, proceed to complete this DIY Christmas tree decorations made from cardboard. It won’t take much time – literally half an hour, maximum 40 minutes. The algorithm of actions should be as follows:
- Prepare squares of colored cardboard of different sizes. 14 pieces should have sides of 2.5 cm, and 14 should have sides of 3 cm.

- Make tubes from the resulting squares, gluing their ends together to form a rhombus.
- Make a circle out of cardboard (its diameter should be 5 cm).

- Mark the middle on this circle and start gluing the tubes one after another. The first row should consist of large tubes, and the second - of smaller ones.

- Decorate the resulting snowflake with rhinestones, a brooch, attach a braid and a chain attachment to it - the decoration is ready and can be used for its intended purpose.
New Year's paper toy in quilling style
You can do something like this DIY Christmas tree toy for school:

After all, every year on the eve of the New Year holidays, children are given homework to prepare an original decoration for the Christmas tree using improvised materials. The quilling technique is the best in this regard, because you don’t need to spend money on decorative paper, you can use:
- ordinary newspaper sheets
- baking molds (in the form of stars or hearts)
- minimum office supplies - glue, scissors and varnish
- braid for attaching the toy to the Christmas tree
Making the toy is very simple:
- Cut out many different strips of 5 cm wide from newspapers and fold them in half lengthwise towards the center. For an example of how this should look, see the image below:

- Twist each strip into circles, gluing them so that they do not fall apart. They should look like this:

- Place the base of the future toy in strips in a baking dish (along its perimeter). In our case it will be like this asterisk:

- Lubricate the base with glue and fill the mold with circles (they will also need to be glued together).
- When the toy is dry, open it with colorless varnish, and then remove it from the mold, thread it through the braid and hang it on the Christmas tree.

DIY paper ball toys for the Christmas tree
Some people throw away old books, but from their shabby, already yellowed pages you can create such a very beautiful three-dimensional Christmas tree ball:

In addition to book pages, you will need:
- Fast drying glue
- Any container that you circle to make circles out of paper, or a compass
- Scissors
- Chopped glitter
- Paper clips
- Braid
- Needle and thread or sewing machine
Creating this paper Christmas tree decoration will not take much of your time. In half an hour you will make an original decoration if you follow this procedure:
- Cut out circles from book paper

- Sew them in the middle using a sewing machine or needle and thread

- Using paper clips in a checkerboard pattern, clamp the edges together as in the photo:

- These edges need to be glued together to form a ball:

- Fill the resulting holes with glitter or use other decor.

All that remains is to attach a ribbon to the toy and hang it on the Christmas tree.
DIY Christmas tree decoration made from fabric
Fabric ranks second among the materials most often used to create Christmas tree decorations. Such toys are very practical, as they do not break. In addition, they look very bright and are completely safe for children. They can be made flat, but they look much more attractive if they are filled with some material, for example, padding polyester or cotton wool, so that they gain volume.

Since the Fire Rooster will be the patron of 2017, we offer you an example of making DIY toys for the Christmas tree, symbolizing the year of the rooster.
To make it you will need the following material:
- Fabric 5 different colors
- Buttons for making eyes for a cockerel
- Sintepon
- Braid
- Pattern
- Thread and needle

- Using this pattern, you cut the fabric, then gradually sew the parts together, gradually filling them with padding polyester.
- Seams can be reversed
- When the product is ready, sew a braid to it, with which you will hang the toy on the Christmas tree
In addition to the symbol of the coming year, you can make others DIY soft toys for the Christmas tree:
- Boots
- Mittens
- Birds
- Asterisks
We have attached the DIY Christmas tree decoration patterns that we have listed for you in this article:


DIY felt Christmas tree toys
Felt is a material that does not require additional processing in the process of making Christmas tree decorations. You can make a huge number of toys from it for the New Year. We will tell you about the simplest but original options.
Felt Christmas tree

- Cut out 5 circles of different diameters from green felt. The maximum diameter should not exceed 10 cm.
- In each circle you need to make a cutout in the form of a triangle, such as shown in the photo below:

- Make cones from these circles, the ends of which need to be glued with quick-drying glue.

- From the cones, assemble a pyramid and sew it with thread. Attach a ribbon to the top.

- Make a Christmas tree trunk from brown felt - cut out a rectangle, twist it into a tube and sew it to the Christmas tree so that the toy looks like this:

Felt candies

- Cut strips from felt, the width of which is 1 cm and the length is 20 cm

- Glue 6 strips of three different colors together

- Twist the resulting volumetric strips into a circle

- Attach sticks and braid to these circles so that you get these Christmas tree decorations:

Crochet Christmas tree toys
Few people master the art of crocheting, because this activity is very painstaking, requiring time and certain knowledge. But with the help of a hook and knitting threads you can make a very simple but original decoration for old New Year's glass balls.

Here are a few Christmas tree toy schemes crochet:


DIY Christmas tree toy from a bottle
The most popular toys on the New Year tree are snowflakes, because they symbolize the onset of winter and the holidays. Oddly enough, you can do something like this Christmas tree decorations made from plastic bottles. They will look very attractive not only on a New Year's beauty in an apartment or at school. Snowflakes from bottles are suitable as handmade toys for the city Christmas tree.

It's very easy to make them:
- Separates the bottom of the bottles from its main part, which you will not need
- Paint the bottom of the bottles with white paints to create a frosty pattern. You can sprinkle them with glitter on top
- All that remains is to attach the ribbon and hang the toy on the Christmas tree
DIY Christmas tree decorations made from disks
In every home you can find many damaged CDs, from which you can make wonderful decorations for the Christmas tree. There are several simple but original options:
- Cover a round disc with knitting threads, fringe, fabric, beads or beads:

- Cut the disk into small pieces, and then paste them over an old glass ball or a ball made using the papier-mâché technique:

- Cut out a bell or a Christmas tree from the disk using a stencil, and simply attach braid to the figures. Due to the natural shine of the disc, such toys will look very bright:

DIY beaded Christmas tree toys
Beading is very popular today. This type of activity is rightfully elevated to the rank of high art, because only gifted craftsmen can create beautiful products from small beads. But this material can also be used to make simple decorative items, for example, Christmas tree decorations. In this article we will present several techniques for making New Year's decorations using beads:
- Cover an old New Year's ball with beads
All you need to make such a beautiful ball is:
- Glass bowl
- Glue brush
- Multi-colored small beads or large beads
Coat the ball with glue and roll it in beads so that it evenly sticks to the ball:

- Weave a toy according to the pattern
This option is suitable only for those who know first-hand what beadwork is. Using beads, wire and a diagram, you can create such a beautiful snowflake:
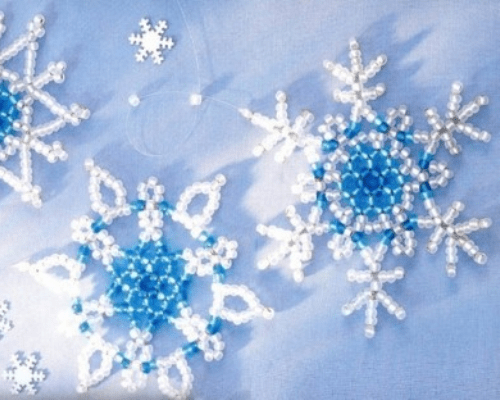
You can safely do this DIY Christmas tree toy for a competition New Year's decorations. Approximate patterns for knitting snowflakes or stars from beads are presented below:


- String beads onto a wire and twist a Christmas tree with a snake

DIY foam toy for Christmas tree
Foam plastic, this is the material from which you can make a large toy for the Christmas tree with your own hands. This material can be processed in any way:
- It can be painted with paints
- Cover with decorative tape or oracal
- Glue beads on him
- Decorate using decoupage technique

Do-it-yourself voluminous Christmas tree toys made from natural materials: photo


Everyone wants to give a surprise to their loved ones on Christmas and New Year. And you can bring the celebration closer with your creative powers. Take note of the original ideas that we have collected in the selection below, and then the upcoming winter holidays will sparkle with completely new colors. Don’t be afraid to create, involve everyone at home in the process - this will bring the family closer, and maybe even become the beginning of a new tradition.
Winter flowers
It’s not difficult to make a beautiful New Year’s tree bloom. In order to make such Christmas and New Year toys with your own hands on the eve of 2018, you don’t even need to use special colored paper, opting for old books or newspapers. Such buds will look original, and you will pay tribute to the currently fashionable eco-trend. So let's get started:
- cut out a perfect square from paper;
- fold it in the same way as shown in the photo;
- repeat this with the remaining 4 sheets of paper;
- glue the resulting blanks together to form a flower;
- We decorate the middle with tinsel, beads, in a word, anything that seems suitable to you.
Ice shards
Who would have thought that old CDs could be used to create such creative balloons? Yes, in most cases, making New Year's Christmas tree decorations will not require either serious material expenditure or the skills of a professional designer. This is what the next master class proves.
To work, you will need transparent (in principle, you can use colored) plastic or glass balls, an unnecessary CD, scissors, and a glue gun.
- using scissors, cut the CD into pieces of arbitrary shape and size;
- Apply droplets of glue to the surface of the ball and fix the “mirror” fragments in the desired order, evenly covering the ball on all sides and leaving no empty spaces.
The result is a wonderful toy, no different from expensive designer works. Their soft shine will perfectly complement the overall impression of a magnificent Christmas tree.
Cute snowflakes
A simple but wonderful decoration in its laconism is snowflakes. Backing material... rolls left over from using toilet paper or kitchen towels. Also stock up on scissors, glue, decorative elements in the form of large rhinestones and thin fishing line. The whole process looks like this step by step:
- we crush the sleeve, pressing it well from the edges;
- cut the bushing into strips of equal width. The resulting elements are visually reminiscent of flower petals;
- glue the resulting blanks together in the center so that you get a flower;
- decorate the middle with rhinestones;
- We thread a fishing line through one of the petals. That's it, the snowflake is ready to float near the branches of your Christmas tree.
Felt fantasy
Here are some more fun DIY crafts. The toy can become either an independent element of holiday decor or act as an integral part of an entire garland.
- Cut out a square from felt of the desired color;
- draw it out as shown in the photo;
- cut along the lines with a stationery knife, not reaching the center;
- glue the strips together, folding the corners on top of each other;
- we alternate actions alternately from one side to the other;
- We hang the finished toy on a fishing line, decorating it with beads.
If desired, you can create a whole vertical garland from several similar parts, interspersing them with beads. The toy can be hung on the Christmas tree or placed in the interior.
Snowball game
It’s very easy to make fluffy lumps of snow that won’t melt no matter how warm it is in your house. We use foam blanks in the form of balls, mother-of-pearl beads, sewing pins, glue, scissors, and braid. The process of making such a toy comes down to the following steps:
- string beads onto pins;
- Having coated the end of the pins with glue for better fixation, we stick them into the ball;
- We continue this way until we cover the entire surface of the toy with beads;
- We attach a braid or ribbon to the ball, using which we will hang the decoration on the Christmas tree.
Funny ninjas
Small ninja toys with cute moving eyes will save your home’s beautiful Christmas tree from being too formal. After all, looking at such New Year's decorations, you involuntarily want to smile.
To work, you will need very few materials: dark opaque balls (they can even be made of plastic), narrow ribbons of different colors, toy eyes (a pair for each ninja).
- We wrap each ball with two turns of ribbon, securing the improvised fighter’s bandage to a knot at the back. For greater reliability, the tape can be placed on glue.
- We glue the eyes to the ribbon on the front, that's it - decorations for the New Year can be hung on the Christmas tree.
Beauty cone
An ordinary pine cone will fit perfectly into the New Year's decor. It would seem how unpretentious an accessory it is, and what wonderful toys can be made from it and how many ideas can be realized. The cone can simply be hung by a coarse twine, and the top can be decorated with a beautifully tied bow made of satin ribbon to match the overall color scheme. Or make New Year trees from pine cones, crowning them with numerous multi-colored plasticine balls. It seems simple, but it looks really unusual and creative.
Snowflakes made from... pasta
For a thrifty and creative housewife, even pasta can become the basis for creating amazingly beautiful decorations in the New Year 2018. You can give free rein to your imagination here - after all, each new snowflake can be completely different from the previous one. All you need to do is stock up on as many different types of pasta as possible in the nearest supermarket (flowers, Christmas trees, spirals, shells, etc.). You also cannot do without glue, white paint and braid (ribbon, fishing line, thread) for hanging.
We form the pattern starting from the center, maintaining symmetry. How the toys turn out depends only on your imagination. We glue the parts of the decoration together with glue. At the end of the work, paint the snowflake white, additionally decorating the decor with sparkles to your liking.
New Year's toys with sequins - festive glamor
You can surprise your loved ones on Christmas and New Year's Eve by making unusual, shiny decorations for the Christmas tree with your own hands. The special beauty of creating such balls is the process itself, which is addictive and very simple. So, we stock up on a small foam ball that fits easily in your hand, sequins of any color, and sewing pins.
We fix the sequins to the ball with pins, as shown in the photo, proceed sequentially, placing the shiny elements close to each other, avoiding gaps. When the ball is ready, all that remains is to place an element in its upper part to fix the decoration on the tree.
Who wants some ice cream?
Do you like ice cream? Why not decorate the Christmas tree with your favorite delicacy for the New Year, especially since you don’t need a lot of materials for this. It is enough to find thick paper to imitate waffle cones and colored napkins or small pieces of compressed paper, a needle, and thin fishing line. Having formed a cone from thick paper, we make ice cream balls from colored paper, the number of which depends on your desire. Then we form a loop from the fishing line, by which our sweets will be hung on the tree, and we thread it through our balls, as was done in the photo.
Rooster on the Christmas tree
It will look good made of paper or other materials. You can make a lot of these cockerels and collect the pendants into a garland to decorate your home. If you are going to make a paper cockerel, use cardboard as a base, which you will cover on both sides.
- You will need multi-colored sheets of colored paper (you can use colored cardboard) and a sheet of cardboard. Draw the silhouette of a rooster on cardboard and cut it out.
- Using a cardboard blank as a template where necessary, draw the details on colored paper (cardboard): head, torso, wings and tail - first fold the sheets in half so as not to waste time preparing blanks for the second side.
- The next stage: we cut out our blanks.
- Now we glue the parts made of colored paper (cardboard) onto the cardboard blank. After the cockerel has assembled into a whole picture, you can decorate it with sparkles, beads - whatever comes to mind.
- Make a hole in the blank, thread a ribbon and hang it on the tree.
You can make a similar toy from felt and also use it to decorate a Christmas tree.
Draw the pattern by hand or use any ready-made one, for example, this one:
Homemade cockerels made using the origami technique will look original.
pillow toy
A difficult, but very exciting activity in making toys is creating a pillow in the form of a symbol of the year, which will delight you not only in the year of the Rooster, but much longer. You will need a pattern, fabric, filler, felt (depending on the chosen model), thread and needles. Here it's a matter of small things, we trace the pattern, sew the parts together, leaving a hole to fill the pillow with filler. We turn it inside out, put the filling inside the toy, and sew it up until the end.
There is also a more complex plan with fabric painting - this is batik, thanks to which the pillow will acquire a bright color. After you have traced the cockerel on the fabric, paint it using special paints; they can be replaced with gouache if you mix it with PVA glue. We leave it for a day so that the paint dries and continue to finish the pillow in the shape of a rooster.
From salt dough
Children are often asked to bring some New Year's crafts to school competitions. Make it from salt dough. A craft made from bioceramics can also be an excellent gift from children to grandparents. Moreover, this activity is so exciting that it quite claims to be a hobby.
Before you make a toy from salt dough, you need to prepare the dough itself. To prepare the dough, use fine table salt, regular wheat flour and water in a ratio of 2:4:2, respectively. First, mix flour and salt, and then add warm water, kneading the dough thoroughly for at least 10 minutes.
There is another recipe for making dough. In this case, take flour and salt in the same proportions, only the flour is pre-sifted. You need to take a little less than 1 1/3 cups of water. The cooking method will vary. According to this recipe, water must be brought to a boil and salt dissolved in it. Only then is flour added.
When the dough is ready, start making crafts. If you are doing crafts with your child, simplify the task by taking cookie cutters, for example, in the shape of Christmas trees or bunnies - you will get wonderful Christmas tree decorations. Make a toy (you can use beads or seed beads for decoration), don’t forget to make a hole at the top. To harden the toy, it is left for 24 hours or baked in the oven. After the toy has hardened, it is painted with acrylic paints, gouache, watercolors, allowed to dry thoroughly and coated with either colorless nail polish or nitro varnish for wood. Thread a thread or ribbon through the hole. So the New Year's gift is ready.
Photo ideas for crafts made from salt dough
Soap figures
Soap is always useful. A little unexpectedly, soap can also be used to decorate a Christmas tree. Soap toys for the Christmas tree are made by hand. The process is simple. First, we grate the baby soap on a coarse grater, melt it in a hot bath (make sure no bubbles form), pour the liquid into a mold and leave until it hardens.
- If you want to make colored soap with a pleasant aroma, then add dyes to the base - these can be either food coloring or the juice of berries or vegetables, for example, cherries, beets, carrots. Smell can be added using perfumes or flavorings.
- If you use a ready-made transparent soap base instead of baby soap, you can make soap with a “filler”. After you fill the mold halfway with melted soap, let it sit for 20-30 minutes, put a slice of lemon or orange on top, coffee beans and fill the mold completely with soapy liquid.
- In order for the soap to also have a beneficial cosmetic effect, ground coffee is added to the base, which will work as a scrub, various oils, lemon zest, and ground oatmeal. Such a toy, which doubles as an excellent gift, will definitely not go unnoticed.
Big toys
Using threads, you can also create wonderful jewelry of rather large size - giants. Just inflate the balloon, wrap it with a thread soaked in PVA glue and leave it for 24 hours. After drying, the ball is burst, leaving an airy New Year's toy made of threads, which, for decorative purposes, can be coated with silver or gold paint, decorated with beads, seed beads, sequins, and ribbons. Thread the ribbon and the accessory is ready. If you prepare two or three balls of different sizes, you can make a snowman.
Christmas trees are made from threads using the same principle. Use a Whatman paper cone as the base on which you will wind the thread. You can make such a toy in miniature if you take a simple sheet of cardboard instead of whatman paper. Light beads and ribbon bows are useful for decoration.
By the way, use a cone of whatman paper for the base if you are going to make Father Frost and the Snow Maiden. It is enough to glue such a cone, paint it, or make clothes from paper or fabric. The head can be an inflated balloon with a painted face.
Boxes from household appliances are also useful for giant toys; they can be covered with foil, colored paper, appliques, or even made into a Nutcracker.

The most beautiful Christmas tree decorations are those made by yourself. Such creativity will help you bring any fantasy to life and make your New Year's decor as original, unusual and very attractive as possible.
In modern stores on New Year's Eve, a person can find a huge assortment of Christmas tree toys made from various materials: glass, plastic, wood, textiles, paper. But just more than half a century ago, it was quite difficult to find a beautiful decoration for the Christmas tree, and people I had to make them myself.
It is worth noting that manual work is very often was distinguished by her skill and was equated to works of art. Many needlewomen still prefer to bring something original to the decor of the room and the Christmas tree, made from the heart and with your own hands.
By following modern master classes, you can learn how to create toys of incredible beauty.
Eg, cotton wool decorations - budget handicrafts. For work you will need:
- Roll of pharmaceutical cotton wool
- Paste
- Newspaper
- Wire
- Paints (acrylic)
- Salty dough
Vatu is necessary pre-paint in different colors. This is done using textile paints, which can be purchased at a household chemical store. The painting process is very simple: put dye in a saucepan with water, add cotton wool, and bring to a boil. The cotton wool is infused for several minutes, after which it is wrung out and dried.
Cooking the paste is also very simple. It is easier to work with than regular PVA glue, as it is more transparent and its texture is more watery. To cook the paste, you need boil a glass of water and dissolve two full tablespoons of starch in it with a slide. The cooled solution will become very sticky.
Salt dough will be necessary in order to create realistic faces and muzzles for toys, since they imitate figures of people and animals. It's easy to knead this dough: mix two parts flour with one part salt and add water by eye so that the texture somewhat reminds you of plasticine.
The dough is formed into the required figurine with notches and baked in the oven for half an hour at a temperature 110-120 degrees. After this, the dough must be painted with acrylic paints, all the details must be drawn: eyes, lips, cheeks and covered with colorless nail polish.
From wire it is necessary make the base. All other elements will be attached to this base. The base should follow the preferred figure, for example, a person. For volume the base is wrapped in layers of newspaper soaked in paste. The ends of the wire (handles and legs) should be wrapped first with cotton wool, wetting it with paste. After this the newspaper also covered with a cotton layer.
The top of the wire should attach a face molded from salt dough (make a hole in it in advance). All details should be done very carefully, hands should be washed often, as the paint will remain on them and spoil the light shades. You can form braids, hats and other little things using thin wooden sticks, which should always help you in your work.
Master class with photos:
Forming a wire base, wrapping the ends with cotton wool and the body with newspaper 
 Wrapping the figurine with colored cotton wool, shaping the face
 Small parts for toys made of cotton wool
Beautiful Christmas toys made of cotton wool for the Christmas tree:
 “Girls” - toys for the Christmas tree
 Cotton Christmas decorations coated with varnish
 Colorful Christmas tree decorations made from cotton wool
 DIY cotton toys
  Homemade cotton wool toys for the Christmas tree
 Beautiful DIY Christmas tree decorations made from colored paper
Colored paper- the simplest and budget material for creativity. Modern stores can offer a large selection of thin colored sheets, colored cardboard, kraft paper, paper with designs and patterns, colored foil, gold and silver paper.
The simplest decoration you can make is multi-colored chain. It looks quite festive and elegant; it can decorate not only the Christmas tree, but the entire room: walls, curtains, cornices, furniture. For product you will need:
- Lots of colored paper
- Scissors
From the sheets you should cut strips of the same width and length, depending on what kind of links you want to get in the chain: big or small. A strip of paper is rolled into a ring and the ends are glued to each other. After this, the next strip is threaded through the already formed paper ring and glued together in the same way. The chain can be made to any length.

 Chain made of colored paper for New Year's decor
 But the chain is far from the only thing paper decoration. From old postcards or colored cardboard you can make volumetric ball for the Christmas tree. You will need exactly eight identical circles, which should be cut one template at a time. To do this, you can use the bottom of the cup, because it is convenient to outline it.
After that Each ball is folded in half and then in half again. After this, four folded cut out circles should be glued to one small one, which serves as the base. The remaining four are also glued to the same base. Wait for the glue to dry completely and start unfold the edges of the glued halves.
Helps to secure the edges together stapler, this can also be done superglue or using hot gun. You can leave the resulting ball the way it turned out, or you can paint with acrylic paints to taste or draw patterns. To the ball on one side should glue a loop so that it can be easily attached to the Christmas tree.

 How to make a Christmas tree ball with your own hands?
 Paper balls, ideas for creativity:

 Christmas tree ball from old postcards
 Newspaper ball for Christmas tree
  Paper ball for a Christmas tree made of cardboard for creativity
 DIY bright paper balls for the Christmas tree
 DIY Christmas tree decorations from scrap materials
In fact, with imagination and a lot of decorative elements(ribbons, beads, rhinestones, sequins, sparkles, threads and much more), any material can be turned into an original, and most importantly, a beautiful Christmas tree toy.
Around November of each year, most craft stores offer to buyers Lots of ideas for New Year's decor: snowflakes, snow, silver, artificial berries and Christmas tree branches, miniature gifts, figurines and other little things.
Other ideas for creating Christmas tree decorations from scrap materials:
Christmas tree figures made from wine corksWine bottle corks can serve as an interesting material for creating Christmas tree decorations. You can collect them throughout the year, and then make a stylish snowflake or figurine that will be held on by wire or with superglue.

 "Soldier" figurine for the Christmas tree made from champagne corks
 Simple Christmas tree figures made from corks
 Bright New Year's toys made from wine corks "Christmas trees"
  Christmas tree decorations made from wine corks
 One of the symbols of the New Year is a snowflake. She can decorate not only your holiday tree, but also the walls of your house. You can make it from anything: paper, cardboard, plywood, buttons and even pasta!
Ideas for New Year's toys made from scrap materials:

 Blue and white snowflake for a Christmas tree made of buttons on a wire basis White snowflake for a Christmas tree made of buttons on a metal basis
  Unusual snowflake on a Christmas tree made of pasta painted with gold paint
 An unusual idea for creating New Year's toys - iron bottle caps
 DIY felt Christmas tree toys: patterns
Felt is one of the most favorite and comfortable materials for creativity, including for creating Christmas tree toys. With felt convenient to work, the store provides it in a large number of colors. You can always choose thin or thick (felt) felt to work with.
SECRET: If you couldn't find felt in stores, but want to create a beautiful Christmas tree decoration, you can use modern washcloths. As a rule, they are sold in packs of three and their material is very similar to felt: it is just as dense and soft, and holds its given shape.
You can make a wide variety of toys from this material. It can be flat or three-dimensional figures, which, if desired, are decorated with embroidery, rhinestones, beads or sparkles. You can sew any figure from felt, any fairytale New Year's character. The filler in such toys is regular cotton wool or felt scraps.
New Year's toys for the Christmas tree, creative ideas:
 Bright toys for the Christmas tree made of felt
 Felt bears - Christmas tree toys
  "Christmas trees" - New Year's decorations
 Stylish felt Christmas tree decorations
  Flat felt Christmas tree decorations with embroidery
  Stylish red and white felt Christmas tree decorations
 The following patterns will help you make a neat and proportional toy:
 Patterns of animals and children's toys
 Patterns for creating New Year's toys from felt
 New Year's patterns for creating felt toys
 Simple patterns for felt toys
 How to decorate felt Christmas tree decorations:
- Small parts of toys: eyes, mouths, mittens, horns, and so on, are also cut out of felt. They can be sewn to patterns using thread or glued with hot glue.
- Glitter, sequins and beads, which you can also sew on yourself with matching threads, will help add shine and shimmer to the toys.
- Covering the edges of the toy and sewing together the pattern elements can be done in two ways: using a running stitch and a buttonhole stitch (the latter looks more aesthetically pleasing).
- Think in advance about where to attach the loop on the toy and sew it on the inside.

 Running stitch
 Loop stitch
DIY Christmas tree toy cockerel: pattern, photo
The festive toy for the Christmas tree deserves special attention. shaped like a rooster. Rooster - symbol of 2017 and therefore his image should be present on New Year's Eve in every home so that bring happiness and prosperity to the family.
You can make a toy from wood, cut it out of plywood or cardboard, but best of all work with felt.
This material allows use many colors in crafts, decorate them beautifully with embroidery and sparkles. In addition, felt allows give any shape to the toy: Make the bird realistic or figurative.
You can cut out the shape of a rooster from felt arbitrarily or use a pattern.

 Pattern of a New Year's toy “rooster” made of felt
 Ideas for creativity in creating New Year's toys:

 Original “cockerel” made of felt for the Christmas tree
 Beautiful New Year's toy "rooster"
 Felt cockerels for the Christmas tree
 Red rooster - Christmas tree toy
 Felt chicken and cockerel for Christmas tree
 Original felt toy for the Christmas tree - “Rooster”
 DIY children's Christmas tree toys: for kindergarten
Children in kindergarten are often asked to bring handmade decoration from home to decorate the New Year tree at the matinee. Modern parents can be very inventive and come up with simple but original ideas. toys for decorating the Christmas tree and room for the New Year.
Ideas for creating New Year's toys for kindergarten:
Paper lantern- a classic elegant decoration for the Christmas tree. Give it more festive look You can use gold or silver paint, glitter, tassels and many other decorative elements.

 How to make a lantern for a Christmas tree?
 How to make a three-dimensional star for a Christmas tree?You can make a three-dimensional star for a Christmas tree from two flat pieces of cardboard. You need to decorate this decoration according to your taste: glue rhinestones, sparkles or stones. You can also smear the star with glue and sprinkle generously with gold sand. Golden sand can also be successfully replaced with small broken glass from old Christmas tree decorations.
A paper heart made from colored paper can be easily made from colored cardboard using the quilling technique. It can be of any color and size, decorated with ribbons, sparkles or snowflakes.

 Christmas tree decoration “heart” using quilling technique
 A Christmas tree decoration made from buttons will help surprise everyone. To do this, you will need to have buttons not only of different colors, but also of different sizes. This way you can form figures out of them.

 New Year's decorations made from buttons
 Bows will be a simple but elegant decoration for the Christmas tree. They can be made large or small using themed, bright or shiny ribbons.

 Bows - Christmas tree decorations
 DIY Christmas tree decorations made from light bulbs
Handicrafts captivate people so much that they are able to turn almost any available material into a beautiful Christmas tree decoration. The most unusual things are used, for example, glass bulbs. You need to use those that have already burned out and are no longer able to shine.
They can be very skillfully paint with acrylic paints, turning in funny snowmen. It is also very easy to attach decorative textile elements, buttons, eyelets and much more using glue.
To quickly paint light bulbs, you can use spray paint or car paint in a can.
Christmas tree decorations from old glass light bulbs, ideas for creativity:
 Light bulbs decorated with colored sequins
 Light bulbs "penguins" - toys for the Christmas tree
  Toy made from an old light bulb “Bear in a hat”
  Christmas decorations made from small light bulbs Colorful Christmas decorations made from light bulbs
 Simple and effective Christmas decorations made from old light bulbs
 Unusual snowmen on a Christmas tree made from old light bulbs
 DIY outdoor Christmas decorations
Outdoor toys for the Christmas tree, first of all, distinguished by their large size. Another feature of such jewelry is their simplicity, that is, they should be sufficient cheap and, but at the same time beautiful. People often make street toys with their own hands.
What can you make an outdoor Christmas tree toy from:
- From the box. You can use absolutely any box: shoes, candy, cookies, juice packaging. It should wrap in any beautiful paper to imitate a gift. At the end of decoration tie the box with ribbon and tie a bow. You can also try to create an original design and make a pig, a nutcracker, a doll, and so on from the box.
- Plastic spoons, or rather, their rounded part can serve as the basis for creating Christmas tree decorations. For example, they will make a snowflake, a Christmas tree, Santa Claus and other holiday symbols.
- If you know how to make buboes from yarn, you will also need this skill in creating New Year's decorations. You can decorate any ball or box with a large number of buboes to make a Christmas tree toy.
- If you have accumulated a huge number of Kinder Surprise packages, they can also serve as an idea for creating a Christmas tree decoration. They can be glued together to form a snowflake, which can then be easily decorated with foil or gold-plated paint.
Toysfor a street tree:
 Decorating the box in an original way
 Santa Claus made from plastic spoons
 New Year's toy made of fluffy pompoms
  Snowflake from Kinder Surprise packaging
 DIY Christmas tree decorations from plastic bottles
Decorations made from plastic bottles can decorate a street Christmas tree or a Christmas tree at a matinee at school or kindergarten.
Ideas for decorating bottles as New Year's toys:

 New Year's bells from two glasses
 New Year's bells from two large bottles of Cola
  Decorating bottles for the New Year
  Original Christmas tree toy made from the bottom of plastic bottles
 DIY Christmas tree toys made of fabric
Textile toys look very original. They are beautiful and always create a festive mood. The main thing is not to be lazy and decorate each product as original as possible with lace, sequins, inserts from other fabrics, beads, and ribbons.
The following patterns will help you sew fabric toys:

 Patterns for textile toys for the Christmas tree
 Ideas for creativity, fabric toys:

 Colorful fabric toys for the Christmas tree
  Very delicate and beautiful DIY fabric toys
 DIY textile toys
 DIY fabric Christmas tree toys
  Original fabric toys
 DIY Christmas tree toys made of cardboard
Cardboard is an affordable and durable material. You can use it to make beautiful New Year’s decorations that are suitable for decorating both the Christmas tree and the entire room.
New Year's toys made of cardboard:

 Christmas tree made of cardboard (folding two flat parts)
 Bright New Year's toys made of cardboard with decor
  Christmas tree toys made of thick cardboard with decor
 DIY Christmas tree toys balls
Threads can make very beautiful Christmas balls. You will need:
- Balloon
- Threads
- PVA glue
Making such a toy is very simple:
- Inflate the balloon. The ball should be the size you want the Christmas tree decoration to be.
- Tie the balloon so it doesn't let out any air.
- Dip the yarn into glue and start wrapping the ball
- If it seems to you that there is not enough glue, you can moisten the wrapped ball with glue again.
- Leave the ball to dry completely
- When the ball is dry, pop the ball with a needle.
- The ball will burst, but the thread frame will remain
- Attach a loop to the ball
- If desired, decorate it with sparkles or rhinestones
 How to make a ball of thread?
 Christmas tree balls made of threads
 DIY Christmas tree decorations for a large Christmas tree
Decorating a large Christmas tree can be very difficult only because small toys are simply not visible on it. Such a Christmas tree can be present at a matinee in the garden or at school, in the yard or in the square.
Ideas for toys for a large Christmas tree:
You can buy a foam base in the shape of a ball at a craft store. It can be decorated in any way, for example, with bright buttons.
 Large Christmas ball made of buttons
 The same foam base can be covered with newsprint and, after complete drying, opened with glitter nail polish.

 Christmas tree ball made from newspaper with glitter
 You can sew a large mitten from the fabric, which can be easily decorated with New Year’s symbols if desired.
 Mitten - decoration for a large New Year tree
 You can make a cuckoo clock from cardboard or thin plywood sheets, which will symbolize the New Year's time.

 Christmas tree toy
 The easiest way to decorate a large Christmas tree is to make candy from any box, wrapping it in colored foil or craft paper.

 Candy - decor for a large Christmas tree
 Beautiful and original DIY Christmas tree decorations for the competition
During the New Year's Eve, children often participate in various competitions where they present their crafts. Original ideas for creating Christmas tree decorations will help you win the competition:
- Toys made from broken mirrors (glass). This material can be used to decorate glass balls or other figures made of cardboard, plywood, or paper.
- Volumetric Christmas tree toy made of felt (wool fabric). To do this, the fabric is folded in several ways to create a pattern of folds.
- Toys made from fabric. Such decorative elements must be done very carefully, choosing textiles and decorations wisely.
- Beaded toys. Such decoration can be completely woven from beads, or decorated with them.
- Plywood toys. You can buy the base for such decorations at a craft store. You can color them to your liking.
 Painted toys for the New Year Decorating toys with a broken mirror
  Volumetric toys made of felt or drape fabric
 Beautiful textile toys
 Beaded toys for the New Year tree
 DIY Christmas tree toys made from threads
Threads can become an original decoration for Christmas tree decorations. you can use figures on any basis, for example, cardboard. Cut out your preferred shape and use yarn or canvas thread wrap the decoration tightly.
Lubricate the base with PVA glue so that the thread holds tightly and confidently.
 New Year's toy made of cardboard and canvas threads
 New Year's star made of cardboard, canvas thread and felt
 DIY Christmas tree decorations made of polystyrene foam
Often sold in craft and craft stores foam bases of various shapes: balls, cones, cubes. Such figures can be decorated to your liking with any material: ribbons, lace, paper, beads to get beautiful Christmas tree decorations.
Ideas for creativity. Foam-based toys:

 Decorating a foam ball with needles and sequins
 gluing glitter onto a foam ball
  Ready product
 DIY Christmas tree toys made from disks
Make mono Christmas tree decorations from materials such as CDs. Most likely, there are a lot of them in the house of a modern person and most of them are either inoperative or not in demand.

 Fish - decoration made from disks
 Flat decorations made of disks, decorated with threads
 Decoration for a large Christmas tree
 DIY Christmas tree decorations made from salt dough
Children often work with salt dough. This classic way to sculpt a figurine, including New Year's: Christmas tree, Santa Claus, Snow Maiden, deer, snowman and much more. The finished figurine can be painted, decorated with sparkles and varnished.
The recipe for kneading salt dough is very simple: two parts flour, one part salt and a little water by eye, so that the mass becomes similar to plasticine. The dough is baked for half an hour at a temperature of 120 degrees.
 Salt dough stars
 Salt dough figures for coloring
  Beautiful Christmas tree decorations made from puff pastry
 DIY Christmas tree decorations made from pine cones
Natural buds can serve as an excellent basis for creating beautiful Christmas tree decorations. In addition, cones are easy to find in the forest, in the park, on the street - they are free and always look natural.
You can transform any bump using paints with gilding, sparkles, ribbons and rhinestones. The larger the cone, the better and more impressive your craft will look.
In the craft store you can find a huge number of ideas for handicrafts: snowflakes, artificial snow, silver.
 Cone decorated with beads and seed beads
 Pine cone decorated with ribbon Snowflakes made from pasta
 DIY Christmas tree decorations made from satin ribbons
Satin ribbon- a very beautiful material with which you can make a Christmas tree toy. As a basis you need to use foam ball. It's necessary cut on four sides, as if into slices.
Wide tape cut into four pieces. Then, using a stationery or regular knife the tape is inserted into the cuts made very tight on all sides. Decorate seams You can use rhinestones, chains or other contrasting thin tape glued with superglue.

 Cutting the ball and setting it inside the satin ribbon
  Ready product
 Video: “Unique DIY Christmas tree decorations. Elena Epinatyeva"
Very soon the pre-New Year bustle will begin, preparing for the festive fun, buying gifts, decorating Christmas trees and houses. Let's talk about how you can decorate a Christmas tree at home, in kindergarten and at school, and outside in the yard with your own hands. After all, from everything that is at hand, you can come up with and make amazing things on your own, including New Year’s decorations for the main beauty of the holiday.
In this article we will look at DIY Christmas tree decorations from scrap materials with detailed descriptions and photographs. We invite you to get creative and feel the spirit of the holiday now. Involve children in the process; they will be incredibly happy to make Christmas tree decorations together with their parents, and then hang them on the tree.
This time, let's not spend money on buying expensive Christmas tree decorations or materials for making them ourselves, let's use everything that can usually be found at home.
Let's use a little imagination and as a result we will get amazing, exclusive and incredibly beautiful Christmas tree decorations.
Surely many people have light bulbs at home, ordinary incandescent lamps, that have already burned out and are not used. They can be of any size and shape. They can be used to create amazing Christmas tree decorations. We decorate these light bulbs with paints, sparkles, fabric, turning them into icicles, balls or interesting characters: Santa Claus, penguins, dogs, gnomes, or anyone else.

Let's take a step-by-step look at how to create an interesting Christmas tree decoration with your own hands from scrap materials using a light bulb. This will be a funny snowman.
Let's prepare everything you need:
- Bulb. You can take more than one.
- A little fabric, whatever you have for the cap.
- Braid (for the loop for which we will hang the toy on the Christmas tree).
- Paints. It is better to use acrylic, but gouache will also work.
- Brushes.
- Glue. You can use a second or thermal gun.
Let's start the creative process:
- Paint the light bulb white and let it dry completely.
- Let's paint the snowman's face and hands with mittens. The muzzle can be made completely primitive or whatever you want. You can draw a snowman and a broom into handles and buttons on clothes.
- Now the cap. We cut out a small rectangle from the fabric, fold it in half and sew it together, tie the top with a ribbon and a bow. We put the cap on the snowman light bulb and glue it carefully.
- He attaches a ribbon for hanging toys.
That's it, the snowman is ready. Using this principle, you can make any toy - an animal from simple light bulbs.

Moreover, you can simply decorate the light bulbs beautifully and attach a ribbon to them and send them to the Christmas tree. For example, a light bulb can be coated with PVA glue and thoroughly dipped in small glitter or any cereal, and then painted over with gold paint. Here are some simple and original DIY Christmas tree decorations for you.
We use any thread for toys
Christmas tree decorations can be created from simple knitting or sewing threads. Don't be afraid, you won't have to sew or knit here. Everything is much simpler! Let's see what you can make from thread for a Christmas tree.
Option 1 – elegant, multi-colored, openwork balls made of threads
What you need for work:
- Any thread, any colors.
- PVA glue.
- Air balloons.
- Braid for loops.
- Any decorations for decorating balls: rhinestones, sequins, artificial spruce branches, flowers made of fabric or plastic, in general, everything you can find at home.

Let's start creating balls:
- First, let's make the base - the balls themselves. To do this, we inflate balloons of the required diameter. These can be very small balls or larger ones, for a street Christmas tree or for a school Christmas tree.
- Wrap the inflated ball with regular plastic wrap. We pierce a tube of PVA glue and pass a thread through it. Now we simply wrap the inflated balloons randomly with glue and thread. We wrap it so that the threads cover the entire surface of the balls. We break the thread, hide the tip under any thread and coat the ball with glue again.
- Let the balls dry overnight.
- Now we burst the inflated balloons and take them out. We made filament openwork balls for the Christmas tree.
- We tie a loop of braid to them and decorate them to your taste.
- Such balls can be made in unlimited quantities and of different sizes and colors.

Option 2 – openwork stars and Christmas trees made of threads
You can make such DIY Christmas tree toys from scrap materials for children or together with them, using the instructions in the photo below and the description. The photo shows how to make a star. But using this principle, you can make a Christmas tree or any other figures.

Let's prepare everything you need for work:
- Knitting threads of any color.
- PVA glue.
- A small bowl where you pour glue and soak the threads.
- Foam base for work. You can use a disposable food tray.
- Pins or simple matches.
We begin the process of creating an openwork star from threads:
- Pour PVA glue into a bowl and soak the threads there.
- We prick the shape of the toy on a foam base. In this case it is an asterisk.
- First, we form the outline of the toy using pinned matches (or pins) by wrapping them with thread from a bowl.
- Now we fill the middle of the figure with thread, laying it chaotically, making fancy curls.
- Afterwards, you can blot the figurine with a sponge and glue again and leave it to dry overnight.
- When our toy has dried, we tie a loop to it and hang it on the tree.

Paper toys
We must not forget and push into the background the good old paper snowflakes and toys. But today they can sound in a new way if modern techniques are used to create them. In general, DIY Christmas tree decorations made from scrap materials, in particular paper, are a great idea for children in kindergarten. They can decorate a Christmas tree in a group.
And the kids will be happy to look at the festive outfit of the forest guest and boast that they themselves and their mother made this or that toy.
Let's look at how you can make Christmas tree decorations using the quilling technique with your own hands.

For work we need:
Strips of paper, 1.5 or 2 cm wide. You can cut them yourself from thick colored double-sided paper or buy them ready-made in craft stores.
- Scissors.
- Thread or braid for a loop.
- PVA glue.
Making a ball:
- Take a strip of any color 20 centimeters long and close it into a circle, gluing the ends together.
- We do this with several more stripes of different colors.
- Now we thread each circle into one another randomly, changing and alternating colors. We do this in such a way as to form a ball. We glue the strips together at the points of contact.
- We attach a loop to the ball. That's it, the ball is ready.

Making an icicle:
- Take a strip of light color 6 cm long, bend it in half and glue the ends. The result is a loop.
- Now take the next strip, darker and a couple of centimeters longer. We bend it into a loop around the previous loop and glue the ends on the sides of the ends of the small loop.
- We do this with several more stripes of different colors and each time we take a strip 2 centimeters longer.
- We wrap a strip around the junction of the loops and attach the braid.
In addition, you can make snowflakes out of paper by cutting them out according to a template and hanging them on a ribbon. And also, openwork snowflakes can be made from ordinary pasta, which is found in almost every home.

Pasta for the Christmas tree
You can create amazing Christmas tree decorations from ordinary pasta of different shapes. Let's see how you can make a snowflake.

Pasta snowflake in the shape of shells
Let's prepare everything you need:
- Shell-shaped pasta (several large and one small).
- Hot glue.
- Braid for loop.
Let's get started:
- Place a small shell in the center, and around 6 large pasta in the shape of shells. Glue the pasta together at the joints.
- Attach the braid.

Openwork snowflake made of round pasta
Round pasta with veins.
- Hot glue.
- Gold acrylic paint (you can use an aerosol or regular acrylic in a jar and a brush).
- Braid for loop.
Let's get started:
- Place the pasta in rays from the center. Glue the pasta together at the joints.
- Cover with golden paint and let dry.
- Attach the braid.

This way you can make snowflakes of any shape using various pasta that you have at home.
You can also paste pasta onto any foam plastic ball, attach braid to it, cover it with paint and safely send it to your Christmas tree. Let's see how else you can decorate foam balls or any other regular old Christmas tree balls.

Snowflakes from pasta master class
Balloon decor using improvised materials
Any old ball can be decorated with improvised objects. To do this, you just need to glue what you found at home onto the ball, and if necessary, cover it with paint or glitter.

You can decorate a Christmas ball with these available materials:
- buttons and snaps;
- disk fragments;
- pasta;
- coffee beans or any cereal;
- beads, sequins, rhinestones;
- pieces of newsprint;
- feathers;
- fabric flowers;
- even nuts and gears.
You can use everything you can find at home; the more unusual the parts you find, the more creative the toy will be.

Delicious toys for the Christmas tree
Returning to the topic of edible and tasty decoration for if, we suggest creating toys using cinnamon sticks, bergenia stars and orange slices. These will be stylish decorations. They will not only add beauty and sophistication to your Christmas tree, but also add a touch of refined and refined aroma.

To make them, you just need to dry the cut oranges and combine the above ingredients in any composition. This could be a pair of cinnamon sticks with a star anise star glued to them, or just a round orange on a string.
You can also glue a cinnamon stick and a few coffee beans to an orange slice. The entire composition can be decorated with small bows or ribbon or jute rope.

Below is a selection of photos for inspiration for similar DIY Christmas tree decorations made from scrap materials. In addition, you can take regular candies in candy wrappers and hang them on the Christmas tree by a string. And tasty and beautiful and New Year's style. And on a lazy New Year's weekend, you can enjoy one piece of candy straight from the Christmas tree.

We decorate a street Christmas tree with toys made from plastic bottles and cups
Now let's see what Christmas tree decorations you can create with your own hands from scrap materials for a street Christmas tree. There is also a lot of room for imagination here. We suggest using ordinary plastic bottles and cups of yogurt or sour cream for the creative process.

Let's make a cute penguin for the street tree.
Let's prepare everything you need for work:
- Two plastic bottles.
- Acrylic paints and a wide and thin brush.
- Some thread for knitting.
- A scrap of fabric for a scarf.
- Braid for loop.
- Glue.
- Paper patch or tape.
Let's start creating a penguin:
- We cut off the bottom of one plastic bottle so that its height is 5-6 centimeters. Cut off the top of the second bottle and set it aside. The base should remain about 20 centimeters high.
- We glue the two parts together with tape or adhesive tape, the bottom on top of the base.
- The result was an oval figurine of the future penguin.
- We paint the entire figure with black acrylic paint and let it dry thoroughly.
- Now paint the penguin’s belly and face with white paint and let it dry.
- We paint the upper part in any color for the hat and let it dry.
- Draw the details of the cap and muzzle (eyes, key). Let it dry.
- We make a pompom from threads and glue it on top of the hat.
- We make a scarf from a strip of fabric, cut terry along the edges, and tie it to the penguin.
- We thread the braid through, making a small through hole at the top.
- The toy is ready.
A similar toy is suitable for a forest beauty in the yard if you use acrylic paints. When they are dry, they are not afraid of either snow or rain.

You can make a snowman or Santa Claus, or even a dog, in the same way. You just need to decorate the figurine accordingly. Put a cap on Santa Claus, and attach fabric ears to the dog.
Snowflakes made from the bottoms of plastic bottles are another option for a street Christmas tree. How to make them:
- Cut off the bottoms of the bottles.
- Using acrylic paint we draw any pattern on them. Let it dry.
- We thread the ribbon through the hole made on one side and hang it on the Christmas tree.
There is nothing easier than making these snowflakes.

Bells made from plastic cups of yogurt or sour cream can also decorate a street Christmas tree.
To do this, you need to take any glass, turn it over - this is the bell. You can hang a bead on a string inside and thread the braid through the bottom, making a loop. This bell can be decorated to your liking and depending on what you have on hand.
You can wrap it with braid, decorate it with rhinestones, sequins, beads, or paint patterns on it with acrylic paint.

In addition, you can make very simple but interesting toys for your street Christmas tree from old children’s plastic toys. For example, you can use plastic or rubber dogs, dinosaurs, cars, simply hanging them on a ribbon. Or you can paint the toy a bright color, and only then attach a ribbon to it and send it to the branch of the street tree.

We looked at many interesting options for making Christmas tree decorations with your own hands from scrap materials, but this is not all that you can think of; for inspiration before starting the creative process, watch the video, which presents some more options.