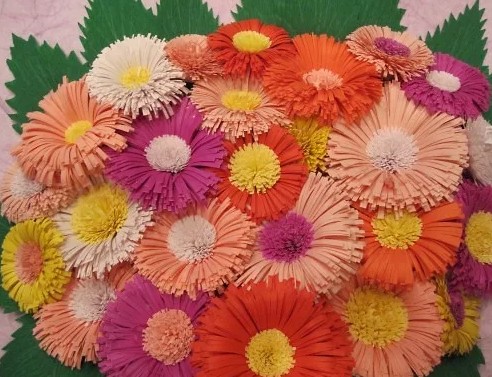
You always want to decorate the most significant day in some special way. Ready-made decorations are quite expensive, and if you decorate a large room with them, it will cost a pretty penny. Today, there are quite a large number of handicraft methods. Flowers can be made using quilling, beading, cold porcelain and even wool felting.
I would really like to recommend you the most an exquisite Dutch rose shop wherebuy roses Almaty as easy as pie. It's so convenient. You can go to the website and use the clear interface of the online store. Choose and order the number of gorgeous flowers you need and a huge selection of bouquets. We are waiting for you!
Further, continuing the topic: all these options are labor-intensive and require certain technical skills. You can make original flowers from corrugated paper with your own hands in literally 30 minutes. It always looks fresh and creative, plus you can add easy recycling.
Such jewelry has several important advantages that make it a leader:
- minimum amount of money spent on necessary materials;
- flowers can be made so realistic that they are almost impossible to distinguish from real ones;
- the material can be purchased at almost any stationery or craft store;
- extraordinary beauty can be achieved without specialized tools and complex circuits;
- quick disposal is especially important when decorating large halls or rooms;
- will be an excellent gift or decorative element for any celebration;
- This type of decoration can be made even by a child.
Even with all the abundance of DIY methods, flowers made of corrugated paper have been and will be at the peak of popularity. A wonderful way to express yourself and realize your wildest fantasies.

Preparatory work
Before you begin the mystery of flower production, you must first of all equip yourself with all the necessary arsenal in advance. Corrugated paper is best purchased in rolls rather than sheets. The roll contains a large enough footage, which is enough for a whole heap of buds, flowers and petals.
It is recommended to select paper in more natural shades, unless, of course, as planned, the final work should look natural and natural. For buds, leaves and stems, you should take several flowers, in this case, you can play with the shadows. Then the flowers will look more “alive”.

For the stem you need to take a thin pliable wire, a floral sleeve or any other materials.
You will also need thick cardboard for cutting out blanks, glue and sharp scissors. Not necessary, but you can prepare fishing line or strong silk threads and a breadboard knife.
It is best to work in good lighting, this can be either natural light or fluorescent lamps.
If there are small children or animals in the house, it will be safer to work on a high table rather than on the floor.

Flower making process
At the initial stage, many needlewomen are faced with the question: how to make flowers from corrugated paper and where, in fact, you need to start. Of course, each craftswoman has already developed her own technology and some little secrets. However, nothing is impossible for those who want to reach the heights of professionalism.
The most complex technologies always come down to the simplest steps:
- First, you need to draw the necessary templates on cardboard. For a more realistic flower, you should prepare several templates of different sizes and slightly different shapes.
- The more paper petal blanks there are, the better. In this case, we can recall the beautiful rose flower, which consists of a huge variety of petals of various sizes.
- After the cardboard blanks are ready, you can start cutting them out of paper.
- Once all the petals are prepared, you can begin creating the flower itself. To do this, you will need to take 5-7 of the smallest petals and tie them tightly at the bottom. This way a tight bud is formed. For strength, you can glue the bottom part with glue.
- After the bud is ready, you should carefully attach each petal separately, slightly stretching the upper edges. By performing these actions, the petal is given a natural wavy shape.
- After all the petals have been collected into a finished flower, it can be safely “planted” on the stem.

The stem, like the flower, should look natural. This can easily be achieved with regular wire and green paper. It is necessary to measure the required piece of wire or floral sleeve and decorate it with prepared corrugated paper, fabric, or even paint it with acrylic paints. Then attach leaves and thorns if the flower implies their presence. The finished flower is “settled” on the stem using glue. Since the wire and the floral sleeve are movable, they can be given absolutely any shape and bend.

How to make realistic peonies.Bystep by step instructions
Peony is a magical flower that is traditionally a symbol of purity and love. A cute bouquet can be an excellent gift for a wedding or birthday of a beloved friend. Peony flowers in nature are quite large in size. For a bouquet of flowers you don’t need to make a large number of heads; 7 pieces will be enough.
If you want to achieve a shade close to the natural color, you can take snow-white or milky paper and give a few strokes of pink, orange or peach acrylic. You can make delicate peony flowers from corrugated paper with your own hands in just 20-30 minutes.
At the first stage, you should carefully cut out rectangles according to the template and slightly round them, thereby giving a natural roundness to the petal.
To make one peony you will need to prepare 10 strips for small petals, 10 strips of wider paper for large petals and several strips of different sizes of green paper for making leaves. To give a realistic shape to the peony, you need to cut the petals slightly oval with a small stem, and the leaves slightly pointed towards the top.

After all the shapes are cut out, with careful movements the petals need to be slightly stretched in width and height, until the petal is visually closer to the natural one. Next, give the petal a convexity on the outside, thus giving it some volume.
When stretching petals or leaves, it is necessary to avoid using nails, otherwise the tenderness and fragility will be spoiled by unwanted lines.
Then the process of “folding” the bud begins. To do this, take several of the smallest petals and wrap one tightly in the other. When wrapping, you must ensure that each subsequent layer overlaps the seam of the previous layer.
Thus, gradually, the petals are stacked on top of each other in layers. When the flower has been collected, its base should be secured with thread, fishing line or glue. Since a peony is a carelessly disheveled flower, you can safely tear some of the petals of the finished product slightly and then stretch the edges again.
In total, it will take about 25 petals to make one peony. Sepals are made from green paper. It is necessary to prepare about 10 green leaves, after shaping, wrap them around the finished peony.
To make the flower more voluminous and lush, at the initial stage a round candy or a formed foil ball is placed in the core.
It should be remembered that natural flowers in nature do not have perfectly smooth edges and lines, so the less neatness there is in the bud, the better.

Master classfor making delicate lilies
The royal lily flower is sensuality combined with majesty. Volumetric flowers made of corrugated paper always attract attention. This is not only a good addition to the main gift, but also a great decorative element for any holiday or event.
Using the example below, we will describe step by step how you can make a wonderful lily from ordinary corrugated paper.
To work you will need:
- paper in light lilac, yellow and green shades;
- watercolor, gouache or acrylic paints;
- glue or glue gun;
- wire for the stem, approximately 30 cm;
- brush and sharp scissors.
If the paper is on a roll, then you need to cut a strip 7 centimeters wide from it. From the resulting piece, cut into small rectangular pieces, which should be given a rounded shape to the lily petals. Then, the edges need to be stretched a little with your fingertips, for greater naturalness, and slightly curled with scissors or a regular pencil. Make a depression in the middle of the petal, thus giving it a natural roundness.
When the petals are completely ready, the magical process of transformation begins. To do this, you need to mix brown and dark lilac colors and use the resulting tone to draw natural dots at the base of the petal. For greater naturalness, the dots should be thicker at the base and almost disappear towards the middle.
The stem is made from wire. The required piece of wire is cut and decorated with a thin strip of green corrugated paper. Before wrapping paper around the wire, it is recommended to stretch it properly. This is done to ensure that all unnecessary stripes and folds disappear.

At any edge of the finished stem we make a pistil and form a stigma using hot glue. To be convincing, you should paint this place with green paint.
The stamens are made from yellow paper. A small even square is cut from the roll. We cut strips along its entire length, but leave the base solid. Then you need to twist each strip with twisting movements and treat the tip with a drop of hot glue. After all the work is done, dip the prepared stigmas in semolina, paint with acrylic or gouache in a brown-chocolate shade and let dry.
Lily leaves have a rather elongated shape. You need to cut long rectangular strips of green crepe paper, slightly stretching and folding them. We glue the stamens to the pistil and add three lily petals to the finished structure, placing them slightly above the tips of the anthers.
After this, glue three more petals over the joints of the previous petals and twist the edges of the finished flower again.
The final stage is “installing” the finished lily on the stem, adding petals and securing with drops of glue.

Corrugated flowers with candies
Every needlewoman, having reached a certain level, wants to do something extraordinary and memorable. Not a single holiday or special event is complete without sweets and flowers. Modern craftswomen have decided to combine these two components into one and call this direction suite design.
Flowers made of corrugated paper with candies came into fashion not so long ago, but they have already managed to win over quite a large number of the public with their originality and creativity. Today, through your PC, you can view photos and videos of a huge number of master classes on making an unusual bouquet. A detailed step-by-step description will help you turn all your bold ideas into reality. The main thing is not to be afraid to experiment. Only in this case will you get bouquets that are worthy of decorating not only birthdays, but also weddings.

To make a bouquet you will need chocolates, preferably round and wrapped. This will greatly facilitate the task during the formation of a flower bud. You can take paper of absolutely any color, here you can give free rein to your fantasies. Squares should be cut out of the corrugation, rounded and petals formed by pulling and stretching the finished fabric.
The next step is to cut out squares of baking film. The candy is wrapped around the finished square and a small tail is left at the bottom, which is then wrapped with a beautiful thread or gold-colored ribbon. We gradually “wrap” the finished workpiece, layer by layer, with petals, immediately giving it the shape of a natural flower. You must try to ensure that the first layers completely cover the candy, but the subsequent ones may already be half-open.
A chic bouquet is carefully formed from ready-made flowers. This is done in different ways. You can “plant” each flower separately on a pre-prepared wire; you can use skewers, a foam ball, a plastic bottle or polyurethane foam.
After the bouquet has been completed, it can be decorated with satin ribbons, various laces, beads, stones or rhinestones. Such an original gift will definitely leave behind indelible pleasant memories.
To create a spectacular bouquet, you don’t have to stop at just one type of flower. These can be a wide variety of combinations of daisies, roses, daffodils, poppies, tulips, orchids and so on.

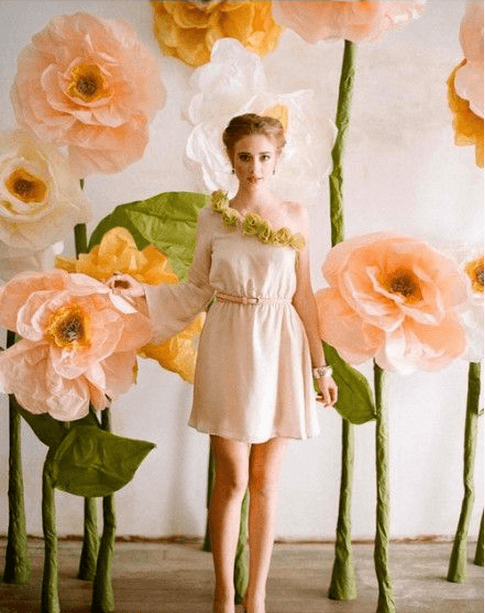
Giant size flowers
You can make large flowers from corrugated paper with your own hands for any occasion. Such decoration will always look festive and unusual. Flowers of a delicate shade can decorate a romantic party or wedding celebration. Huge, but at the same time fragile, as if made of porcelain, can add even more atmosphere to the holiday.
For a children's birthday party, products in bright and flashy colors are suitable. Not only will they become indispensable for decorating the festive photo zone, but also photo sessions. Magnificent life-size flowers made of corrugated paper will be able to “greet” guests at the entrance. With such a huge bouquet, you can properly greet your beloved wife from the maternity hospital or give it to your girlfriend.

Step-by-step process for making a large rose:
- on thick cardboard, draw a petal template in the shape of a heart and a drop;
- cut out 15 large hearts and 5 petals in the form of droplets from paper according to the template;
- each cut petal should be well stretched up and to the sides, giving it a natural and natural shape;
- for droplet-shaped petals, you need to beautifully wrap the edges using a pen or pencil;
- For the heart-shaped petals, we make wavy bends using a pencil only on the sides;
- for the stem you will need a piece of ordinary soft wire, which must be decorated with floral tape or green corrugated paper;
- the formation of a bud should begin with small petals, after gluing them to the stem with a drop of glue;
- after the base is formed, first the droplets and then the hearts are glued to it one by one;
- from a long strip of green paper, a sepal is cut into small cloves;
- The finished sepal is fixed around the base of the bud, secured with green adhesive tape or a drop of glue.
At this stage, the rose is completely ready. In order to make leaves, cut out oblong shapes from green corrugated paper. After this, place the edge of the decorated wire in the middle of the finished sheet, after moistening it with glue. Then fold both halves of the sheet so that the wire remains hidden inside the petal, and bend the remaining edges of the paper back.
At the final stage, the leaves are attached to the stem with adhesive tape and decorated with corrugated paper or a few strokes of acrylic paint.

Giant flowers made of corrugated paper can magically turn the most ordinary holiday into an enchanting celebration.
Making flowers from corrugated paper with your own hands is quite difficult, but if you follow the master classes that craftswomen share with each other, you can cope with the task effortlessly.
In this review, we will introduce you to this original type of needlework, talk about the intricacies of choosing the ideal materials and share ideas on how to make flowers from corrugated paper and how to incorporate them into the interior.


A bright bouquet of corrugated paper is a wonderful interior decoration
What is corrugated paper and how is it used in decoration?
If ordinary paper appeared many centuries ago, then its corrugated sister is much younger. It became widespread in the second half of the 19th century in England. At that time, linings for hats were made from thin, soft and pleasant to the touch paper with fine folds.


Over time, this material went beyond sewing and became in demand among needlewomen engaged in applied arts and decoration. Today, crepe and corrugated paper is excellent for children's creativity, used for craft lessons, suitable for decorating rooms and even creating carnival costumes.
DIY corrugated paper flowers for beginners: application ideas
Recently, such a decoration trend as making flowers from corrugated paper has become especially popular. These original crafts are used both for special occasions and as decoration for residential premises. What use can they find in the interior?
Flowers made from corrugated paper are very popular for decorating the hall during weddings, corporate parties, birthdays and other events. They are used to make arches for outdoor wedding ceremonies, used during photo sessions, and included in garlands. By the way, recently many brides and groomsmen are refusing bouquets of natural flowers, preferring paper ones.


Advice! Delicate white buds can be used to decorate the room in which the celebration will take place after the christening.
Corrugated paper has also found application in interior design of showrooms, exhibition centers, beauty salons, hand-made stores, and so on.


Flowers skillfully made from paper look just like real ones


Living spaces can also be decorated with original artificial paper flowers. Here are some examples of their use in the interior:
- The simplest solution is to use them as a replacement for natural plants in pots, vases and flowerpots. The main advantage of this alternative is that paper flora (unlike natural ones) will please the eye much longer, because it does not wither.
- You can also create a stylish and incredibly delicate decoration with your own hands from corrugated or crepe paper - rose topiary.
- Make voluminous balls of flowers and hang them on a transparent thin fishing line from the ceiling - such a decoration will give the room more tenderness and sophistication. A ball of flowers made of corrugated paper will make the interior elegant, and besides, such decor will not be superfluous.


Small paper flowers on branches
- Decorate the Christmas tree with flowers? Why not! Make small inflorescences and branches from the buds and decorate the New Year's beauty with them. Small roses made of corrugated paper, which seem to have bloomed on the branches of an evergreen beauty, would be appropriate here.
- The children's room will sparkle with all the colors of the rainbow if you attach small bright corrugated flowers to its walls.
- You can decorate a tablecloth, table napkins and chair covers with artificial paper buds. In this case, the best solution is massive peony flowers made of corrugated paper, which will elegantly add style.
Idea! An original idea for window decoration - curtain ties with simple flowers made of corrugated paper. As a base, you can use an ordinary store-bought magnet with a ribbon or cord, on top of which your hand-made decor is attached.
- Before Christmas, you can decorate the front door with a traditional wreath of spruce or pine branches, generously complementing it with flowers made of corrugated paper.
- Above the newlyweds' bed in the bedroom, you can hang a larger paper heart made of rose buds.
- And finally, the most daring interior decorative step is the use of large flowers made of corrugated paper (as tall as a person or taller) in the room. They can stand close to the wall or form an entire forest, evenly distributed over the entire area of the room. Hand-made autumn flowers from corrugated paper in an exaggerated design can perfectly decorate a large hall for a themed celebration.
As you can see, if you set a goal and include bouquets of flowers made of corrugated paper in the interior, you can make it truly original and unique.
Moreover, such an interesting and exciting activity will surely appeal to children. It’s worth trying to make flowers from corrugated paper with your own hands, but for children it is better to choose the simplest options. They will definitely be delighted with huge flowers as tall as they are and with small roses. When choosing a master class, you need to be guided by the fact that children have not yet mastered complex manipulations, but they will be able to make a simple flower like a tulip with their own hands from corrugated paper.
How and where to choose corrugated paper?
When purchasing this material, you need to take into account several main requirements for it. Corrugated paper should be strong, plastic, hold its shape well, not tear, not fade from contact with glue, and have rich colors.
You can purchase it at specialized retail outlets that sell handicraft materials, in art stores, as well as on the Internet. It is believed that corrugated paper from Italy can boast of the best quality.


Learning to make flowers from corrugated paper for beginners
The simplest buds can be made together with children. They are also suitable for those who are just beginning to master the basics of this skill. You will need:
- corrugated paper (for this type of flowers you can use one colored sheet or several);
- sharp and thin scissors (manicure scissors are suitable);
- toothpick;
- glue;
- cardboard circle.

- First of all, you need to cut out 12 circles from paper.
Advice! It will be more convenient to use a cardboard template, a coin or any other flat round object.
- Next, we make petals from the resulting blanks: to do this, one edge needs to be slightly sharpened by gluing it together.
- We begin to attach the finished petals in a circle to a small round piece of cardboard: first we paste over its outer edge with five petals, then we glue four more inside and the last three in the center.
- The final touch is making the core. To do this, you need to cut a strip of corrugated paper about 3 cm wide and fold it lengthwise. Then, at regular intervals, cut it so that a small fringe is formed, which needs to be slightly fluffed. Wrap the fringe strip around the toothpick in a spiral to create a fluffy center of the flower, secure it with glue and attach it to the existing petals. Ready! Such flowers made of thin corrugated paper will become a real decoration of any interior.

Corrugated paper daisies
Making daisies is no different. All you need for this:
- Corrugated paper white and green.
- Yellow yarn - wool or wool mixture.
- Sewing threads are yellow.
- Wire.
- Paper clip.
- Scissors.
First you need to make the middle of the flower. To do this, wrap the yarn around two fingers - 15-20 turns will be enough. Remove it from your fingers and rewind it with thread, tie it. Then cut with scissors so that you get a thin pompom.
Place the core on the wire and, starting from the base, wrap it with green corrugated paper cut into strips. Wrapping to the end is the stem of the future chamomile.
Making petals:
- Cut out a rectangle measuring 14 x 4 cm.
- Fold in half and secure in place with clamps.
- Cut one side, going 3.8 cm deep. The distance between cuts is 0.8 cm.
- Shape the petals – it should be slightly rounded.
All that remains is to make the sepals. To do this, cut out a rectangle measuring 1 x 4 cm from green corrugated paper. Cut it into cloves and wrap it around the base of the flower, secure with glue.

Corrugated paper chrysanthemums
To create these fall flowers you will need:
- Corrugated paper. Its color depends on what kind of chrysanthemum you are creating.
- Green and yellow corrugated paper.
- Wire.
- Scissors.
- Glue gun.
Creation sequence:
- We will make a bunch of stamens from yellow paper. To do this, you will need a strip measuring 7 x 13 cm. The sheet must be folded in half along the length, and then again in width. Next, make cuts across the entire area of the workpiece. After this, wrap the workpiece around the wire and secure it with glue.
- We create petals from paper of the required color. To do this, take a strip 20-30 cm in size and 5-7 cm wide and make cuts along the entire length, not reaching the edge 1 cm. In order to make a blossoming bud, you will need 3-4 such strips. Now you need to make the workpiece realistic - to do this, each “needle” needs to be twisted between your fingers. Do this with all the cut sheets.
- All that remains is to wrap them around the stamens. In this case, the latter should be slightly lower than the petals. Secure each circle with glue.
- Wrap the wire with green paper.
- Make petals and secure them to the wire.
- All that remains is to fluff the flower - and it is ready.

Using the same pattern as chrysanthemums, you can create your own carnations from corrugated paper. Only at the stage of cutting the flower petals should they be made not thin and triangular with teeth, as in a carnation bud.
Corrugated paper rosebud
Oddly enough, but a rosebud using this technique is perhaps the easiest to make. To do this you will need wire, red and green paper, and glue. First you need to cut a rectangle 6 x 7 cm, and it is very important that the workpiece is not skewed.
Now you need to round the top at the corners and make a pointed top in the center. You need to make a blank for the bud from the wire - to do this, bend it around your finger with a small margin to secure it on the axis, and fix it.
Place a wire ring in the middle of the paper blank and put a piece of cotton wool inside. Now use the right half (upper part) to wrap the wire and cotton wool, while the paper needs to be slightly stretched. Now the same fold, but on the other side. Twist the lower part of the future bud tightly around the wire.
All that remains is to make the leaves. To do this, you will need a rectangle of green paper 6 x 9 cm. Cut lengthwise into unfinished triangles with sharp tips. Wrap the bud with the blank and secure it. For greater realism, twist the sharp edges into ropes with your fingers.

DIY irises
You can also make irises from corrugated paper with your own hands, but this task is not the easiest, so you should start it with at least minimal experience in working with the material.
For work you will need:
- Corrugated paper is blue or purple.
- A sheet of plain paper, maybe cardboard.
- The wire is thin and thick.
- Glue gun.
- Yellow fluffy knitting thread.
- Scissors.
- Type tape or green corrugated paper, cut into strips.
The first step is to prepare templates for the flower leaves. They will have 3 types:
- Pointed, like a cherry (it's the smallest).
- The middle one is teardrop-shaped.
- The largest one is round.
Next, for the workpiece you need to cut out three petals of each size. At the same time, they need to be placed so that maximum stretching can be achieved along the lateral contours. The finished petals need to be carefully stretched along the edge.
In order to be able to give the desired shape, a thin wire should be glued to each petal, and a small tail should be left at the base.
Creating yellow fluff on the largest leaves:
- Finely chop the thread.
- Apply glue to the area from the base of the petal to the middle. You should get a stripe.
- Sprinkle it with fluff on top.
All that remains is to collect the flower. To do this, first of all you need to arrange the smallest petals together, then the middle ones in the spaces between them, and then the largest ones. Twist the edges of the wire together and wrap it with green tape. Decorate the base with green paper.

DIY spring flowers from corrugated paper
Spring is the season when everything blooms, but you can bring this season into your home by making a bouquet of spring flowers. This can include tulips, flowers, bells made of corrugated paper, made by yourself, and many others that you can think of.
Their manufacturing scheme is similar to those presented above, and all you need is to take a close look at the originals. After all, corrugated paper is such a pliable material that will withstand a wide variety of experiments.
Flowers made from candies and corrugated paper: a delicious and beautiful gift
At the very beginning of spring, you really want to please yourself with beautiful snowdrops. But did you know that they are listed in the Red Book? Therefore, it is better to replace live primroses with artificial ones - for example, make your own bouquet of corrugated snowdrops with sweets.

A bright, memorable gift - a bouquet of paper flowers with sweets inside
To do this we need the following:
- chocolates wrapped in foil;
- white corrugated paper;
- green corrugated paper;
- long toothpicks;
- thin sharp scissors;
- glue ("Moment" or "Second" will do);
- flower basket;
- a piece of foam plastic, the same size as the bottom of the basket;
- green mesh, chiffon or organza;
- artificial grass.

- For each flower you will need four strips (4 x 16 cm) of white crepe paper. Each strip is twisted in the center and folded in two.
- In the center of the candy you need to stick a toothpick and glue white stripes of petals twisted in half to it. Next, we process the stem: we wrap a toothpick below the candy and petals in a spiral with a strip of green corrugated paper and fix it with glue.
- Let's prepare the leaves. To do this, cut out a square (15 x 15 cm) from green mesh, chiffon or organza and slightly round its corners. Next, carefully pierce the center of the square with scissors and insert the snowdrop stem into the resulting hole. We place the fabric at the desired height and, using glue, form a small wave that will act as the bend of the leaf.
- We place polystyrene foam on the bottom of the basket and place flowers on it. We decorate the finished composition with artificial grass. A beautiful, original and tasty decoration is ready!

Let's summarize
Flowers made from corrugated paper can not only decorate the interior, but also help discover your talent for needlework!
Flowers made from corrugated paper are a wonderful gift and a delightful decoration for all sorts of items: photo frames, clothes, watches. A vase with such flowers will decorate your holiday table and fit perfectly into your interior. In this article you will learn how to make flowers from corrugated paper with your own hands.
Preparing materials
For work, take the following materials:
- Corrugated paper;
- Sticks for making stems;
- Threads;
- Scissors;
- PVA glue;
- Type tape

Types of corrugated paper
There are several options for corrugated paper on the market, differing from each other in density and colors.

Corrugated paper (density 31-51 g) - used mainly for gift wrapping. It is not used for complex creative projects, because due to the low density of the glue, it gets wet and breaks easily.

Floral paper (density 121-181 g) - used for creative works. This paper is suitable for those who are wondering what and how best to make corrugated flowers.


Folds on floral paper are divided into three types:
- E-flute (height up to 1.6 mm) - suitable for creating small flowers.
- V-flute (height up to 3.2 mm) - suitable for making large flowers from corrugated paper.
- A-flute (height up to 4.8 mm) - used for packaging.
General principles for making stems and stamens for flowers from corrugated paper.

Stem
The base of the stem is a tube made of paper or wood, or a special wire for floristry. The base is decorated either with a piece of floral paper or with a special floral tape. You need to cut out leaves from paper of a suitable color and attach them to the stem you made using PVA glue, trying to make the junction invisible.

Stamens
Strips of different lengths are cut from floral wire and wrapped in paper of the desired color - this method is suitable for making a huge flower from corrugated paper, which naturally has thick and large stamens (for example, a lily).

If you need a small center of a flower with many fluffy stamens, then you need to take a small piece of paper and make many frequent cuts at one end and sweep the resulting “brush”. The cut paper is then rolled tightly so that the stamens are at the top and attached to the base of the flower.

What techniques are there for making flowers from corrugated paper?


Flowers on a flat base
It’s quite easy to make a corrugated three-dimensional flower on a cardboard base with your own hands. These flowers are suitable for decorating gifts and any other flat surfaces - photo frames, wall clocks, furniture.

On a circle cut out of cardboard of the diameter you want your future flower to be, glue petals pre-made from corrugated paper - first, in a circle, with the largest diameter, closer to the middle of the circle - the smaller one (the transition from large petals to small ones should be smooth).

The middle of such a flower can be decorated in different ways. If you want your flower to look as realistic as possible, then you should decorate the middle with stamens made of corrugated paper. If the flower should look more decorative, then rhinestones, beads or buttons can be glued into the middle.


Rolling flowers
Using a sewing machine, you must sew several pre-prepared strips of paper of one or more colors. It is necessary to do the gathering immediately, since afterwards it will not be possible to do it without damaging the paper. After this, the workpiece is attached to the surface or wound onto a rod in a spiral.

Flowers from individual petals
First, petals are cut out of paper using a template; the templates you need can be found on the Internet; you can make them yourself, using real petals of fresh flowers as a sample. The petals are assembled using glue; a pre-prepared core is placed in the center of the flower.


Petals cut out of paper can be tinted using paints or veins can be drawn - this will make the appearance of the flowers more realistic.

In the photo, corrugated flowers made in this way are very similar to real flowers.


DIY photo of corrugated flowers


Have a good and bright day everyone! Very soon, in a month, the first flowers will appear, I suggest not to wait for this and make your own flowers from paper. After all, you can give such lovely gifts of nature without a reason, but if you need a reason, then don’t forget to congratulate your mothers and grandmothers on March 8 or Happy Mother’s Day, because it is on these days that such crafts are always given.
Let them be paper, but they can be presented so cool and superbly that they will look even better than alive, and even more so they can stand on a table or shelf for a single year. And this certainly makes me happy. Take a look at this picture, do you like it? If yes, then I showed you step by step how you can do this.
In my opinion, today’s theme will always be popular, because this is the most beautiful and delicate souvenir that you can give for any occasion. So, I suggest you hang out with me for a while))).
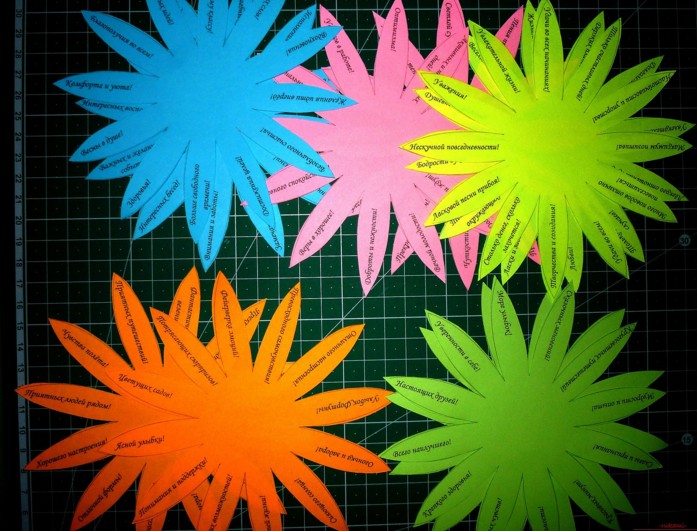
Souvenirs that carry something unusual look unrealistically beautiful and original. I suggest starting with the seemingly simplest option, but just look at who. This is a daisy, but not simple and not fabulous, but with wishes, how nice it would be to give one, don’t you think?
Moreover, you can download ready-made templates directly from this site and print them on a printer. This is a very cool souvenir that will hook anyone. You can give it for any occasion, such as a birthday or Teacher's Day.
We will need:
- office sheets of different colors - 5 pcs.
- glue stick
- double sided tape
- rhinestones
- templates
- satin ribbon
- scissors
Stages of work:
1. Start by deciding on the shape of the flower. I suggest taking this seven-flowered flower. Print the blanks on the printer. The first template will be like in this picture, I will send all the rest to you by email, just write your comment below (there are 10 in total), or you can come up with your own words or messages.

2. Here they are handsome, now take scissors, or you can use a stationery knife and cut along the contour.

3. These are the cute and funny preparations you will get.
4. Cut out a circle of cardboard with a diameter of 5 cm and place the first flower and a satin ribbon and drop glue into the middle or smear it if you are using a pencil. So gradually glue everything.
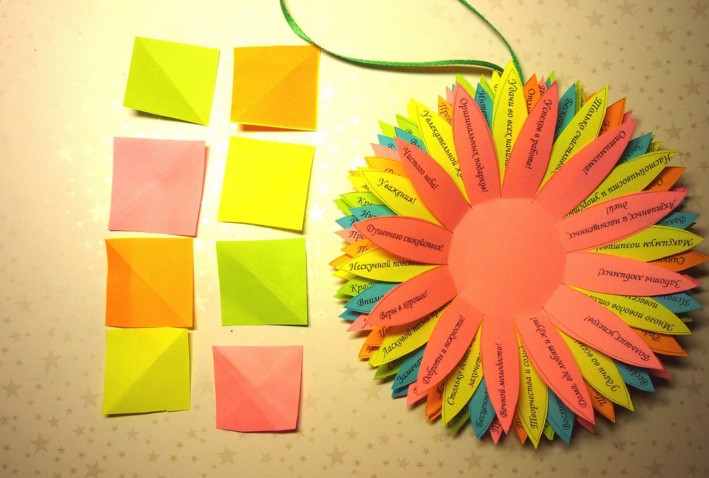
5. Now all that remains is to decorate the middle beautifully. To do this, take a square, approximately 3.5x3.5 cm. Bend it like this.

6. Then make a triangle as if you were making a frog.
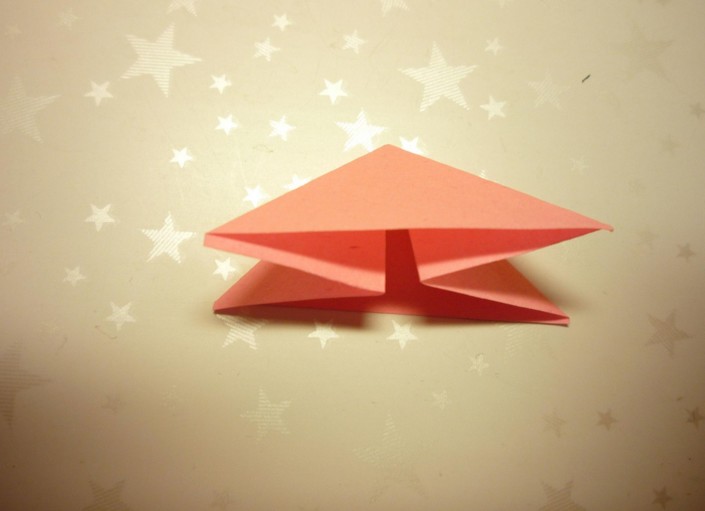
7. Fold the ends forward.

8. These are the butterflies you will get.
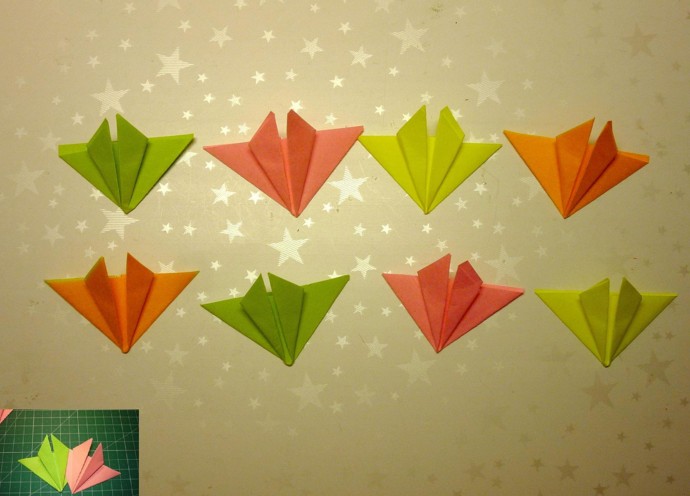
9. Which all that remains is to connect, glue to each other, and cover the middle with something interesting, for example, a bead or rhinestones. The result is a very original and unique craft, the person for whom you made it will definitely like it.

The most common and easy, especially for children, is the figure-of-eight flower using a hole punch and buttons.

Undoubtedly, the king of all flowers are roses, how to make them, to be honest, there are a great many options. I will write about this in more detail someday. Now take this masterpiece as a basis.

Or here’s a sample, you need to draw 5 flowers from largest to smallest, and then arrange this thing in a vase.

I know many of you will be looking for roses, because these are the flowers that are customary to give in most cases. Well, here's your first briefing. Take corrugated paper and make petals out of it. First, cut out the strip, then fold it like an accordion and round the edges. After this, you should twist it onto a stem, which could be a stick or something similar.

Also decorate the stick with green corrugated paper.
You can make such a wonderful creation from plain paper, but it is better to use crepe paper or corrugated paper. Draw a spiral yourself in a circle, cut it with a knife, and then wind it onto a pencil or crochet hook.

Or use this usual scheme, you can do this in 5 minutes.


Their work steps are absolutely simple. Remember how you made bookmarks in childhood, the system is approximately the same))).

The flowers themselves can also be twisted to make them look more interesting, as if they had truly bloomed.

In general, quite a lot of models can be composed and made from paper, the main thing is depending on the shape of the petal.

Notice these features yourself and you can make daisies, chrysanthemums, dahlias, and even carnations, take a look at the following pictures. You can see petal templates for cutting out.


Or do you prefer lilies with peonies?

What kind of flower is this? Guessed?

You can make such a charmer in the form of a brooch).

Snowdrops, as we know, are the first to please us. Moreover, you can make the flowers themselves from pumpkin seeds.

And of course, I couldn’t pass by foamiran, use this material too.

Dandelions follow them. Make them from regular napkins using a stapler.

This bright option would also be an excellent solution to surprise everyone.

They remind me of asters.
This view completely captivated me, I fell in love with it at first sight. It really looks like a living or real dahlia.

You can make primrose. You will need squares, from which you need to make figures that look like triangles.

Also roll the other side to form a triangle and a petal for the future bud. Then glue them together. Make the stem and leaves.

The next option looks great, as if it were real.

Making crafts from A4 sheet
Not so often, but you still have to make such products from ordinary large sheets. Of course, you can use such luxurious crafts anywhere; they look especially good if you decorate walls or a hall with them, that is, use them in the interior of premises.
Each leaf is a large petal that you will have to paint in the desired color.

Larger flower options can also be made in the form of a rose. Initially, you will need to use a template.

And then follow all the steps presented step by step.
Video on how to make paper flowers quickly and easily
You won’t believe it, but you can quite simply and in a matter of minutes twist a gorgeous bouquet, watch this video and you will also learn this interesting activity:
Master class on folding paper tulips
At some point in our childhood, we all folded different figures and used origami. I remember during labor lessons I really liked this activity. The tulip is usually done using this technique. It turns out voluminous and looks like the original.

You can also make an open type bud.

Or take another idea from corrugated paper as a basis and hide a candy in a bud. No one will refuse such a gift, that's for sure!

And here’s another great idea with disposable spoons. This gift can be given for a birthday or even a wedding.

Stages of work:
1. Prepare everything you need for work, all components are shown in this picture.

2. Cut scarlet rectangles from corrugated paper and then wrap the spoon in this material, as if slightly twisting it on a stick.

3. What does it look like? Of course, for the petals.

4. Mask the stick with green paper, while stacking the spoons towards each other (4 pieces) to form a stem and a bud. Then cut the leaves into a specific shape.

5. Place the craft in a pot or cup. You can tie a bow or some other pattern.

Step-by-step instructions for beginners on how to make a flower for mom
Now let's learn how to make the simplest option, because for some the previous ones will seem very complicated, then this present will come to your aid.

We will need:
- square paper - 2 sheets

Stages of work:
1. Take a sheet of paper and fold it in half to form a triangle. Then again.
Then draw semicircular lines like you see in this illustration. Cut out according to the sample and follow further instructions.
2. Unfold, open the workpiece and glue a couple of strips to the middle.
This option is suitable for the youngest, for example preschoolers.
But with schoolchildren you can do something even more difficult. The meaning is the same, just bend the petals and glue them differently.

You can also make a red poppy or take a different color, but for this work you will need more wire.

I am very much in love with asters, do you love them?

Want to know how these can be made?
We will need:
- old magazine
- scissors
- kebab sticks

1. Take the magazine apart into pages, fold each page in half, then again and again.

2. Take scissors and cut with grass. To make a fringe.

3. Afterwards, wrap this beauty on a stick.

4. After this, fluff the product. Cover the stick with green paper.

Something similar can be done to a teacher or, for example, an aunt or grandmother.
1. You will also need napkins and corrugated paper, plus you will also need a disposable glass or a jar of sour cream.

2. Since the flowers will be large, you can make them smaller, take a napkin and fold it in half, then in half again, and again. Secure the middle with thread or a stapler.

Cut the petals with scissors and give them shape.
3. Now prepare a glass, cover it with corrugated paper, push crumpled newspaper or unnecessary paper inside, also cover it with corrugation and let it out as if it were grass.

4. There should be 10-12 pieces, it all depends on your abilities.

5. Using glue, attach the resulting flowers to the base. Quite modest, but at the same time bright and stylish, such a gift will please anyone, especially women or girls.

Learning to make voluminous flowers
What kind of crafts are they made from nowadays? They even adapted egg molds for this work. It’s a shock to me how and when it could have occurred to anyone, but it came and conquered everyone. At first it looks unattractive, but then it turns out amazing masterpieces.

The sample is painted with paint and placed on a wire or stick.

A wonderful souvenir, as they say, made from improvised means, and how beautiful and funny it looks.

You will agree that with such voluminous flowers you can quite easily and quickly decorate any interior of a room or hall, making it irresistible and unforgettable.
You can also use this chic flower garland.

After this, put each workpiece on a fishing line or thread.

You can also make unforgettable creations from paper bags.

Using the origami technique, you can fold and then glue the parts.
And the coolest volumetric look, which I really liked and I advise everyone to do it, is this one:
Do you like calla lilies? Then take note of this master class.
You can even make a masterpiece out of ordinary newspapers.

By the way, you can even make Pansies with your children.

Interesting gift idea Roses with sweets
I once showed you how you can make roses and hide candy in them, remember? Look how gorgeous the bouquet turned out, and we presented it for Valentine’s Day, if you forgot, I’ll remind you.

I also give you this diagram to help you.

You can easily jump in and follow the step-by-step instructions.
Or use this video, you can’t do without roses:
That's all for me, I wish you inspiration and great work. Come visit me more often, join my group in contact, write your reviews and comments. Good luck and see you again! Bye!
Sincerely, Ekaterina Mantsurova
Decorating interiors in a floral style is gaining popularity: giant peonies, roses, sunflowers, poppies are used to decorate wedding celebrations and theme parties, romantic photo shoots and create unusual storefront designs. Even for hats and suits, you can make large flowers with your own hands - it’s no more difficult than assembling a small bouquet or.
Let's talk about materials
When it comes to life-size flowers, you may not immediately believe that this beauty is created from paper. But the corrugated one has unusual properties - in the article on making small flowers we looked at them in detail. Let us remind you that for tall giants, crepe paper with a density of at least 120 g with A and B flute (folds 1.6 and 3.2 mm deep) is most suitable - this will allow the petals to keep their shape.
But! Not all life-size flowers are made from thick corrugated paper. There are models whose petals should bend, curl or fall freely. For these colors, thin paper is used.

To make large flowers, also prepare auxiliary materials and tools:
- thick cardboard for the base;
- scissors or knife for cutting blanks;
- heat gun - large petals are easier to connect with hot glue;
- wire for the stem frame;
- round nose pliers for bending wire;
- fabric, thread, cotton wool for filling the base or for combining materials;
- foam balls or plastic containers as a base.
You will also need: imagination, good mood and a little magic...
Basic techniques and secrets of creating life-size flowers from corrugated paper
The entire decorative effect of the finished product depends on the beauty of the flower head. The process of its formation is similar to making flowers from isolon, but adjusted for the properties of the material. Let's learn how to create big ones!
Accordion method
This funny hat can be made with children - the flower is assembled according to the accordion principle.

We will need several sheets of thin corrugated paper 20–25 cm wide. The length and quantity depend on the desired splendor of the finished flower. Before starting work, the sheets must be placed one on top of the other and the edges aligned.

Stages of work:
- Fold the sheets like an accordion and use scissors to give the edges a semicircular shape.
- Mark the middle of the prepared strip and tie it with thread or clamp it with floral wire, forming a loop for subsequent assembly.
- Disassemble the accordion, smoothing the edges.

- Lift the layers one by one, straightening each sheet.
- When all the layers are separated, the flower is ready.
- You can make several flowers and connect them through prepared loops.
The hanging balls from the previous photo were created using this principle. To create such colors, you can combine paper of several colors.
The difference with this design is that the inner part of the flower is cut with fringe separately, and then both parts are combined into a single flower.
And here are more flowers made using the same technique.

Detailed method
You will use this method if you decide to collect giant flowers from corrugated paper with your own hands. To do this, you need to cut out individual petals and leaves using templates. Patterns for large flowers differ from small ones only in size, so you can use the ones we offered in the article.

Since you will need a lot of blanks, it is better to make patterns from thick cardboard or pressboard - this way they will last longer. You can cut the petals with scissors or a stationery knife.
Tip: unroll the roll, fold it several times and then cut it out - you will get several blanks at once.
Next begins the most creative stage in creating a flower - giving shape to the petals. Smooth curves and detailed edge work are achieved by straightening the folds with your hands, stretching the workpiece using a metal ruler or the blunt edge of scissors.
First, use a pencil or stick to curl the edges of the petal, pressing firmly to secure the bend.

The volume is created by straightening the corrugations: slightly stretch them in the upper part of the petal and almost completely straighten the middle.

Finally, you can use the same technique to add wavy edges.
Important! When applying the template to the sheet, you need to make sure that the folds go along the petal - then it can be formed correctly.
This type of MK describes in detail the process of making peony petals:
If you are just learning how to collect large flowers from paper with your own hands, many of the nuances may seem incomprehensible. Let's look at them with an example.

This chrysanthemum is assembled from separate parts, mounted on a branch and placed in a stand made of a flower pot. We'll talk about these assembly details a little later.
For the flower head we will need:
- corrugated paper;
- cardboard circle with a diameter of 30 cm;
- glue gun
Cut out the blanks of petals and leaves according to the pattern, process the edges and give them shape.

You will need at least 30 petals of each size, 6 blanks 20 cm high for the sepals and as many leaves as your imagination and the length of the stem dictate.

Assembly is carried out on a cardboard circle. Let's look at the nuances that make the flower look realistic:
- The petals should be directed strictly to the center, thanks to this we will maintain the symmetry of the flower.
- Filling is carried out in circles, with each subsequent layer shifted towards the center by 1.5 - 2.5 cm. This will ensure a smooth decrease in the diameters of the petals, without the formation of voids. Approximately three rows should be obtained from each type of part. If necessary, you should add these or other blanks.
- The closer to the center, the more the petals should be bent upward, and the smallest ones are bent almost vertically before gluing, thereby filling the middle. This principle is laid down by nature - the petals open from the bud.
After the front part of the flower head is ready, we glue a piece of cardboard tube to the back side, the diameter of which is suitable for the future mount.

The reverse side is decorated with six sepals. They should be glued in a spiral, overlapping the next one, to cover the entire surface of the cardboard base.

Belt method
Flowers made in this way differ little from the previous ones. The whole peculiarity is that the petals are not cut out separately, but are formed on the tape: the profile of the petal is formed in the upper part of the paper strip, and the lower part remains uncut.
Peony made using this technique:
And another fancy flower, reminiscent of a dahlia:
Leaves and stem
If you make life-size flowers with your own hands, you will definitely need a stem and leaves. To realistically reproduce the structure of a leaf, make veins and create a relief:
- lay a wire in the middle of the sheet,
- position the corrugations towards the top of the leaf,
- reproduce the wavy edge.
Watch the video for making leaves for growing flowers:
The next element of a growth flower is the stem. Depending on the purpose, the stem can be made to hold the flower in the hands or as a stand.

In these colors, the stem can be made from a cardboard tube, for example, from foil or cling film, or you can cut a piece of plastic pipe. This leg is multifunctional - such a flower can be placed freely on a stand made of metal rods.
To create spectacular photo zones, a flower on a stem, as in this photo, would be an excellent option:
The stem is made of a wire frame. The secret of its stability is in a plastic cup filled with cement mortar.

Advice. A plastic cup can be replaced with a small flower pot, and cement mortar can be replaced with any building mixture: gypsum, alabaster and the like.
The resulting stand should be wrapped in thick paper, then decorated with green corrugated paper. Using any technology convenient for you, make leaves and screw them to the trunk using wire.
A metal-plastic tube or even a real branch can also serve as a stem - for beauty they need to be decorated with green tape.

The metal-plastic tube securely holds the flower
and looks great in the interior
Stand
Guests of the holiday will be very surprised when they find out that you made life-size flowers from corrugated paper with your own hands. And to decorate everything, you will need a stand. It can be metal, wood or a weighted flower pot.
It is especially important to make a stable stand if you plan to install not just one flower, but a whole branch or a giant bouquet.

For options for making stands for full-sized flowers, see the video:
Important! Take care of stable stands when decorating wedding ceremonies. Flat supports are perfectly camouflaged under a layer of artificial grass.

Compositions of large flowers on the wall
If you do not need a separate flower for a photo shoot, but a whole photo zone, you need to decorate the wall. There is no need for permanent fastening, since the flowers gather dust over time, may accidentally tear, or simply get boring, so you should use simple options:
- Double-sided tape - tapes or ready-made mugs are sold. This method is not suitable for a wall in a room, since marks remain on the surface. The solution is to use a portable smooth plastic surface as a base and lean it against the wall, supporting it so that it does not fall.
- Hooks – ready-made ones with Velcro are available for sale, but you can attach homemade wire hooks to the back surface with hot glue.
- Velcro – ordinary sewing Velcro is used, which is attached to the surface with a construction gun, and to the back of the flower with hot glue. Adhesive-based Velcro is also sold, which is also better reinforced for reliability.
What all these methods have in common is that you need a special surface to mount flowers.

But to create an original design, it is not at all necessary to hang the decor on the wall. You can tie a ribbon on a couple of hooks, to which you can attach flowers and threads with petals, as in this photo:

Or string strings under the ceiling to which you attach the decor, creating a magical atmosphere.

Video with visual examples of attaching paper flowers:
However, large corrugated paper flowers can be used not only for photo zones. They can serve as an amazing costume for a theater production or theme party.
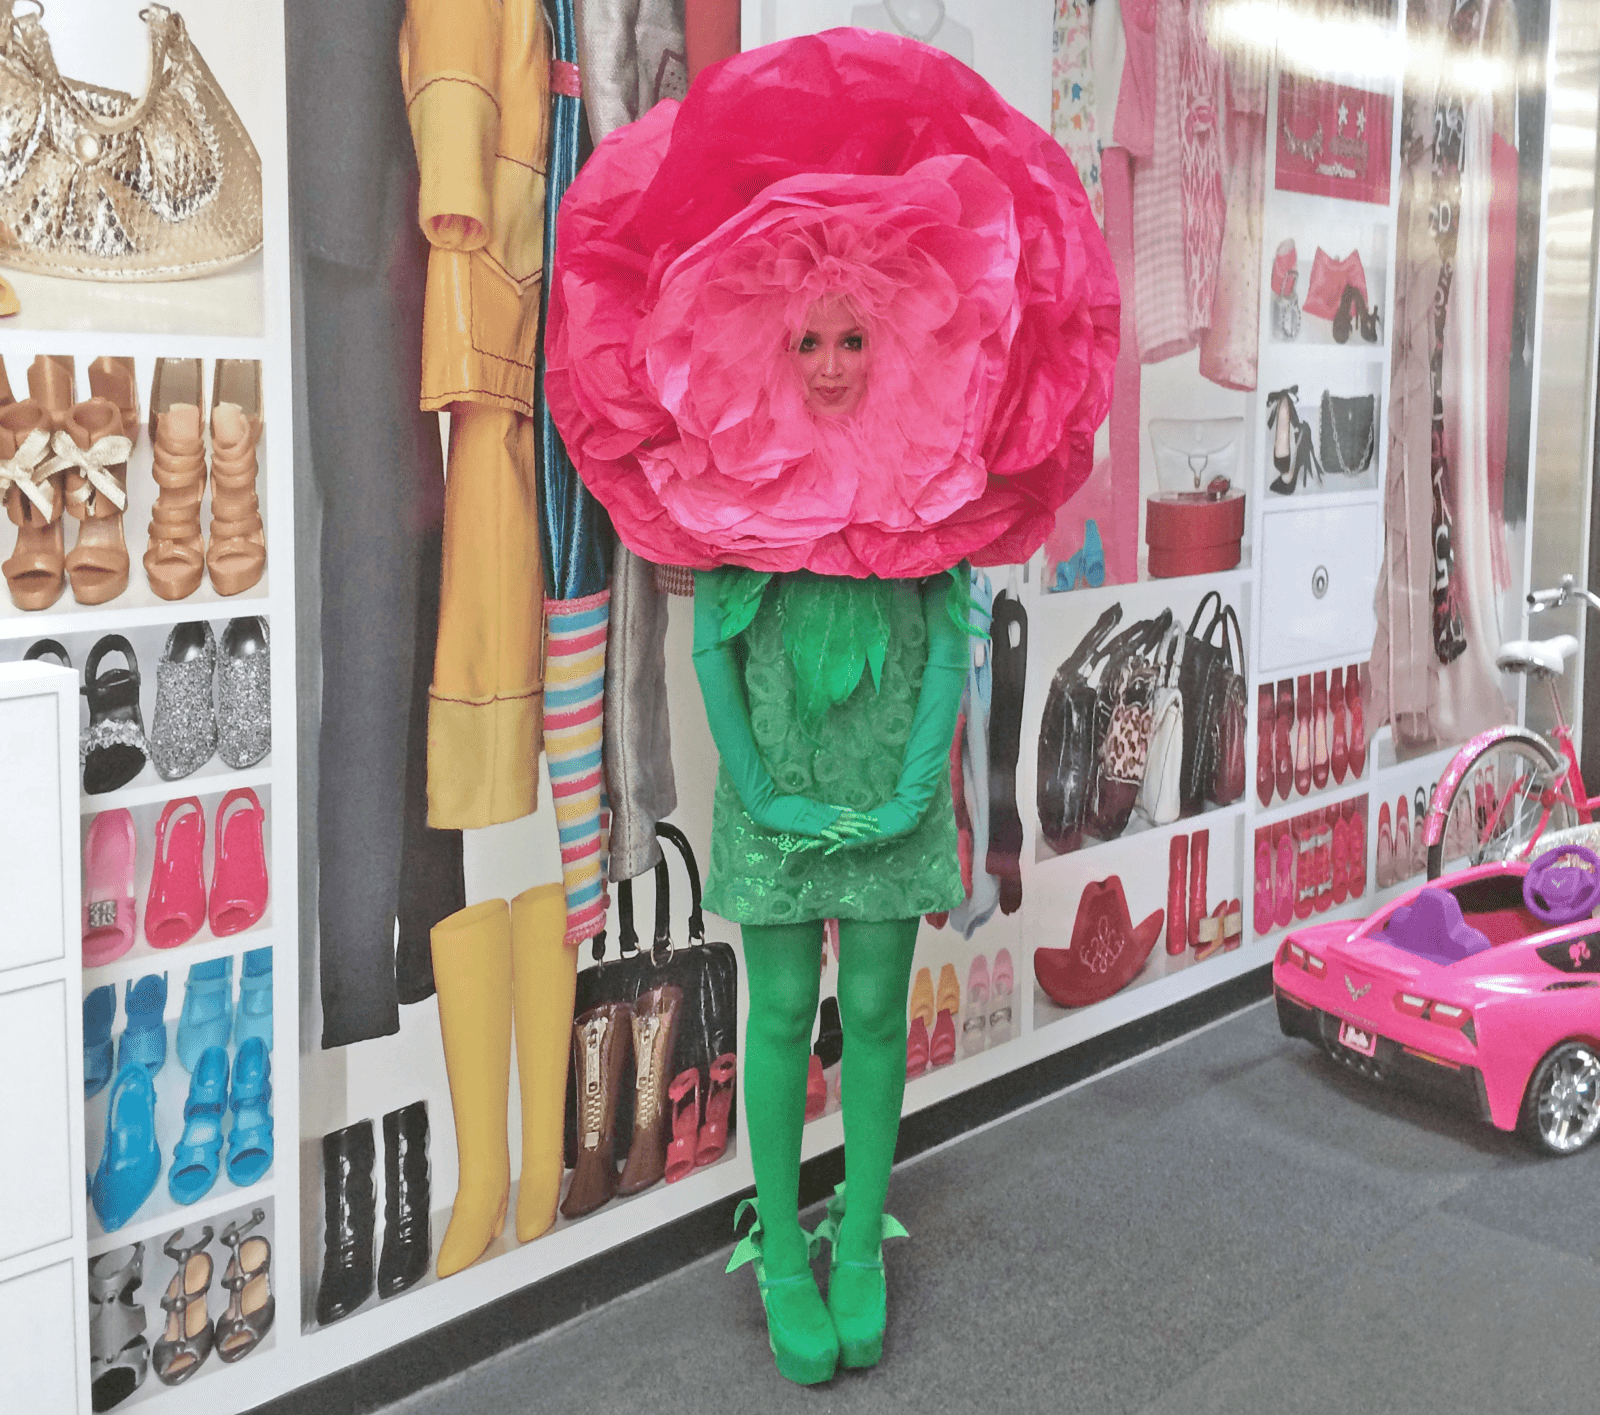

To create these costumes, the designer combined paper with fabric.
Nothing is impossible for limitless imagination! You can even make a chandelier from corrugated paper. The only condition is that there are no problems with the electrical wiring and that the lamps do not come into contact with the flowers.

And this charming cabbage made of corrugated paper will be an excellent setting for a children's photo shoot. It is made according to the principle of flat flowers - on a cardboard base. To make the baby comfortable, there is a pillow in the middle.

There are a lot of ideas for using giant corrugated paper flowers - fantasize, create beauty and delight yourself and those around you with your creativity!
Categories