Most often, the public condemns adults who fall into childhood. But, you must admit, sometimes it’s so nice to forget about everyday problems and worries and enthusiastically immerse yourself in the wonderful world of children’s games and entertainment.
The other day I was lucky enough to briefly return to my carefree childhood. And it happened completely by accident.
Late in the evening, wandering around Pinterest in search of interesting ideas for New Year's crafts, I came across photographs of works made from thermomosaic.
The IKEA set, which was a gift to my daughter for her birthday, consisting of plastic beads, thermal paper and special plastic bases with pins for laying out thermal mosaics, had been lying idle in our house for several months.

And suddenly I realized that I definitely needed to test the thermomosaic in action, and right away make something out of it. I had to sneak like a spy into the room of the sleeping children and take out a jar with the treasured beads from the shelf.

Thermomosaic is laid out according to the same principle as regular mosaic. The only difference is that the beads are not inserted into the holes of the base, but are strung on special plastic pins.

In addition, thermal mosaic beads can be fused together by ironing the laid out picture through thermal paper, and ultimately get a solid figurine for games or interior decoration.
So, everything is ready for work. All that remains is to decide on the image that is to be laid out from the thermomosaic.
Like most adults, it didn’t even occur to me to turn on my imagination, which was sleeping because it was late, and I decided to look for ready-made patterns for thermomosaics. There were more than enough of them on the Internet.
That is why my choice may surprise you. Why? Yes because I decided
make your own Minion – a character from the cartoon “Despicable Me”

The fact is that my children are delighted by the contemplation of this creature on the computer screen, and after watching the cartoon they play “minions” for a long time.
I was inspired to create my own thermomosaic minion by these three patterns:


1. Having made some minor adjustments to the sample diagram, I laid out my minion from thermomosaic beads on a special plastic form.

2. Covering the laid out image with thermal paper included in the thermomosaic kit, ironed it with a very hot iron for 3 minutes.

The top edge of the plastic beads melted and the beads joined together.
3. Then I carefully removed the paper and placed the thermomosaic minion figurine on a flat, hard surface so that the melted side of the figurine was on the bottom and the raw edges of the beads were on top.

I covered the figure again with thermal paper and ironed it with an iron.
Many lovers of thermomosaic crafts iron only one side of the figurine. However, beads melted on both sides hold tighter, and the figurine is more durable and durable.
4. After letting the minion figurine cool a little, I removed the thermal paper and placed the finished figurine under a press for several hours so that the thermomosaic craft did not lose its shape during the hardening process.
I’ll tell you a little secret: in fact, the little minion is not alone. He has a twin brother (well, almost a twin) - the first, in my opinion, not entirely successful experimental copy. As they say, find ten differences:

In general, the process of creating crafts from thermomosaics turned out to be fascinating, and perhaps you will see our new products using this technique on the blog for creative mothers and grandmothers.
And now the answers to some questions that may arise in your mind while making thermomosaic crafts:
What can replace special paper for thermomosaic?
When you have such a huge jar of beads as I have, 2 pieces of thermal paper is unforgivably not enough. Especially if you don’t yet have the skill to work with thermomosaics.
Thermal paper can be replaced with tracing paper. But it is best to iron the thermomosaic beads through baking parchment. Tested: it does not stick to the molten figurine and can be easily removed.
To what temperature should the iron be heated to make thermomosaic crafts?
Personally, I prefer to heat the iron to maximum in the “cotton” or “three” mode. This way the beads melt faster.
Do not overdo it when melting plastic thermomosaic beads with a hot iron! Otherwise, you will get a thin melted pancake (see above: Minion No. 1 - experimental).
How many minutes does it take to iron thermomosaic beads?
An image made of plastic beads is melted with an iron heated to maximum temperature for 2-3 minutes on each side (or on one side as desired). It all depends on the iron and on the quality of the figurine you want to receive.
For example, I prefer figures without holes, so I iron the image from a thermomosaic longer with an iron.
Where can I get diagrams for thermomosaics?
Look for diagrams for thermomosaics on the websites of manufacturers. There, the pictures on the finished sets are presented in good resolution, and when enlarged, you can easily see the diagrams of the figures.
You can use simple cross stitch patterns as patterns for laying out thermomosaics.
Where to buy thermomosaic?
Sets of thermomosaics, beads and base forms for them can be purchased in art supply stores, in children's toy or stationery departments, or you can order thermomosaics in an online store.
Forget about household chores - remember how great it is to be a child with HobbyMama!
When we arrived, we once again took out the thermomosaic. Well, of course, we began to actively play with her after the weekend.
So I decided to show and tell why I love thermomosaic
So, let's start with what a thermomosaic is, in case you haven't come across such a toy yet
You have a tablet - a base with pins. These same tablets are very different. The simplest one is a square. If this is a Hama thermomosaic, then the square will have grooves for connecting with others of the same kind. This is needed to create large pictures.
If you bought a tablet from Ses, Lori, Ikea, then your square will not connect to anything, even in the distant future
As you can see in the picture, there are other options. The circle is a very useful shape, but it would be better if there was a little more of it. The heart is almost a square, only it has small specific curves. You can make more than just hearts on this tablet!
And a very cool one - a hexagonal tablet. You can take a lot of great pictures with it.
I specifically bought this set for the sake of the tablet. Although, of course, they are sold separately, you just need to find where exactly. Now I already know where :)
There are also tablets that are so attractive at first glance - ready-made figures. But experience has shown that they are the least used. Because nothing else but the given figure can be assembled on them.
The beads themselves are also different. The size is basically the same for all manufacturers - 5 mm in length. And there are also super-small beads of 3 mm and 2.6 mm! Their trick is that the resulting figure will be flexible. But this, of course, is no longer for children.
It seems that Hama has large beads for babies. I haven’t seen these, but I think that if they exist, it’s cool.
The only thing you need to remember is that each size needs its own tablets!!!
But, oddly enough, something depends on the manufacturer.
If you plan to make regular flat pictures, keychains, earrings, etc. - then any will do. The only question here will be color. There are a lot of colors in a cheap Ikea jar, but there will be no more shades
The ready-made sets will contain beads that match the colors, but they are enough for 1-2 figures. And if you yourself want to buy a specific color, then this is Hama again - I have seen up to 60 colors, but I think there may be more.
When else might Hama be needed - if you decide to do a large-scale project. Unfortunately, the beads are from Ikea, etc. if you melt them weakly, they won’t stick well, and if they melt too much, then they won’t stick together. And such a miracle plan can no longer be created 

But let's get back to the mosaic itself. What exactly is so unusual about it that makes it stand out from other mosaics?
The whole point is that first we collect a picture from colored beads. And then iron it through special paper (baking paper works great). And in our hands we end up with a flat colored thing :)
Do you see these flowers? They are made from thermomosaic. A caring brother made them for his little sister for the New Year.
Why is it interesting and useful?
Let's start with the fact that it is bright, simple pictures are assembled quickly enough, and a 3-year-old child, after a little effort, can get a bright and cute result - a flat figurine for play or just beauty
What's the benefit of this?
- Well, of course, fine motor skills. Taking beads 5 mm in diameter with your fingers and placing them on a small pin is an excellent job.
You can also master tweezers! In fact, in large and complex jobs it will be difficult without tweezers. It is very useful for kids to master this instrument.
And if the beads are all in one jar - bowl, then you also need to sort them and find what you need. You can, of course, look for the right bead each time while working. But this, as you understand, is not very rational. It's a constant distraction. This means we will select the necessary beads in advance. Thus, on the one hand, we teach the child the correct, rational organization of his activities. On the other hand, we train attention - looking for the right color among many is quite a task, especially for a baby.
When you collect a beautiful picture that you like, you can be patient a little, try... In general, little by little we develop concentration and volition.
For example, Alenka could not assemble this picture in one go - it was too big. We divided it into 2 approaches. Moreover, I honestly was going to assemble it in 3 times. But when the finale was already visible, the child pulled herself together and, with an effort of will, finished the work.
Work according to the scheme.
Read the diagram, count the parts, navigate on your tablet, install, check. ABOUT! This is a very difficult job not only for a baby, but also for older children. This is a skill, a very important skill that we can develop precisely through playing with mosaics.
You can work even deeper with the scheme.
There are a lot of photographs of works and pictures on the Internet. We take a high-quality picture, make it large on the monitor and ask the child to draw a diagram in a notebook. A very good task for both 5 and 7 year olds. If a rectangular tablet is mastered quickly enough, then circles, hexagons... there are more questions here.
Here in the photo you can see a box of pencils. First, Alice drew herself a diagram, now she assembles it using it.
By the way, here's an interesting observation along the way. Alice first copied the diagrams in color - painted over the necessary squares. And only over time she saw that it was more rational not to paint over it, but to simply put a colored icon, or a non-colored one at all. And more recently, she herself realized that you can simply designate the desired color with a letter or number. And this little discovery of hers is worth a lot
You can fantasize and collect your own pictures and patterns. And then sketch them as a keepsake
- By the way, yes, with the help of thermomosaics you can perfectly practice what you can do with a regular mosaic: symmetry, consistency, similarity.
But such pictures are an excellent material for various gifts, decorations, holiday decor, they can become elements of a postcard or directly as game material 

Well, or simpler 
We have such a variety of food living in toys for 7 years. Slava once made it for Alice, and we are slowly updating it as needed.
But Slava gave these cars as gifts to children in kindergarten. Just? Yes, sure. But for a person, 4.5 years is just right. And how happy the boys were. And how happy the speech therapist and teacher were! After all, they organized a competition. Blow on the cars to make them move to the finish line! Great workout:)
But you can make such beauties 
And, most importantly, such a project is within the capabilities of a 4-5 year old child! You see, probably no other material gives such freedom. It does not make it so easy to achieve results. Minimal help from parents, and the child gets a truly beautiful, bright thing that brings him joy, which he can play with and use.
From this photo you can immediately see what book Alenka recently read. Well, of course, about Elmer the elephant. But she made a colorful dog, not an elephant.
Well, of course, we use mosaics as beads.
- this is just food that we pour in - we pour in games
- cargo that can be put into the back of a dump truck and brought in the game
- these are beads for the doll
- this is also a replacement for large beads in weaving simple crafts. Something that is quite easy for a child to start weaving with
Well, for kinesthetic learners it’s nice to just put their hands in a bowl of beads and sprinkle them from palm to palm.
I myself, in my spare time, when he suddenly appears, or next to the children, collect pictures with pleasure. I like both the process and the result.
In general, I think it’s already clear that I love thermomosaic, and so do my children :)
Do you have thermomosaic tiles at home? Show me what you make of it? Children like? What about you?
We have a BOOM! Thermomosaic is my new hobby! In fact, mothers very often choose those activities, toys, educational activities for the baby that mothers personally find attractive.
Pros: fine motor skills in their purest form, these are beads!!! The girls will be delighted, and the boys... when you see what kind of DINOSAUR we made today and we put a couple of ideas in our piggy bank... the boys won’t resist! And for boys, due to the peculiarities of brain development and the possible lag behind girls their age in terms of fine motor skills, which will be very noticeable in the elementary grades, this is simply a must do.
So let's get started. There are a lot of sets in stores, we bought the most effective one in terms of price-quantity ratio. A set about a kolobok (yuck!) with a huge number of beads (super!) and a large square tablet (super!). The tablet is the most important thing, since only on a large tablet can a child collect everything he wants, and on a small tablet in the shape of a dog - only a dog.
Our beads!!!

First we assembled the house, but quickly got tired of it and didn’t finish it.

We are assembling the house... we didn’t even finish it, we abandoned it
We decided to do something small for the first time, simple and interesting. DINOSAUR!
The work is very difficult for a child due to two points - directly placing small beads on the tablet, although the pegs help and prevent the beads from moving, but for small clumsy fingers this is a real training in accuracy (and stamina). Secondly, it will be difficult for younger children to navigate the diagram and count the beads. So for now we will work together! Great activity together!
So we started laying out the dinosaur, I am the navigator, leading us according to the scheme, the younger one is laying out the beads on the tablet. Then we ironed (I ironed) the dinosaur with an iron at maximum through tracing paper. This is how it all looks, you can clearly see how the beads began to melt. Don't forget to remove the figure from the tablet; it will remain on the tracing paper.
Unfasten the tracing paper and place it under the weight for 10 minutes. We placed it under a set of wooden cubes. And here is our dinosaur!!! Nyashka! We immediately created a habitat for him, people came running to take photographs and in general.
The whole process took us about 20 minutes plus 10 minutes under weight. An excellent project to start with when you are not yet sure how the iron will behave and generally want to make and play as quickly as possible...


The dinosaur under tracing paper is still on the tablet. I forgot to take it off, but remembered in time.


If you have small transparent jars from hotel shampoo or baby food, you can’t think of better storage containers


Schemes for thermomosaics in a piggy bank.

Thermomosaic schemes

Thermomosaic schemes

A completely new type of mosaic - thermal version. As the name itself makes clear, it is associated with heat treatment. But first things first.
What is a mosaic?
Thermomosaic consists of small cylindrical parts that are made of fast-melting plastic. They come in different colors, thicknesses and diameters. They are somewhat reminiscent of a juice tube cut into small pieces. These mosaic pieces are assembled on a tablet board, which consists of convex pins. Parts are placed on them in a certain order, maintaining the required colors.
After the workpiece is completed, you need to cover it with ordinary tracing paper or thermal film and iron it with an iron. Due to the high temperature, the parts melt and join together. After this, the fused work can be removed from the tablet, waiting until it cools completely. Thus, a thermomosaic is assembled, the diagrams of which you can find in this article.
Who is it suitable for?
The main rule of this mosaic, in principle, like many others, is that the child’s work is strictly under the supervision of an adult. Thermal mosaic is not suitable for children under three years of age. But for older kids it will come in handy. But here too there are age restrictions. For children from three to five years old, mosaics with a diameter of ten millimeters are produced. These are quite large cylinders that will be convenient for kids to pick up and hold. But another difference between toys for the smallest toddlers are the diagrams. Thermomosaic is assembled on special panels that already have a shape. It could be a butterfly, a flower, a bear or a dog.
Children from five to ten years old can purchase a mosaic with five millimeter pieces. Accordingly, you need to purchase different tablets for manufacturing. Children can assemble the thermomosaic themselves, but the procedure with the iron still needs to be done by the parent. The third type of parts is for the oldest children from ten years old and older. They differ in their small diameter: only two and a half millimeters. To make the figures you will need twice or three times as many parts, but this is not a problem. After all, you can create patterns for children’s thermomosaics yourself. We'll talk about this later.

Skills in a game form
As you know, children working with small parts helps develop motor skills. When assembling this mosaic, the child must take the piece with his fingers, turn it the right way and put it on the pin. These activities develop concentration and motor skills of small hands. Multi-colored cylinders are used to assemble the mosaic. This will be an excellent palette knowledge training. Such activities are especially useful for the younger group of children. By talking through the color of each detail your child uses, you can hone your knowledge of shades.
Thanks to the fact that the patterns for thermomosaics can be changed, the child will learn to fantasize. You can also invite the children to create a diagram themselves, for example, draw it on a piece of paper in a checkered pattern. And the parent will help transfer it to the tablet. One of the skills that puzzle solving helps develop is perseverance. To achieve results, the child will have to concentrate on small details and be attentive. This skill will be useful before the school year begins.
Ready-made sets
You can purchase ready-made kits for working with mosaics. They are usually sold in children's stores and the choice is quite large at the moment. The finished set contains: a drawing diagram, the necessary colored beads, a tablet board and thermal paper, instructions for use.

As mentioned above, the sets come in three types: for children 3-5, 5-10 and 10+ years. As practice and reviews from parents show, a ready-made set is perfect for toddlers. The thermomosaic, the diagrams for which are attached, can be given to him for any occasion. But older kids will be interested in inventing them themselves. For an entertaining process, you can purchase ready-made plastic beads and a universal square tablet.
Simple and accessible schemes
If you have chosen the option of a flight of fancy, then the following information will be very useful to you. Buying ready-made kits is, of course, convenient, but quite expensive. Considering that you can only collect one drawing. Therefore, let’s reveal one very valuable secret that thermomosaic conceals: assembly patterns can be used classic for cross stitch. It would seem like a small thing, but quite useful information.
This will help save a lot of money. And it will be more interesting for children. All you have to do is purchase packaged beads, which are sold in individual colors or mixed. And also a large board so that you can place a drawing of any size on it. Print out the embroidery pattern and get to work. And in order to keep up with the times and interest your child, choose your favorite cartoon characters for the mosaic. This will definitely surprise your baby, and his favorite pastime will be thermomosaic. Schemes - smeshariki or strict robots - will appeal to children. You can see one of them below.

Where can ready-made works be useful?
So, we have already figured out the types of mosaics and patterns for them. But the question of using finished works remains open. From these amazing beads you can make not only interesting toys, but also quite useful things. Having built favorite cartoon characters or animals, a child can add them to his arsenal of toys. Due to heat treatment with an iron, the parts are firmly attached to each other. You can make a house, furniture for dolls and even cars. But we’ll talk about the most interesting ideas further.
Holiday gifts
Thermal mosaic will help you create an exclusive gift. which are depicted colorfully and brightly, will come in handy. Together with your children, you can make Christmas tree decorations, a snowman, Santa Claus, snowflakes and many other holiday paraphernalia. Below in the picture you see a wonderful example of New Year's crafts.

Photo frame
A rather interesting and extraordinary solution that will help preserve the brightest moments of life is to make a picture frame. This can be done as easily as possible. A frame is assembled according to the size of the photograph on the tablet panel. Choose the thickness yourself. It can be four, five or three rows of beads. Fix the result with an iron, remove the finished frame and glue the photo on the back side. If desired, you can add small details to decorate the finished frame. This activity will be interesting not only for children, but also for adults.
Useful Application
Due to the fact that the 3D thermomosaic has a format, diagrams do not need to be used. It is easy to make a square one. The use of various ornaments looks impressive. And out of five blocks you can easily build. Even a child can make a box of plastic beads. When making such complex structures, it is important to connect the parts with hot silicone glue.

All kinds of trinkets with your favorite and popular movie and cartoon characters will now become more accessible. Due to the fact that the product is voluminous, it can easily become a replacement. And it will be convenient to thread the metal ring due to the holes that the thermomosaic contains. Schemes, as you understand, are not difficult to find. Advanced users can try to collect entire pictures. They can be placed in a wooden frame or left without it. A large number of cross stitch patterns will also be useful in this matter.
Important to remember!
Follow safety rules when working with mosaics. Due to small parts, do not leave children alone. After all, they can easily swallow a bead, so strictly control the entire process.

Choose plastic parts according to age to make it interesting for your baby. Always do the final stage of ironing yourself, even if the child is already an adult. Thermomosaic is a joint work of an adult and a toddler. Therefore, do not forget to prompt and praise the baby.
Thermomosaic is an excellent material for creativity with children over 3 years old. It is a set of colored plastic cylindrical beads, which are laid out in the form of a pattern on a special base with pins, and then ironed through thermal paper (parchment). When heated, the top layer melts and the beads are connected to each other, forming a solid figure. Thus, together with your child, you can create various crafts from thermomosaics: jewelry and accessories, home decor, toys and gifts for the holidays.
Instructions for working with thermomosaic
You will need:
- beads for thermomosaic (in, in, on);
- base for thermomosaic (in, in, on);
- a set of forms for thermomosaics (in, in, on);
- thermal paper (in, in, on) or replace with baking paper;
- tweezers (on);
- iron;
or use a ready-made set for thermomosaics (in, in on).
Thermomosaic is suitable for children 4-5 years old, but there are also sets for children aged three years and older - they differ in the size of the beads; in sets for the youngest they usually have a diameter of 10 mm.
Standard sets for children over 5 years old are equipped with beads with a diameter of 5 mm, and for older children - very small ones, 2.5 mm in size.
Different sets of thermomosaics are equipped with different tablets with pins. They can be in the shape of a butterfly, horse, bunny, etc. There are also universal bases - square, round, oval. The first ones are easier to use, the second ones are more practical and provide more room for creativity. It is best to have both, start with blanks and move on to free creativity. If the child is old enough, then you can only get by with universal tablets.
How to do
1. Let the child independently lay out the pattern on the form, placing the beads on the pins (use tweezers for convenience). You can assemble the mosaic according to the diagrams, or you can do it at your own request, relying on your imagination. It is very convenient for kids to use a transparent tablet, under which they can place a template and assemble according to it.
2. Heat the iron to medium temperature.
3. Then place thermal paper on the finished image and carefully iron the mosaic surface with a hot iron in a circular motion. (this step is only allowed for adults or children under parental supervision). This will take about 10 seconds.
4. Remove the resulting figure from the tablet, turn it upside down with the untouched side. Place on a flat wooden surface. Cover with paper and iron for another 10 seconds.
5. To ensure that the figurine does not deform after cooling and remains flat, it is necessary to place a weight on top for several minutes.
What does thermomosaic develop?
Classes with thermomosaics provide many opportunities for shaping a child’s personality. In addition to developing fine motor skills, it provides opportunities to play with colors, which helps develop artistic abilities, imagination and creativity. The ability to lay out drawings according to diagrams develops the ability of visual-motor coordination of movements, which is important for preparing children for writing. Counting the number of necessary parts and rows in a drawing will certainly help in the development of the child’s mathematical abilities and his intelligence. When laying out figures from thermomosaic, in addition to developing abilities, children develop such character qualities as patience and concentration, accuracy and attention.
What to make from thermomosaic: ideas for crafts, diagrams
Bookmarks
Together with your child, create colorful bookmarks for books from thermomosaic and large paper clips. Lay out the thermal mosaic according to the diagram (download), iron it through thermal paper, glue the finished figures with hot glue to paper clips.
Source: perler.com
Bookmarks “Fruit” made of thermomosaic and wooden ice cream sticks (diagram).

Source: perler.com
Accessories and decorations for children
Thermomosaic bracelets
Option 1. Place thermal beads in any color combination on the base. It is important that the ends of the future bracelet are made at different angles for proper alignment. Iron through thermal paper. Take the strip while it is still warm and wrap it around the glass, making a bracelet. Run the iron over the surface of the bracelet again to secure the ends.

Source: diycandy.com
Option 2. Even a 4-year-old child can make a simple bracelet from thermal beads. First, flatten the beads with an iron, wait until they cool down and invite your child to string them on an elastic thread.

Source: craftandcreativity.com
Option 3. Weave a bracelet from thermal beads in the same way as beaded jewelry is woven according to patterns.

Source: diycandy.com
Thermomosaic headbands for girls

Source: perler.com
To make it you will need: a simple headband (on), a thermal mosaic (diagram) and a heat gun for gluing decorations to the headband. Source: perler.com

Source: eighteen25.com
Summer earrings made of mini thermobeads

Source: perler.com
Thermomosaic necklace

Source: thecraftedsparrow.com

Invite your child to draw their own design for a future necklace.

Source: blog.modcloth.com
Buttons for children's clothing
You can use thermomosaics to make bright buttons for a child’s outfit.

Source: makermama.com
Molten thermomosaic hairpins
Cover a baking sheet with baking paper, lay out a pattern of thermal beads and place in a preheated oven at 200 degrees. oven for about 10 minutes. When the beads are melted, remove the pan from the oven and let cool. Glue the finished figurine to the hairpin with hot glue. A bright hair accessory is ready!

Source: the36thavenue.com
Carnival masks
Thermomosaic mask for girls (diagram).

Keychains "Fruit"
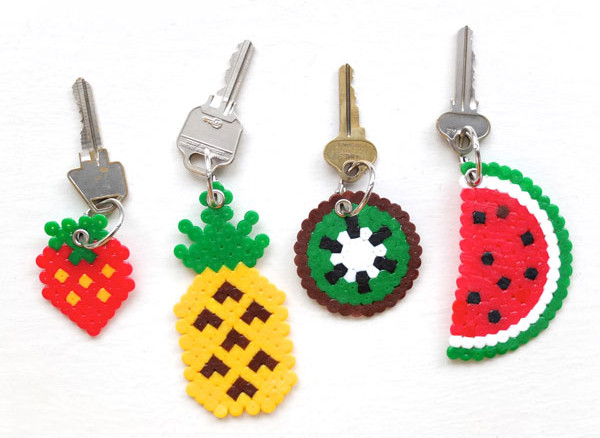
Source: mypoppet.com.au

Phone case decor

Gift decoration
Creating holiday packaging is a very exciting process that will appeal to both adults and children. With thematic figures from thermomosaic, you can make original gift wrapping for any occasion.

Source: meinfeenstaub.com
Festive packaging for the New Year

Thermomosaic cards
Postcard for St. Valentine's Day (diagram).

Source: perler.com

Home decor made from thermomosaic tiles
Pencil holder

Garland
