Autumn is an underrated time. Not everyone is happy about her.
On the other hand, this is a plus, since you can make many discoveries that will make you look at this time of year in a new way.
Here ordinary maples, which are valued in ornamental gardening, will help us. And our discovery is roses made from maple leaves.
Let's look at some step-by-step instructions for making these “autumn flowers” with your own hands.
Method one:
To make a bouquet you will need.
- Maple leaves of different colors.
- Threads.
- Iron.
- Newspaper sheets.
- Yellow masking tape (optional)
When collecting leaves, do not try to collect only the same ones. Multi-colored leaves will be better. But dry, damaged or diseased ones are excluded.
Small leaves are also a bad idea as they will be difficult to work with. Then divide the collection by color.
For a single bud, use leaves of the same color. Let the bouquet be variegated, but it is better for the flower to be monochromatic.
So, take a sheet and fold it into two parts. The bend line is across the rachis (the vein located in the middle). Moreover, the front side should be on the outside. Roll this bent “petal” into a roll. It should be bent parallel to the rachis. This roll should be dense; this is the core of our workpiece.
Now you need to lay out the leaves around the core. Take the first one and place the roll in the center of this sheet, with its outer side placed inside. Next, bend the sheet in two halves outward. Make sure that the edge of this fold is a centimeter or one and a half higher than the core of the flower. The bend should be smoothed out. Bend the edge that protrudes above the core outward. There is no need to smooth anything out here. Wrap the sheet in this state around the roll on both sides.
For a new petal, take another sheet, the algorithm of actions is the same, although from the very beginning place this sheet opposite to the first. And so in the same way, collect the petals into a bud. Determine the number of petals according to your wishes.
Use threads to tie the bud at the base, thereby securing the flower. The number of flowers is also at your discretion.
Part two - making “leaves” from leaves. To do this, as already mentioned, take the most colorful of them.
First, make sure that the leaves do not curl when they dry. This can be prevented if you iron them before work, placing them between newspaper sheets with an iron. Here another problem arises: the leaves become fragile. But beauty requires care. Place the leaves under the buds in a circle.
Make sure they are laid evenly. Secure everything with the same thread. For beauty, it is recommended to hide the knot. Do this with yellow masking tape. You will receive a neat and complete product.
Method two.
Here you need:
- Maple leaves of different colors (among them should be green)
- Threads
- Scouring wire
- Wooden sticks
- Sunflower oil
Regarding the assembly of leaves, the rules here are the same as in the previous method. But pay attention to the fact that you must also have green leaves. Just as in the first case, divide the leaves by color.
Bend the first sheet across the rachis. Then twist the folded sheet, but so that the core is not compressed, but voluminous.
Arrange the cuttings parallel to each other. Then form a cuff from green (and partially yellow) leaves. Secure the cuff, buds and their cuttings with wire.
In order to decorate the leg, use several wooden sticks, inserting them between the cuttings.
The bouquet is ready.
But in order for it to maintain its brightness and shine. Lubricate it with regular sunflower oil. This brings with it a few more positive aspects.
When the oil is absorbed after two days, the leaves will become soft, they will be protected from drying out and will not lose their attractive shape. If you want, you can go ahead and cover your bouquet with varnish, or treat it with special glue for leaves, which, when dry, will make the entire texture of the leaf clear, all the veins will be visible to you, and the “petals” and “leaves” will play with color.
A simpler option is regular hairspray. Also, to maintain softness and shine, you can use glycerin diluted with water (can cause unpredictable color changes) and simple liquid silicone.
Get creative with your bouquet to give it the perfect look. Try one of the suggested methods, supplement the second.
A new autumn has arrived, and our golden autumn bouquet of roses made from leaves becomes relevant again. This is just some kind of miracle! The reality of unreality is to fold rose petals from a maple leaf!
The author of the idea of making roses from autumn leaves is my colleague, primary school teacher Natalya Yakubova. Unfortunately, her lesson - how to make a rose from maple leaves - was copied from us by many sites without indicating the authorship of these materials...
We are happy to share this art with the readers of Gardenia.ru.
So, a virtual lesson from Natalia: the sequence of making such a wonderful bouquet of roses from leaves, with my photographs and comments.
At the end of the article - advice from our readers who learned how to make a bouquet of roses from leaves.
Making a rose from maple leaves step by step
We collect suitable leaves (too small, dry, diseased, torn leaves are NOT suitable for us) of various colors. To make one flower, it is better to choose leaves of the same color.
We fold the first sheet in half, across the central vein - so that the front side of the sheet is on the outside.
Now we roll this folded sheet into a tight roll. This roll will be the “core” of the rose.

Now we begin to place “petals” around this “core” of the flower. To begin with, we take a leaf, and place the “core” in its center (note that the front side of the leaf is inside the future flower!).
We bend this sheet outward in half. The edge of the bend of the “petal” is located above the “core” by a centimeter and a half. Smooth out the fold of the sheet.
And now we also bend this protruding edge of the sheet outward, but do not smooth out the fold...

We wrap the side edges of this double-folded sheet on both sides around the “core”.
We pinch the lower edges of the leaf at the very base of the flower.
We take a new sheet for the next “petal” and repeat the operation just performed. Only this petal is now placed on the side opposite to the first leaf.

Next, we perform several similar operations, adding new leaves - now the petals are collected into a bud. Add leaves until you think it is enough to complete the flower.
When the bud is ready, we tie threads around its base to secure the flower.
How many flowers there will be in your bouquet is up to you. For this “photo shoot” we had three...

Making a bouquet
Now let’s take care of the “greenery” of the bouquet that frames our roses. The most beautiful and variegated leaves are suitable here.
To prevent these leaves from curling into a tube the next day when drying, it is better to first iron them between sheets of newspaper. After this procedure they will become more fragile, but if handled carefully they will not be damaged.
We evenly arrange the prepared leaves in a circle, placing them under the buds in the hand. Then we fix the now finished bouquet at its base with the same threads.
By the way, you can wrap this knot with yellow paper tape (painting tape) over the threads. The ribbon will hide the threads and make the bouquet look neater and more complete.
Here is our autumn bouquet of roses from maple leaves and it’s ready!
I’ll tell you a secret that I folded one of the three roses in this bouquet :)

P.S.
And here is some advice we received from users of the forum of the site www.eva.ru:
“In order for a bouquet of roses made from leaves to last longer, you need to lubricate the already rolled roses with vegetable oil (with a brush). The oil is absorbed after two days. The leaves become soft, do not dry out, do not lose color and do not shrink.”
Tips from our readers:
“Indeed, leaf flowers smeared with sunflower oil last much longer. Checked: our rose has been standing for a year now, and is still the same beauty :)
By the way, you can add a couple of drops of essential oil to sunflower oil. I added pine and really liked the result. Or you can take orange - it has been proven that it improves mood. Experiment!”
“Sunflower oil will dry out over time and turn into a sticky drying oil.”
Florists use glycerin to preserve various plant materials.
If you put twigs or leaves in a mixture of glycerin and water (3:1, hot water), they will not dry out, but will remain soft. The only thing is that there may be an unpredictable change in the color of the leaves.
You can probably lubricate the autumn leaves with pure glycerin to make them softer. Or liquid silicone."
Julia.
“You can go to the flower department and ask to cover all this beauty with a special varnish, which is used to treat cut flowers when necessary and when not necessary.”
Yu.T.
“You can treat a finished bouquet of roses with regular hairspray :)))
I watched how they make mats from autumn leaves - they are coated with some special glue that makes the entire texture of the leaf clear. Then all its veins become very distinct, and the color of the leaf plays out.”
“At home I have a can of flower varnish (well, to make the glossy leaves of indoor plants shine better). So we coated our bouquet of 11 roses with this varnish, and it turned out really great!”
Tanya
“I was able to secure this stunning bouquet of autumn leaves using melted wax. Roses and individual leaves did not lose their color after this treatment and have been delighting us for the second year!”
Tariel
“We also sprinkled glitter on our made roses, and it turned out absolutely gorgeous!”
“Last fall I painted rose leaves made from leaves with gold paint, and in winter I decorated the Christmas tree with them.”
Here's what happened:

“And in Israel we made roses from sycamore leaves.”
“We don’t have any maples with red leaves in our area. I had to use the wonderful crimson-red leaves of wild grapes both to make miniature roses and to frame the bouquet.”
“You definitely need big maple leaves to make roses. Moreover, if the size of the leaves is different, then you need to start with smaller ones, because for the growing volume of the rose, a larger leaf is needed each time.”
And in conclusion, the last piece of advice from the author of the article: for a large bouquet of hand-made roses you will need about fifty maple leaves, and for a small one - less...
You can make a chic bouquet from such natural material as maple leaves. They have a beautiful soft color and can easily take a given shape.
For those who love roses and crafts made from natural materials tips on creating artificial bouquets of maple leaves. Their shape and structure lends itself perfectly to work. In addition, the leaves are completely free collect in the park together with children - it’s interesting and useful for spending time together.
Useful for work, like fallen leaves, yellowed and still green. You can twist them into such a beautiful bouquet that its beauty can outshine even real roses. Besides, leaf bouquet is durable. We can safely say that such a craft breathes “second life” into dry foliage.
Maple foliage is an ideal material for creating bouquets
Work step by step:
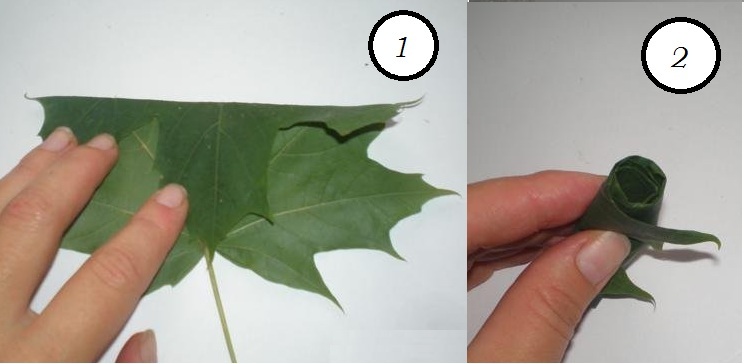
- Take a nice, smooth, clean sheet, place it in front of you and fold it in half. (see photo No. 1)
- Roll half the leaf into a tube. This should not be done too tightly, because the flower needs to be lush and voluminous. (see photo No. 2)

After the core of the flower is ready, you need to start creating petals from other leaves.
Work step by step:
- Take the second maple leaf
- Place the core inside the sheet
- Alternately fold the sharp edges of the leaf so that when folded you get petals (see photo No. 1)
- After you have completely rolled the sheet, you can secure it with thread. (see photo No. 2)
- In order for you to get a voluminous and lush rose, you will need to roll about five or six maple leaves into one flower. (see photo No. 3)
- Secure each new rolled leaf with regular sewing thread, and make several flowers for the bouquet. (see photo No. 4)

 Step-by-step rolling of roses from maple leaves
 To make a flower wrapper, wrap the bouquet in several maple leaves so that their sharp edges stick out in a circle.

 Tube (wrapper) for a bouquet of roses made of maple leaves
 Bouquet with three roses from maple leaves
 How to make a bouquet of roses from maple leaves with your own hands?
Maple leaves in the autumn season are distinguished by a variety of rich color shades:
- green
- yellow
- orange
- brick
- burgundy
- red
- brown
- brown
The more colorful foliage you use to create a bouquet, the brighter and more beautiful your bouquet will turn out.
You can stick to one shade of foliage to get. For example, only yellow or red roses. But it is much more interesting to work with completely different marbled leaves.
Yellow roses from maple leaves:
- Take a small leaf and fold it in half
- Gently roll the sheet into a tight tube
- Take a large maple leaf and place a curled leaf in its center.
- Turn the big sheet back
- Start rolling the leaf so that voluminous petals grow around the core.
- Secure the product with thread
- Roll a large number of roses into a bouquet
- Wrap the entire bouquet with wedge foliage to make the product more luxurious.
 Step 1: Rolling up the center of the bud
 Step 2: Rolling the sheets around the core
 Step 3: Rolling the Petals
 Step 4: Adding Volume to the Flower
 Step 5: Secure the Rose with Thread
  Step 6: Creating roses for the bouquet
 Step 7: Adding splendor to the bouquet
 How to make flowers from maple leaves with your own hands?
The soft maple leaf lends itself perfectly to rolling. You can use it to make a lush rose or a thin bud.
Ideas for creativity, folding flowers from maple leaves:

 Roses from maple leaves, option No. 1
 Large round roses made of maple leaves, option No. 2
 Red roses with a green stem of maple leaves, option No. 3
  Multi-colored roses made from colorful maple leaves
 How to make a bouquet of flowers from maple leaves with your own hands?
The secret of a resilient maple leaf flower is soft sheets, which have not yet dried out enough to break and burst. Fresh green leaves also roll very well.
Maple leaves that are harvested in November are good for crafts - high air humidity and frequent precipitation do not allow the leaves to dry out.
Each leaf you roll to make rose petals should be... consolidate. This is done with a regular fine sewing thread or tape. Just pull it tight without tying it in a knot. How to save maple leaves for crafts?
A well-known way to preserve a maple leaf by putting it in a book, unfortunately, is not suitable for preparing material for creating flowers. In this way, the leaf dries out and makes it quite brittle.
There are other ways to preserve maple leaves:
- Leaves can be wax. To do this, melt the wax of one candle on the stove or in the microwave. After this, the sheet is dipped alternately into hot wax on both sides.
- The paraffin sheet should be left on the newsprint to dry and absorb excess wax.
- The sheet may darken, but will retain its softness, which is very useful for crafts.
- You can also use the sheet “bathe” in a glycerin solution. To do this, dissolve half a glass of glycerin in a glass of water.
- The leaves are completely dipped and then tied and hung to dry. The sheet should be dried for about four days.
Video: “Master class: roses from leaves”
Autumn leaves are an excellent material not only for making herbariums, but also for creating unusual compositions and flower bouquets. From the leaves of maple, birch or rowan you can make beautiful roses that will decorate both the interior and an autumn themed event.
- maple;
- linden;
- birch;
- viburnum;
- chokeberry;
- poplars.
In this case, the foliage should be intact, without obvious damage, and not dry. The material must be malleable and easily take a new shape. The leaves must be aesthetically beautiful: the same or similar color shade, so the color scheme of the bouquet must be thought out in advance.
Procurement of natural material
How to make a rose from leaves so that it lasts for more than one day - prepare the material correctly:
The main thing is not to dry out the foliage. Otherwise, it will break and become deformed when creating a rose.
Master class: how to make a rose
Master classes will help you create a rose from maple, birch leaves and chokeberry leaves with your own hands. In addition to the main natural material, you will need strong threads to attach the foliage into buds. No other special tools are required for this craft.
Please note that any leaves must have cuttings.
From maple leaves
For roses, it is better to choose large maple leaves; too small ones will not work. Within one bouquet, the color scheme of the buds may differ, but for one rose it is recommended to select leaves of the same tone.
Step-by-step instruction:

The shape of the wedge leaf allows you to form a flower in another way:
- the core is made as in the previous version;
- take the sheet and bend its central part inside the wrong side;
- wrap the core with this sheet so that the edge of the previous sheet falls in the middle of the next one;
- continue to form the bud until it reaches the desired size;
- The base of the flower is fixed with thread.
From chokeberry leaves
Chokeberry leaves turn red and brown in autumn, making them suitable for creating bright bouquets. On average, one bud takes 19 leaves, but it is better to have a small supply of them. In addition to the leaves themselves, you will also need a small twig (twig) from the same tree.
How to create a rose from chokeberry leaves:
- Core twisting. Take a small twig and wrap it with a leaf, with the front side facing inward. The base of the core is held with your fingers.
- Creating petals. Take the second leaf and bend it around the stamen, then take the next leaf, gradually forming a bud. The front side of the leaves faces the core.
- Creating a bud. When the flower has reached the desired size, its base is fastened with thread or wire. The rose petals are folded back, fluffing the resulting flower.
- The branches located at the base of the core allow you to form a bouquet that can be placed in any convenient container.
From birch leaves
Birch leaves, both in shape and structure, are well suited for creating roses. For one bud you will need to collect 7-8 leaves of large, medium and small sizes. The color scheme of the material should match, while the soft yellow leaves will allow you to create original tea-colored roses. 
Flower making technology:

From leaves of different trees
When autumn has just begun and there is not much yellowed foliage yet, a flower can be made from leaves of different tree species.
To create the composition “Rose in a Pot” you will need the following materials:
- bright, beautiful, preferably large leaves (loach, maple, aspen or any other) - 15–20 pcs.;
- green maple leaves - 2 smaller, 3-4 larger;
- juice straw (medium size);
- a twig (twig) with leaves in diameter slightly smaller than the juice tube (the tube should fit over it);
- elastic bands for weaving;
- Double-sided tape;
- Polish for hair;
- rose pot;
- plasticine or modeling mass (for fixing the rose);
- earth or ground pine cones.
Step-by-step master class:

Making bouquets from natural materials
The resulting buds can be arranged into beautiful bouquets:

- Maple roses are decorated with large leaves of the same tree, and the color scheme can be very variegated and differ from the color of the buds. To make the leaves even and beautiful, they are ironed, placed between sheets of paper. The prepared leaves are carefully wrapped around the maple buds and secured at the base with a thread. You can decorate the place of fixation with adhesive or rag tape of a suitable shade.
- The flower arrangement will look good in a “vase” made of natural material. For this, half a pumpkin, previously peeled and dried, or a basket woven from newspaper tubes is suitable. You can supplement the composition with bunches of rowan berries, cones, and leaves of other trees.
- If you attach stable cuttings from twigs (branches) to the buds and wrap them with adhesive or rag tape of a suitable color, then such a bouquet can be placed in an ordinary tall vase, decorating it with sprigs of asparagus, bergrass or gypsophila.
How to keep a bouquet of leaves attractive
How to make a rose from leaves is described in detail in the master classes. One more question remains: how to preserve the freshness of the bouquet, because natural material dries quickly and loses its shape.

You can also create roses from autumn leaves. This bouquet will help decorate the interior of your home or a themed party. The main thing is to choose the right material, choose the execution technique and turn on your limitless imagination.
Article format: Vladimir the Great
Video about making roses from leaves
Bouquet of roses from maple leaves:
For the autumn holiday or for Teacher's Day, you can make roses from maple leaves with your own hands. Thanks to the bright colors of the leaves, which can be pale yellow, bright golden, orange, red, green, the bouquet will also appear in a new guise every time.
What will you need for work?
- Maple leaves (freshly picked);
- Threads.
Depending on the structure of the leaves, the end result is not always the same or expected. Soft, thin leaves produce more defined layers and crisp roses. And it happens that the sheet is hard and cracks during work, so the layers of the bud will not be so pronounced, not very clear. But in any case, the bouquet is beautiful and interesting.

How to make roses from maple leaves with your own hands?
Prepare the center. It may be from a small leaf.

Turn it with the front part facing you, then fold it in half, bending the top back.

Roll into a tube, starting from the right or left side. For convenience, you can secure this roll a little with tape.

This is the core of the rose, and the bud needs to be arranged around it. To do this, take another sheet, as in the previous case, fold it in half, then slightly, about 1 -1.5 cm, bend its top back and wrap it around the core. It’s like throwing a blanket on or starting to swaddle a baby.

And then everything is the same. Take the next leaf, a little larger than the previous ones, and wrap it around in the same way, forming a bud. Only in each subsequent case this must be done from the opposite side. That is, you wrap a sheet around the core, pinch the converging sides with your fingers, and then start the next sheet in this area so that the ends meet on the other side. So you need to add about 5-6 leaves one by one. You can do less, but then you will get very small buds. However, they may well also be part of the autumn bouquet.

While working, you need to tightly squeeze the stem near the leaf itself, since the bud always strives to open. As soon as you have added the last, largest leaf, you need to carefully wrap all the stems with threads. Just wrap thoroughly from the base to the middle. If desired, the flower stem can be wrapped in beige, green or yellow corrugated paper.

You can make any number of flowers, from three or more. Then put them together and also wrap the stems with threads or tape.

Finally, the bouquet is complemented with whole leaves, which can be of a variety of colors. For shine, you can apply sunflower oil to each bud, just a little bit, one drop is enough. That's it, your DIY maple leaf roses are ready.

A small bouquet of three flowers.

Chic bouquet of 9 roses.
