Chess is the greatest board game of all time, which does not lose its relevance in the 21st century. In many families, chess sets are passed down from generation to generation, just as teaching the royal game passes from father to son or daughter.
If you don't have a chess set, the easiest way to get one is to purchase one from your local office supply or gift store. However, do not rush to spend money, because you can always make chess with your own hands; this will only require certain available materials, as well as a little time and creative imagination.
Craftsmen once again prove that chess can be made from anything. For these purposes, not only plywood, wooden beams and metal nuts are suitable, but also ordinary A4 sheets or homemade polymer clay.
Thanks to numerous videos in the public domain, you don’t even have to be able to draw beautifully or try to come up with something of your own; just follow the instructions in the master classes exactly, and you will definitely succeed!
Be patient, use your imagination and go ahead!
Carved wooden chess
Do you know how to carve wood or at least have an idea about this process? Great! In this case, cutting out three-dimensional chess pieces using a detailed video master class will not be difficult.
In order to start carving, it is necessary to prepare sketches of future chess pieces (using patterns), a set of tools for cutting (cutters, chisels), as well as materials for polishing and decorating chess.
Having prepared everything you need, you can start watching a series of video tutorials from wood carving master Konstantin Belyaev, who gives precise recommendations on making the following chess pieces:
- pawn:
- horse:
- elephant:
- queen:
The master cuts the chess pieces by hand, using special cutting tools. Linden boards with a width of 25-28 mm are used as manufacturing material. After cutting, the figures should be sanded with sandpaper and, if desired, burned or painted with acrylic paints.
Konstantin also has a video on how to make a chess box:
The master offers to make a chessboard from natural veneer. If you don’t have such material at hand, you can make a chess board from an ordinary piece of plywood and slats for the frame, drawing the cell markings with black acrylic paint.
Giant wooden chess
Today, huge chess sets are especially popular; they decorate spacious halls or the courtyard area. The cost of such chess in stores is off the charts, so many people manage to make them with their own hands.
For giant wooden chess, you will need pine beams (preferably without knots) with a width of 10x10 cm to 30x30 cm and even more, as well as a lathe and sandpaper. Craftsman Valery Grishin will tell you in detail about the process of cutting such chessboards:
Hand-made chess made of polymer clay
Modeling chess from polymer clay may appeal to the fair sex. Undoubtedly, this process is more labor-intensive than wood cutting, but the final result is amazing - with the right skill, the figures turn out incredibly beautiful, with precise depictions of faces and clothes.
In order to make chess from polymer clay, you need the material itself (by the way, you can prepare such clay yourself), as well as special tools for modeling and ordinary food foil for the frames of the figures.
Youtube craftswoman Sveta Vrednaya shows step by step the sculpting of each chess piece in an accessible form:
- frame:
- pawn:
- rook:
- horse:
- Officer:
- king:
- queen
Homemade paper chess
You can make chess using the origami technique from ordinary office or colored paper. True, the creator will need to have skills in this area of handicraft, as well as a developed imagination for making fabulous chess game figures.
Origami chess looks very interesting, the process of creating it is relatively quick, the only drawback is that such paper figures require careful handling. To familiarize yourself with the process, we offer step-by-step master classes on creating chess pieces using the origami technique:
- origami pawn:
- origami horse:
- origami boat:
- origami king:
Children's bright chess made from plastic bottles
You can make chess in a very creative way, and even “waste” material, for example, small plastic bottles, is suitable for this. A stationery knife, acrylic paints, foam balls, famiaran and a little imagination will help you make a colorful board game for children, see for yourself:
As you can see, there are plenty of ways to create hand-made chess, so if you set out to make hand-made chess pieces, choose the option that suits you and get creative! The result will definitely exceed your expectations!
Our step-by-step instruction will help you easily master the game of chess.
It's never too late to learn how to play chess - the most popular game in the world! Learning the rules of chess is easy:
Step 1. How to install the board
Before the game, the board is positioned so that there is a white field in the lower right corner in front of each player.

Step 2. How the pieces move
Each of the 6 pieces moves differently. Pieces cannot jump over other pieces (with the exception of a knight) or stand on a field where there is already a piece of the same color. However, they can take the place of an opponent's piece, which is considered captured. Pieces are usually placed so that they threaten the opponent's pieces with a capture (stand on the square where the captured piece stood and replace it), defend their own pieces that are in danger of being captured, or control important squares on the board.
How to move the king in chess
The king is the most important piece, but also one of the weakest. The king can only move one square in any direction: up, down, sideways and diagonally. The king can never stand on a broken square (where it can be captured by an opponent's piece). When the king is attacked by another piece, it is called "check".

How to move the queen in chess
The queen is the strongest piece. He can move in a straight line in any direction - forward, backward, sideways or diagonally on any number of squares, but he cannot jump over other pieces. If the queen or any other piece captures the opponent's piece, the turn ends. Watch as the white queen captures the black one, forcing the black king to move.

How to move the rook in chess
The rook can move any number of squares, but only forward, backward and sideways (not diagonally). Rooks are especially strong when they protect each other and work together!
How to move the bishop in chess
The elephant can move in a straight line to any number of squares, but only diagonally. During the game, each elephant always moves to squares of the same color (white or black). Bishops work well together because they cover each other's weaknesses.
How to move a knight in chess
Knights move differently than other pieces - two squares in one direction and then one square at an angle of 90 degrees, in the letter "L". The knight is the only piece that can jump over other pieces.
How to move a pawn in chess
A pawn is an unusual piece; it moves and captures in different ways: a pawn can only move forward, but can only capture diagonally. A pawn can only move one square at a time, except for the very first move, when it can move forward one or two squares. A pawn can only capture diagonally one square in front of it. A pawn cannot move or take back. If another piece is directly in front of a pawn, the pawn cannot move forward and cannot capture that piece.
Step 3: Learn the Special Rules of Chess
Chess has several special rules that may seem counterintuitive at first. They were invented to make the game more fun and interesting.
How to promote a pawn in chess
The pawn has one remarkable feature - if it reaches the opposite side of the board, it can become any other piece (this is called "pawn promotion").
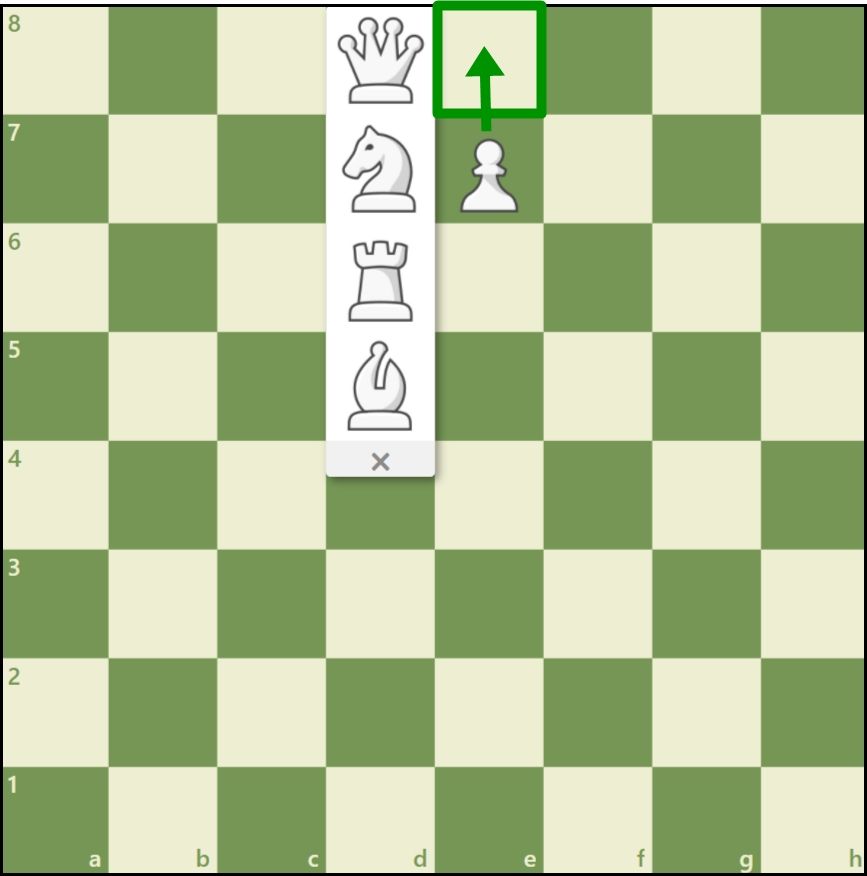
A pawn can be promoted to any piece. There is a misconception that a pawn can only transform into one of the previously captured pieces. This is wrong. As a rule, a pawn is promoted to a queen. Only pawns can transform into other pieces.
How to perform an en route take
The last rule regarding pawns is called "". A pawn that has just advanced two squares in one move from its original position can be taken by an opponent's pawn occupying a square on the same vertical and on an adjacent rank, as if the last move of the captured pawn was only one square that it passed.
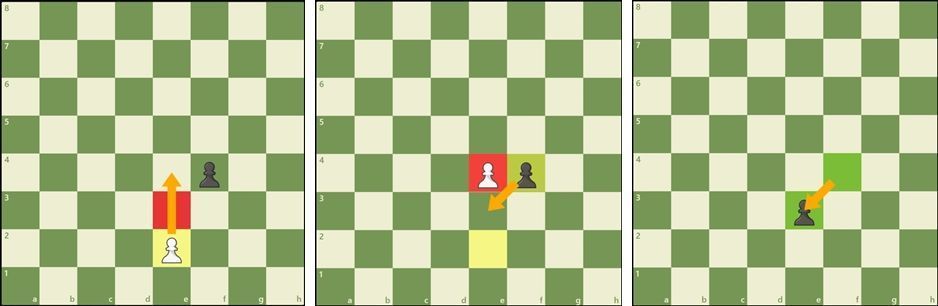
Such a capture is only possible in a move following an advance two squares, and is impossible subsequently. Study an example to better understand this unusual but important rule.
How to castle
Another special rule of chess is called. Castling allows you to do two important things in one move: secure (if possible) your king and move your rook out of the corner, bringing it into play. When castling, a player moves his king two squares towards a rook, then that rook moves onto the square that the king just crossed (see example). Castling can only be performed if the following conditions are met:
- the king never moved before castling
- before castling, the corresponding rook had never moved
- there should be no other pieces between the king and the rook
- the king cannot be in check or cross a square attacked by an opponent's piece
Please note that when castling to the kingside, the king is closer to the edge of the board. This move is called "short castling". Castling to the other flank, across the square where the queen was, is called "castling long". In both short and long castling, the king only moves two squares.

Step 4. Who goes first
The chess player playing with white always goes first. To decide who will play white, chess players usually flip a coin or one of them guesses the color of the pawn hidden in the opponent's hand. Then white moves, then black, then again white, then black, and so on in turn until the end of the game. Being able to move first is a small advantage that gives White the opportunity to attack immediately.
Step 5. Let us remind you how to win a game of chess
A game of chess can end in several ways: checkmate, draw, surrender, defeat by time...
How to checkmate in chess
The goal of the game is to checkmate the opponent's king. Checkmate occurs when the king falls into check and cannot escape. There are three ways to protect yourself from check:
- retreat to another field (but castling!),
- protect yourself from the check with another piece
- or take the piece that attacked the king.
If the king cannot avoid checkmate, the game is over. Usually the king is not taken or removed from the board, the game is simply declared over.
When the game ends in a draw
Sometimes a chess game ends not in victory, but in a draw. There are 5 reasons why a game can end in a draw:
- " " appears on the board if the player who is to move has no possible moves and his king is not in check

When moving the queen to c7, Black is not in check, but he cannot make a move either. The board is stalemate and the game ends in a draw.
- Players can simply agree to a draw and end the game.
- There are not enough pieces on the board to checkmate (e.g. king and bishop against king).
- A player declares a draw if the same position on the board is repeated three times (not necessarily three times in a row).
- The last 50 moves were completed by each player with no pawn advances and no captures.
Step 6: Learn Basic Strategic Techniques
There are four simple things that every chess player should know:
Protect your king
Move your king to the corner of the board, where he is usually in less danger. Don't delay castling. Usually castling should be done as early as possible. Remember, it doesn't matter how close you are to checkmating your opponent's king as long as your king is checkmated first!
Don't give away figures
Don't lose your pieces just like that! Each figure is valuable. You can't win the game without pieces to checkmate. There is a simple system by which most players determine the relative value of each piece:
- Pawn - basic unit - 1 point
- Horse is worth 3 points
- Elephant is worth 3 points
- Rook is worth 5 points
- The queen is worth 9 points
- The king is priceless
These points do not affect the outcome of the game in any way - it is only a system that you can use to make decisions during the game. It helps you understand when it's best to capture an opponent's piece, exchange pieces, or make another move.
Control the center of the chessboard
You need to try to control the center of the board with your pieces and pawns. If you control the center, you will have more room to maneuver your pieces and make it harder for your opponent to find good squares for his pieces. In the example above, White, trying to control the squares in the center, makes strong moves, while Black makes weak ones.
Use all your shapes
In the example above, White has used all of his pieces! Your pieces are useless as long as they are on the first rank. Try to develop all your pieces in such a way as to gather more strength to attack the enemy king. In a game with a worthy opponent, attacking the king with one or two pieces will not work.
Step 7: Practice by playing as much as possible
To improve at chess, the most important thing for you is to play! Whether you play at home with friends or family or online, you need to play a lot to get better. Nowadays it's easy to find opponents online!
How to play chess variations
Although most people play chess by the standard rules, some people like to play chess with modified rules. These are called "chess variations". Each option has its own rules.
- Chess-960: in chess-960 (Fischer chess), the initial arrangement of pieces is chosen randomly. The pawns are positioned as in regular chess, and the remaining pieces behind them are placed randomly.
- king of the hill: In this variant of chess, you can achieve victory by occupying with your king one of the squares in the center of the chessboard, the so-called “top of the mountain.”
- Swedish chess: This game is played in pairs. When one player takes an opponent's piece, his partner can use it. For example, if I play white, and my partner, playing black, takes the white knight from his opponent, then with any future move I can place it on any free square of the board.
- Crazyhouse: A very interesting game where you can use pieces taken from your opponent. For example, if I play white and take a black pawn, it turns into a white pawn, which I can put on the board as my piece with any future move.
- Up to three checks: In this game, the first one to give three checks to the opponent's king wins.

Enjoy these amazing chess variations.
How to play chess-960
How to play according to the rules of chess tournaments
Many tournaments use a set of general, similar rules. These rules do not apply to games played at home or online, but you may still want to use them.
- Touched - go- If a chess player touches his piece, he is obliged to make a move with this piece, if possible. If a chess player touches an opponent's piece, he must take it. A chess player who wants to touch a piece to correct it must first indicate his intention by saying “correcting.”
- chess clock- Most tournaments use a chess clock, which allows you to set the time for the game, not for the move. Both opponents receive the same time for the entire game and decide independently how to spend it. After making a move, the chess player presses a button or lever that starts the opponent's clock. If a player runs out of time and the opponent declares this, the player who overstayed loses the game (if the opponent has enough pieces to checkmate, otherwise a draw is awarded).
Frequently Asked Questions about Chess (FAQ)
This amount of information may be a little confusing. That is why we provide answers to the most frequently asked questions that people who are just starting their journey into the world of chess usually face. We hope you find them useful!

How can I improve at chess?
Knowing the rules and basic strategy is just the beginning: chess is so difficult that a lifetime would not be enough to master everything! To improve, you need to do three things:
- play a lot- just keep playing! Play as often as possible. Learn from every game, won or lost.
- Learn chess lessons- if you really want to make progress quickly, you should take some online lessons. Here you can find .
- Enjoy- Don’t be discouraged if you can’t win all the games in a row. Everyone loses - even world champions. If you enjoy the game and know how to learn lessons even from lost games, you will always love chess!
What is the strongest first move in chess?
Although there is no universally recognized strongest move in chess, it is important to fight for the center of the board from the very beginning. For this reason, most chess players make the first move of one of the central pawns (from the king or from the queen) two squares forward: 1. d4 or 1. e4. Others prefer 1. c4 or 1. Nf3. Most of the other moves aren't as good. Bobby Fischer considered the best move with the king's pawn to be 1. e4.
Which color goes first?
The player with white pieces always goes first.
Can a pawn move backward?
The pawn cannot move backwards. Once it reaches the opposite edge of the board, it can transform into another piece (for example, a queen). The piece you promoted the pawn to can, of course, move backwards.
Is it possible to move more than one piece at a time?
During your turn, you can only move one piece, but there is one exception! When you castle, you move the king and rook in one move.
What is the most important piece in chess?
The king is the most important chess piece. If you lose the king, you lose the game. However, the most powerful chess piece is the queen.
When was chess invented?
The origins of chess are not completely known. According to the most common version, chess originated in India almost two thousand years ago from other similar games. Modern chess has been known since the 15th century, when the game became popular in Europe.
What was the longest game in the history of chess?
The longest tournament game (by number of moves) in chess history was played by Ivan Nikolic and Goran Arsovic in Belgrade, Serbia in 1989.
What is chess notation?
The notation was invented so that it was possible to analyze played chess games. Thanks to it, we have the opportunity to record all the moves of the game and play it back as many times as we like. You just need to correctly record your own moves and your opponent’s moves.
Chess notation allows you to store all your games...
Each square has coordinates, and each piece is designated by a capital letter (K - knight, C - bishop, F - queen, L - rook and Kp - king).
What is the purpose of chess?
Chess is a game between two opponents on opposite sides of a board lined with 64 squares of light and dark colors. Each player has 16 pieces: 1 king, 1 queen, 2 rooks, 2 bishops, 2 knights and 8 pawns.

A board, two chess players and 32 pieces are all you need to start the game.
The goal of the game is to checkmate the opponent's king. Checkmate is a situation where the king is threatened by an opponent's piece (the king is in check) and he cannot avoid this threat.
Unusual? Yes. Elegantly? Yes. Comfortable? Yes. Thanks to the new design with shelves for pieces, you can not only enjoy the ancient game at the table, but also hold chess tournaments in front of spectators.
Starting with cells
1. From 6mm birch plywood, cut four blanks measuring 83x610mm for dark cells A and six blanks measuring 51x610 mm for light cells B (Fig. 1).
Note. We chose birch plywood due to its lack of voids and relatively thick face veneer, allowing for small chamfers on the edges of the cages.

2. Glue together two pieces of 19mm MDF board measuring 152x152mm and 64x152mm to create an L-shaped stop stop. (photo A). Secure this stop with a clamp in front of the saw blade and adjust its position using a light cell blank IN to cut 51mm lengths. Then make 32 dark cells A 51 mm long. Use the remainder of the blank for the dark cells as a template for a new setting of the stop stop. In the same way, cut out 32 light cells B, 83 mm long.

With the light cell blank B next to the saw blade, adjust the position of the rip fence until the scrap fence touches the workpiece, as shown on the left. Fix the longitudinal stop and saw off 32 parts from the blank for dark cells A, placing its end against the stop-limiter, as shown on the right.
3. Make small chamfers on the front side of all squares A, B using a sanding block or small plane. Then proceed to tinting the dark cells (see section “”).
Mark the playing field

Press cells A and B one at a time, using a separate clamp for each of them. A piece of MDF board secured with clamps parallel to the edge of the backdrop C will help to align them.
1. To determine the width of the backdrop WITH, match four dark and four light squares in one row A, B, measure the length of the row and add 12 mm. Cut out a backdrop from a 6mm MDF board WITH specified sizes (Fig. 1). Draw lines parallel to one short and two long edges, 6 mm apart, to mark the boundaries of the playing field. Glue the first row of checkerboards along the top edge of the backdrop, starting with the light colored square in the top left corner (photo C).
2. Cut seven 6mm strips for shelves from walnut boards D. Glue the edge of one shelf to the backdrop C close to the first row of cells A, B (Fig. 1).

Carefully install the clamping device so that cells A and B do not move, and, squeezing its ends with clamps, leave until the glue dries.

The dimensions of cages A, B and shelves D may differ from those shown, so the position of shelf G may change. Mark it on the walls of the case after assembling the playing field A-D.
3. To glue the next row of cells in place A, B, make a clamp by gluing two blocks measuring 38x76x457 mm with a 12 mm spacer at one end (photoD). Continue gluing cages and shelves D to the back WITH until the completion of the assembly of the playing field. Note. Apply the adhesive in a thin layer to avoid squeezingsurplus, due to which the clamp can stick to the cells.
Checkerboard framing
1. Cut out the side walls from 12 mm walnut planks to the specified dimensions. E, top bottom F, shelf G, cornice H, base I and false panel J. Select a 6mm deep tongue on the inside of the sides, top and bottom to insert the backdrop WITH (Fig. 1 and 2). Then cut 12mm seams along the ends of the side walls.
2. Insert the game board A-D into the tongue of the side wall E by aligning the top row of cells A, B with a shoulder of the top fold. Mark the position of the shelf G (photo E). Saw out grooves in both side walls for inserting a shelf.
3. Dry assemble the housing (without glue) to check all the parts surrounding the playing field and adjust them if necessary. If dry assembly was successful, apply glue and secure the body with clamps.
Quick tip! DTo glue the case together, you will need a lot of clamps, so it is advisable to divide this operation into stages: first glue the shelf and the game to the side wallsfirst margin, and then reattach the top and bottom.
Add a figure box
1. Saw the side walls out of 6 mm walnut planks TO, front and back walls L and bottom M (Fig. 3). Make 3mm tongues and grooves in the sides of the box (Fig. 3 And 3a, photoF). Then cut 3mm folds along the ends of the front and back walls, as well as along the perimeter of the bottom. After assembling the box dry, check the connections of the parts, then glue and secure with clamps.

2. When the glue has dried, tilt the saw blade at an angle of 35° and saw the back of the drawer from above (Fig. 3a). With the saw blade vertical again, take the previously cut panel J and make a cross cut in the middle with a depth of 3 mm (Fig. 3). Glue the false panel to the front wall L.

Wrap a piece of masking tape around the drill bit, 19mm from the tip. When the flag touches the board, the desired hole depth has been reached.

With one setting of the sawing machine, you can cut out not only tongues in all walls of the box K, L, but also grooves in the side walls K.
3. Insert the drawers into the body A-G and drill holes for the axle pins that will be installed later. To ensure that the box rotates freely, place a 1.5-2.0 mm thick spacer under it (we used a steel ruler) and secure one side with small wedges. Using a 6mm center point drill bit, make a hole 19mm deep (Fig. 4, photoG). Then make the same hole on the other side. Drill 3mm holes in bezel J to install knobs (Fig. 3).
 Add decorative details
1. Mill fillets with a radius of 10 mm along the ends and leading edge of the cornice H. Glue it on top to the body, aligning the side overhangs (Fig. 1). Mill 10mm fillets on the outer edges of the base I and glue it to the body from below.
2. Make two mounting strips N, sawing a piece of board measuring 19x152x406 mm lengthwise at an angle of 45°. Glue one of the strips to the backdrop (Fig. 2).
3. Apply a colorless coating by spraying (we used semi-matte nitro varnish), and after drying, install the button handles.
Quick tip! Before installing brass axle pins, Insert wooden dowels instead and make sure the drawer rotates freely.
Prepare two 19mm brass pins with a diameter of 6mm and insert them through the holes in the walls E into the axial holes of the box J-M. Finally, secure the remaining mounting strip to the wall N to hang your game board, place chess pieces (no more than 76 mm high) and invite your opponents to the tournament!

 How to make chess squares dark
To achieve a deep, rich dark color on light wood such as birch or maple without hiding the grain, use a combination of stain and stain. Here's how we stained the dark A cells: Using a foam brush or cloth, apply a generous amount of water-soluble Cuban Mahogany aniline dye, let it soak in, and then wipe off the excess liquid. Water causes the lint to rise on the wood, so once dry, we lightly sanded the pieces with 320-grit sandpaper before applying stain again. After a few hours, when the surface of the parts was completely dry, the stain-gel was generously applied with a cloth swab, allowed to soak in for a few minutes, and then the excess was wiped off and left to dry overnight.


Black and white love: how can you make original chess with your own hands? / DIY toys, patterns, videos, MK
Chess is one of the most mysterious and greatest games of all time. Shrouded in ancient mystery, black and white figurines continue to excite the minds of countless people across the planet. The favorite pastime of sultans, kings, shahs, emirs and other powerful people has not lost its relevance today. 


Great game
Chess helps you learn to think logically, carefully, and calculate your actions many steps ahead. There are different variations of materials for the figures and boards: they could be made of gold and other precious metals, black, mahogany or ebony, ivory, crystal, inlaid or decorated with precious stones, mother-of-pearl and semi-precious stones. In the same way, many execution options are known: in the form of fighting armies belonging to a particular historical era, in the form of famous people, various animals, characters from favorite films, etc. However, the chess order remains unchanged - 32 pieces (16 white / light and 16 black/dark) on a field with corresponding 64-square cell markings. It is not at all necessary to save up for gold chess, because today they can be made from literally anything. If you know how to carve wood, then it is quite easy to carve wooden figures with your own hands. It’s even easier to cut them out of plywood or glue them from thick paper using a stencil. 

 Special craftsmen make chess sets from the insides of a computer (the motherboard for the board and chips in the form of figures), from electronic vacuum tubes, from plastic, glass, LEDs or neomagnets, etc. Use your imagination and go ahead.
How to make chess with your own hands: manufacturing options
One of the most popular options for homemade chess technology is cutting them out of plywood.
- Take sketches of the shapes, a ruler, a pencil, a strip, plywood and carbon paper. You will need to transfer the images onto the plywood first. To do this, place copy paper under the sketch and carefully trace all the figures in full using a pencil.

- The next step is to cut out the flat shapes that you have drawn with a jigsaw. The holes will also have to be cut out, having first marked them: their thickness should correspond to the thickness of the plywood, and their length should match the length of the other product. The hole can be made using a drill or awl. It is better to leave a margin of 1 mm at the joints so that the figures fit more tightly.

- You should get 32 figures and stands with holes - in the same quantity, and another 30 round parts-blanks for future checkers. All of them will need to be sanded using sandpaper.

- Next, proceed to assembly. Attach the figures to the stands using glue.
- Then separate half of the elements and paint them with black acrylic paint. Leave them for a while to let the paint dry.

- The chessboard can be made from a piece of plywood (4 mm thick is suitable). You will also need slats. Cut out two blanks (400*200), and make frames from the slats - in the same quantity and in the same sizes. Glue plywood blanks to them, and place hinges between the halves so that the board opens and closes well. Using a stencil, apply numbers, letters, and make “cell” markings on the surface of the board. And inside the board you can draw markings for playing backgammon. Paint the side parts with red acrylic paint.
 For figures, take plywood 3 mm thick. Make sure there are no cracks or knots on it. Apply the varnish in two layers so that the resulting color is more presentable. To make the chess set voluminous, you will need more skills and abilities, since you cannot do without wood carving. For the light side, you can choose the following species: boxwood, birch, ash, maple, hornbeam, and for the dark side, walnut, ebony, apple tree and others are well suited. If this is not possible, then it is easier to make all the figures from linden, for example, and then burn them or varnish them. Using “Dutch” carving, you can do without a lathe. To do this, you will need square bars of various sizes: blanks for future figures:
- cut out chess stencils from cardboard and transfer them to the edges of the blanks (for the knight you will need two views - from the side and from the front);

- to get the profile of the figure’s leg, drill it out by holding the workpiece in a vice (different figures will require drills of different sizes);

- cut out the shapes along the marked lines using a jigsaw (watch the profile of adjacent faces and leave bridges on them);

- Having carefully cut out all the figures, remove excess wood and process the surface with a file (you can sand it with sandpaper);
- The finished chess pieces need to be soaked in hot drying oil and coated with the appropriate varnish (the black pieces will first need to be tinted with stain). To make them stand better on the board, you can glue pieces of felt, plush or thin suede to the legs.
Having the desire and imagination, chess can be easily made from paper using the origami technique, from wine peels or bottle caps, and even molded from plasticine.
Some nuances
A chess set can be very large: such pieces are considered to be outdoor or garden pieces. That is, they can be placed as an element of landscape design to play a party or two in the fresh air. There are also mini-sets that are easy to take with you on the road or travel. But the most common size of the figures is the classic measurement: the king has a height of about 7-10 cm, and other figures decrease in size, depending on what rank they are. Take into account the height of the base when working. As you can see, making chess with your own hands is quite simple. It doesn’t matter at all what material or theme you choose for your set, the main thing is that it will be created with love and soul, which means that the “royal game” will reveal its innermost secrets to you a little...
Comments
Related posts:
How to make a deer with your own hands, how to sew, from bottles, from wire / DIY toys, patterns, videos, MK
I really like to play checkers and chess. And my board is the most ordinary one. To be honest, I'm already a little tired of her. That's why I decided to create something new. I looked at a wide variety of patterns and instructions for creating a chessboard with your own hands. I chose the best option and got to work. I am simply delighted with the result. My homemade product turned out to be so elegant and convenient that I did not even expect it.
For making a chessboard with your own hands I spent a lot of time, which I never regretted. Those things that we make ourselves will never go out of fashion and will never cease to please us.

The squares on my chessboard are made and attached individually. The square tiles are made from Maple and Cherry which need to be individually cut, then rounded through a router, hand sanded (3 steps) and finally glued into place. Many people will recommend using fiberboard or MDF because of its smoothness, but I don't like what it turns into when it gets wet. So I used birch plywood.
How to make a chessboard with your own hands
Step 1: Gather all the lumber.

The chessboard consists of 64 squares located on the playing field. Here are 8 rows and 8 columns, with 32 tiles of each color. I used thick cherry and maple.
So to break it you must have 1 board of each color 1.5" X 53".
I started cutting boards with a finished width of 1.5".
Step 2: Cut each square tile.

Carefully saw each square, then mark it with numbers. Once all 64 tiles plus a few extra tiles for each color have been cut out, you can move on.
Step 3: Round the top edge of each tile.

Round all edges of square tiles using a router. Do this carefully and slowly, otherwise burns may appear on the tiles that cannot be eliminated. Once you have rounded all 256 top edges, i.e. 64x4, get rid of any sawdust that appears on the tiles.
Step 4: Sand the tiles by hand.

Sanding takes quite a long time, so you can leave this job until the end. For convenience, you can hold the tile at a slight angle and move it along the sandpaper. It took me about 4 hours to sand.
Step 5: Polish the edges of each tile.

Step 6: Glue the tiles onto the plywood.


When you glue the tiles, be careful with the amount of glue, do not overdo it. After you have applied a drop of glue to the tile, carefully glue it to the intended place. When the last tile is glued, lay wax paper on top, then cover with a towel. After these procedures, place a flat granite slab on the structure so that the weight of the tiles adheres well. Leave it like this overnight.
Step 7: Adding Trim.


Now I need to make a frame for the board to hide the ugly parts of the plywood. For this I use walnut boards. The drawings will show you the process of working on the frame for the board. Unsightly parts of the plywood should be removed or covered.
Step 8: Adding More Trim.

To make your board look even more beautiful, add another layer of frame, but in a different color.
Step 9: Decorating the corners.
Decorate the corners following the designs.

Step 10: Making the legs for the board.
