Ordinary clay, of course, is a completely different material in terms of plasticity, weight, and texture. But the imitation made from polymer clay is quite convincing. This does not require complex tools. I use a metal knitting needle, a wooden sculpting stick, a bamboo skewer broken in half for texture, and a sharp knife. Instead of a wooden stack, you can use the back of a brush or any object with a rounded tip. I immediately choose a shade like baked clay; it does not change during the work. This is a color not from the pack, a mixture of beige, chocolate and a little red.
Of course ordinary clay is a completely different material taking into consideration its toughness, weight, texture, but you can imitate is by polymer clay quite realistically. You won't need any specific instruments for this. I use a metallic knitting needle, a wooden stake for molding, a brushy bamboo skewer to add texture to clay and a sharp blade. Instead of the wooden stake you can use the wooden part of a brush or any other alike item with a dull roundish tip. I choose the color of clay from the start. It won't change in the process. I mix the following colors to get the color of baked clay: beige, chocolate and a bit of red color.
I will decorate a square candlestick, you can even use a glass jar, in the end it will be completely hidden under the clay.
Roll out the clay to the thinnest thickness. Cut it into the shape of a cup. I don't use a pattern, I just lay it on and cut it to shape.
I chose a candle holder to decorate. Actually you can use any glass cup. Its surface will be completely hidden under clay. We roll the clay as thin as possible. Then we cut the needed form to wrap the glass. I don't use stencils. I just cover the glass with the rolled layer of clay and cut.

At the joints I trim off the excess with a knife and roll it with a knitting needle like a small rolling pin. If debris sticks to the surface during work, it can be removed with wet wipes, and they can also be used to smooth the surface. At the same stage, it is worth getting rid of air bubbles between the glass and polymer clay. They are visible in the previous photo. To do this, simply stroke the surface from the center to the edges. If the bubbles are left, not only will they be visible from the inside, but during baking the air will expand and the polymer clay will swell if there is no way out.
At the seams I cut away the excess clay and roll with the knitting needle like with a small rolling pin. You can get rid of dust from the surface of clay by wet wipes. They can also help you to smooth the surface. It’s high time to choke out air bubbles that appear between the glass and the clay. You can see them at the previous photo. Work from the middle to the ends. If you don't choke out air bubbles before curing, the air pockets will expand while baking and misshape the clay surface.

After that I move on to the texture. Different effects can be achieved using available materials: sandpaper, toothbrush, salt. I just press with a bamboo stick, it is hard, gives a deep texture, its gaps will be visible even while the candle is burning:
Now I get down to the texture of the surface. Different effects can be achieved just by simple tools and materials like sanding papers, tooth brushes, salt. I just press with a bamboo skewer. It is firm enough to texturize deeply. While burning the candle will gleam through the textured clay.

After that I make the stems. I chose a very simple drawing. Using a knitting needle or a toothpick, I press the strips almost all the way to the glass. They will also glow later.
Then I texturize stems. The pattern is quite simple. I press a knitting needle or a toothpick on the clay almost down to the glass. Later these lines will also glow.

Using a round stack I make round “flowers”. To do this, I simply press and then twist a little to widen the hole.
I press down with the roundish tip of the stake and spin it a bit to expand indents, forming round flowers.

I press the points with the sharp end of the knitting needle, and also try to reach the glass. The more holes, the stronger the glow. Drawing is limited only by imagination:
With a pointed tip of the knitting needle I press down dots as dipper as possible. The more indents you’ll do, the more shiny the candle holder will be. The pattern is limited only by your imagination
 Well, everything is ready, you can bake. The next photo shows the candlesticks in use. I couldn’t fully convey how all the patterns glow, but believe me, it’s very cozy) On the right side, the glass is tinted with oil paints. The surface after texturing is very good for tinting. you can use acrylic (not all, Ladoga is definitely suitable, but Decola reacts and begins to stick over time), oil ones, although they take longer to dry, but any can be used; gouache ones are definitely not suitable for plaster. I tint with my finger almost dry paint, maybe in several layers.
Now our candle holder is ready for curing. At the photo you can see the ready works. The photo doesn’t reflect fully glowing patterns but believe me such candle holders will help to create quite a cozy atmosphere at your home. The candle holder to the right is an example of applying oil paints to a cured item. Texture accepts paints easily. You can use acrylic paints but not all of them are suitable for use on polymer clay. “Ladoga” acrylics perform well with polymer clay. “Decola” acrylics are chemically unsuitable. They make the surface sticky. You can use any oil paints but keep in mind that they need more time for drying. Gouache paints are not suitable at all. I dab dry paint on the clay with my finger. You might need several applications.
 There is a fish in the next photo, it is also made from FIMO. An ordinary stone is wrapped inside it to save material and make sculpting easier. The surface was initially smooth, not very suitable for tinting, I rubbed it with coarse sandpaper after baking, and tinted it with oil paint with the addition of linseed oil. Here I showed in more detail about this type of coloring, I will not repeat myself.
At the next photo you can see a fish. It is also made of “Fimo” clay. There is a stone inside it to economize clay. It also simplifies the molding process. At first the clay surface was smooth and wasn’t suitable for applying paint. I rubbed it with a coarse-grit sandpaper and applied paint with linseed oil added. In this tutorial you can find more information for paint application.
Do not rush to tint immediately after baking, let the clay cool, since immediately after baking it is fragile, especially if there are small parts simply stuck to the surface, checked.
Don't hurry to apply paint. Leave the clay along for a while to chill. After baking the clay is brittle, especially if there are any details attached to the surface.

And it looks out against another background:
Here is another photo with the fish on it:

Good luck and have a creative weekend! If you have any questions, write)
Good luck! Wish you inspiration! If you have any questions, let me know.
Small vases are great for storing keys and small items. They can also be used as a container for jewelry and costume jewelry. In this article we will tell you how to make an elegant vase or candlestick from ordinary clay or plaster. Our products will be made in the form of leaves, so they will organically fit into any interior. Another advantage of the described technique is that all the necessary materials are available to everyone.
Note: the sizes and shapes of vases and candlesticks can be very diverse. It all depends on the choice of leaves that will serve as templates.

Materials and tools:
- leaves
- clay that does not require baking, or gypsum
- rolling pin
- construction knife or scalpel
- glossy varnish
- paint brush

How to make vases and candlesticks from clay
Take a small piece of clay and use a rolling pin to roll it into a thin layer. The thinner the layer of clay, the thinner the walls of the vase will be. But the thickness should still allow all the veins of the leaf to be imprinted into the clay without making it too brittle.

Place the leaf face up on top of the clay layer. Make sure that the edges of the leaf do not protrude beyond the boundaries of the clay.

Using a rolling pin, gently roll the leaf into the surface of the clay.

Holding the edge, remove the leaf from the clay layer. A clear imprint of veins should remain on the surface.

Using a construction knife or scalpel, trim off the excess clay, following the contours of the print. Try to do this as carefully as possible, do not touch the clay with your hands so as not to leave imprints on the clay that has not yet hardened.


Carefully lift the layer of clay and place it inside the bowl or saucer. This will give the clay the desired bend.

Leave the clay to dry overnight. In the morning, remove the clay from the bowl, turn it over and place it on the bottom of the inverted bowl so that the bottom layer of clay dries out.

After the clay has dried, the product can be painted or varnished. It is advisable to apply the coating in 2-3 layers, allowing each to dry before applying the next one.

Original article in English.
On dark winter evenings we need comfort and warmth more than ever. The coziest things in winter are knitted items, and the most vibrant warmth in the apartment comes from a candle. All this can be combined in original handmade candlesticks, and the key to the longevity of your work will be the material - polymer clay.
Materials and tools for work
- polymer clay in the colors you like best. I used white, blue and blue colors
- working surface: glass or ceramic tiles with a flat, smooth surface
- knives for polymer clay
- extruder (metal syringe with nozzles for plastics)
- baby food jars without lids
- candle tablets
Modeling from polymer clay
Knead thoroughly and warm the polymer clay in your hands. If you, like me, decide to use white color to decorate your candlesticks, it is best to pass it through the extruder first so that it does not mix with other colors if they suddenly remain in the extruder after cleaning. If your colors complement each other, you may not need to clean the extruder very thoroughly between uses of different colors, or even not clean it at all. But if you chose contrasting colors, thorough cleaning is required.

To create one “knitted” cover of our candlestick, you will need enough plastic to fill approximately half of a standard extruder. I use a fine hole extruder tip, but you can make a larger "knit".

To get the effect of “melange yarn” you need to mix equal parts of any two colors, but without mixing until they are the same color. I used white and blue.

As a result, they are mixed chaotically in the extruder, and at the output we get two-color “threads”.

Now the most interesting part of the work, but at the same time requiring accuracy and patience, is turning our “threads” into a “knitted” pattern. To do this, we twist two “threads” together. We twist two more in the opposite direction. For some reason, it is very difficult to turn the second part in the opposite direction. I almost always confuse the direction, so at first I twist it just a little and check whether the work is going correctly.

Now we combine two twisted threads, making a “pigtail” pattern.
This is the main element of our candlestick case. If you are familiar with knitting firsthand, you can now use your imagination and create any patterns, just like in regular knitting, only without using knitting needles.

The base of our candlestick will be a baby food jar. You can take any other beautifully shaped glass jar.

The cover of this candlestick will consist of different pieces of “yarn”. Therefore, we decorate each piece along the edges simply with two twisted “strings”. This gives neatness and completeness.

Now I'll show you how to make a two-strand braid. We take a “thread” of white and blue colors and twist it together. We do the same with two more, but always in the opposite direction. In such a braid, the turns must be combined especially carefully, otherwise the whole effect will be lost.

From this type of “yarn” I got this piece.

Even using only three colors allows you to imagine as much as you like.

And to create a particularly romantic effect, you can deliberately lay the “threads” loosely or experiment with the “yarn” pattern.

Bake in the oven according to the instructions.

Now we will decorate the neck of the jar, trying to close the not very beautiful place where the lid was screwed on. It is necessary that in this place the plastic does not get on the inside of the jar for fire safety purposes. When exposed to an open fire, plastic can melt or even catch fire.

Bake in the oven for 15-20 minutes at 130 degrees according to the instructions. After this, the jars will remain intact and unharmed if they are not cooled sharply. It's best to let it cool directly in the oven. If you are using the same oven as for cooking, you will need to use a baking oven to bake the polymer clay.

For this candlestick I made the cover one piece. But the cover made of pieces after baking needs to be checked for strength, and, if necessary, glued directly to the jar. For this I use Cosmofen glue.

The holes that remain in our “yarn” in places where the “threads” do not fit tightly together allow the light from the candle to penetrate outward and form beautiful patterns.

And if you intend to loosely adjust the “strings” or experiment with the “yarn” pattern, then a spectacular and romantic evening is guaranteed.
It’s especially wonderful when the comfort in your home is created with the help of homemade items. Today we invite you to start creating very beautiful candlesticks using different techniques. Use your imagination: you can combine different techniques together and get amazing results.
Candlestick made of polymer clay
You will need:
a piece of polymer clay of the desired color;
a special knife or other cutting object;
rolling mat;
stencil with a pattern;
special paper for clay;
a bottle to give the desired size and shape to our product;
a sheet of sandpaper;
a needle with which the design will be created.
Work order: 
Frame. To do this, roll out a layer of 5 mm thick from a piece of clay with your own hands. Align the edges of the layer. Its width should correspond to the height of the future product. Wrap the bottle in clay and secure it where the edges overlap. Trim off the excess.
Drawing. You can do it yourself or use a stamp (). We apply the sheet with the design to the frame and press it in. Take a needle, awl or other similar tool and make holes along the contour of the design. The distance between the holes is about two millimeters. It is desirable that the needle enters perpendicular to the surface of the product, and not at an angle. You can use multiple designs to ensure there are no large bare areas on the candle holder. 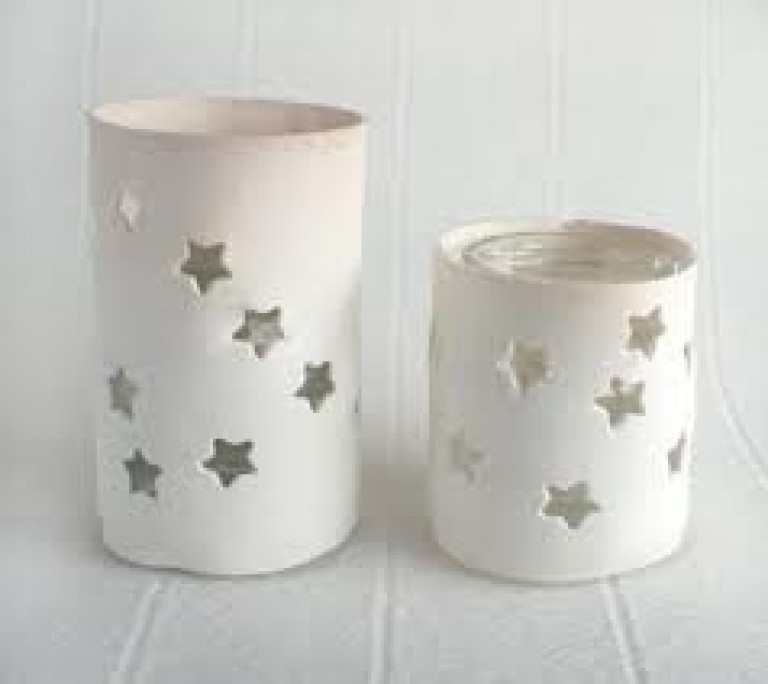
Making the bottom. You can make a circle-shaped base in advance. When the frame is ready, attach the bottom to the product and connect the edges, trim off the excess. To create smooth transitions of lines, smooth them with your fingers dipped in water.
The final stage. Wait for the clay to dry. Use sandpaper to sand all edges and seams. After this, you can use the candlestick.
Magic candlesticks made from glasses or jars
 A handmade item like this looks like a fairy tale and is perfect for the decor.
Take the following:
several glass glasses or jars (can be of different sizes);
a lot of beads or bugles of the desired color;
glue;
hairspray with glitter.
Technique:
Pour the beads into a wide, flat bowl;
Lubricate the outside of the jar or glass with a thick layer of glue;
roll the jar in beads or glass beads;
We also grease the neck and top with glue and sprinkle with glass beads;
we leave our handmade candlestick to dry;
For greater shine and reliability, it is recommended to spray the product with glitter varnish.
How to make a candlestick from a CD and pebbles for decoration
 Take the following items:
unwanted CD;
candle-tablet;
transparent pebbles for decoration (can be different in shape and color);
polymer or any other colorless glue;
plastic bottle or cylindrical tube.
Execution order:
Let's start making a candlestick from
DIY CD from what we apply thick layer of glue onto the surface of this (on the mother-of-pearl side) along the edge.
First row: fix the pebbles with glue, placing them tightly against each other. You can use both square and round stones. Holes and voids between such “bricks” are filled with transparent glue or sealant. To ensure that the walls run smoothly and do not warp, place a bottle or other cylindrical object in the middle. 
Second and subsequent rows pebbles are laid out similarly to the first to the desired height. Leave the candlestick for several hours to dry. After that it can be used.
Wooden candlesticks
 Let's look at how to make a candlestick from a natural material - wood.
From branches.
Take a good beautiful branch and a special drill for cutting circular holes. The diameter of the drill attachment is 3.8 cm.
Make marks on the branch (desired locations for the candles). Drill the holes. Clean the wood from sawdust and dust. You can insert candles.
With an image.
Take a wooden block in the shape of a cube, white paint, stickers in the shape of circles, a drill with a nozzle of the same diameter as the thickness of the candle.
Mark the drilling location and make a hole about 25 mm deep. Around the circle of the timber, make a kind of “belt” of circles, gluing them overlapping. Paint the bottom of the cube. When dry, remove the paper stickers. Your handmade wooden candlestick is ready - you can insert and light the candles.
In a similar way, you can make cylindrical coasters or with a different pattern.
From a tin can
 You can make a beautiful and unique candlestick with your own hands and from an old tin can.
Take:
tin can;
drill;
spray paint of the desired color (golden or silver will look impressive);
masking tape or cling film;
colored paper or cardboard;
glue;
sharp small knife;
stencil with a pattern.
The procedure for making a product with your own hands:
Cover the inside of the jar with film;
paint the product, maybe in several layers for greater color saturation;
after the paint has dried, stick a stencil with a design on the jar;
Drill holes along the contour of the picture;
Glue a piece of colored paper on the inside so that it does not cover the drawing.
The candlestick is ready for use.
Candlesticks are easy and quick to make. They will decorate a formal table and become an elegant interior decor.
Material:
- Self-hardening polymer clay (FIMO Air Light, for example)
- Glass jars
- Modeling tools:
- Work surface (acrylic, glass board)
- rolling pin
- Round cutters (they can be replaced with a cap from a felt-tip pen, spray, ...)
- Blades
- Toothpick or awl.
Roll out the polymer clay to a thickness of 4 mm. Carefully trim the edges with a blade to create a rectangle.


Carefully “wrap” the clay around the jar and cut off the excess, making sure the edges meet butt.
Smooth the seam with wet fingers. You can smooth out any unevenness with a silicone brush, so if you have such a tool in your arsenal, great; if not, you can do it with your fingers too.


Cut out the circles. Using a toothpick, remove the clay from the resulting holes.

Leave the candle holders to dry for 24 hours at room temperature.
Ready:-)
You can decorate a candlestick made of self-hardening polymer clay with gold leaf, powder, and paints. This is just an idea that you can improve to your taste.