Did you pick up all sorts of feathers as a child? Yes? After all, they are so diverse, attractive, different colors, lengths and shapes, fluffy or thin, neat. Feathers are an incredible work of nature, a symbol of lightness, which is always useful if you are a lover of needlework, if you like to decorate and decorate. But in order not to injure the birds by pulling out the most beautiful feathers from their tails, let's try to make them ourselves.
How to make a feather from paper?
It's very simple, for this we need:
- a sheet of white or colored paper;
- scissors;
- glue;
- toothpick;
- pencil.
How to make feathers with your own hands? Take a piece of paper, for a medium-sized feather, cut out a piece about 15 by 10 cm. Fold it lengthwise and draw an arc with a sharp end near the fold. Feathers come in different sizes, some flare out towards the end and some maintain a flat shape. Draw the shape of the future feather that you like. Cut along the outline.

All that remains is to give the workpiece a finished look. Cut the edges into thin strips, moving from the sharp end at an angle downwards. Do not make too deep cuts, cut into 2/3 halves.
Feathers are fluffy and even. If desired, give your feather fluffiness by twisting several paper fringe ribbons in different directions.
You will need a toothpick for the pen shaft. From the remaining paper, cut a ribbon about a centimeter wide. Apply glue to one side of the ribbon and wrap it around a toothpick. You can also use a match. Glue the finished rod to the product on the inside fold. This way you will get a medium feather that you can easily find a use for.

Another way
How to make a feather of an unusual shape? For example, curved or Simple. You have several options. Draw the feather by hand, marking the cut locations with thin strokes, or use ready-made printed stencils. Cut out the feather carefully using small nail scissors, a blade or a utility knife.

Decor
You can, of course, leave the feathers white or cut them out of colored paper. But what if you want something bright, colorful, with shimmer?
The feather needs to be painted. Be careful, it’s not in vain that we pay attention to this topic. To make a bright feather, first color the sheet from which it will be cut. The fact is that if you use markers or watercolors, the liquid will curl or soften your feathers and tear if you move awkwardly. Watercolor is a good way to create a leaf with iridescence. You can also use a sponge or sponge to create a blur between colors.

Add sparkles, stars and inscriptions as soon as you cut out the feather, but it’s better to decide on the color before you pick up the scissors.
Material Variations
Such feathers will definitely come in handy in decorations, in various crafts, and for decorating gifts. How to make a feather attractive, presentable, unusual? What other material can you use to create something interesting? Use foil. It produces iridescent bright products.

Newspapers, pages of magazines and books will come in handy. Try decorating your gift with feathers cut from old American newspapers or a music book.

Combine colors and materials, and then you will get an interesting decoration. Good luck!
A delicate and weightless feather, made with your own hands from paper, looks just as good as a real feather. Paper feathers are widely used in the design of cards, gift wrapping, large feathers are collected into unique bouquets and placed in vases, feather garlands are made... I think every craftswoman will find a worthy use for this original decor.
To make feathers you will need:
Thin but fairly dense cardboard, designer paper with a print, or even the thinnest rice paper - the choice of paper directly depends on the further use of the pen;
- Scissors with thin and sharp blades or a stationery knife and ruler;
- Wooden skewer or metal knitting needle;
- Template for pen;
- Paints, glue, glitter and other decor for decoration (optional).
First, prepare a template for the future feather - use the ready-made templates presented below, or draw your own, then carefully cut it out. Lay out the feather template on the selected paper and, using a wooden skewer or knitting needle, transfer the contours of the feather, pushing through the outlines (the contours of the template can also be transferred to paper using a simple pencil, but in this case the finished pen will not have a very beautiful outline).

Carefully cut out the feather along the pressed outline. If your feather has a more or less even shape, bend the workpiece in half lengthwise, press the fold with pressure with a skewer or knitting needle and, without straightening the workpiece, make very frequent cuts along the edge, not reaching the fold about 1-2 mm, depending on the size of the feather. If your feather is curved, press the central shaft of the feather with a skewer or knitting needle and then make frequent symmetrical cuts along both edges.
To get very thin, most realistic cuts, it is recommended to make them under a ruler with a blade.

If desired, after completing the cuts, the feathers are decorated with sparkles, small beads or tinted with paint.
All photographs were found on the Internet, all author's logos were preserved. I propose to consider photographs without indicating the author’s name as folk photographs. If you know the name of the author of an unsigned work, write in the comments and in the near future I will definitely sign his work.
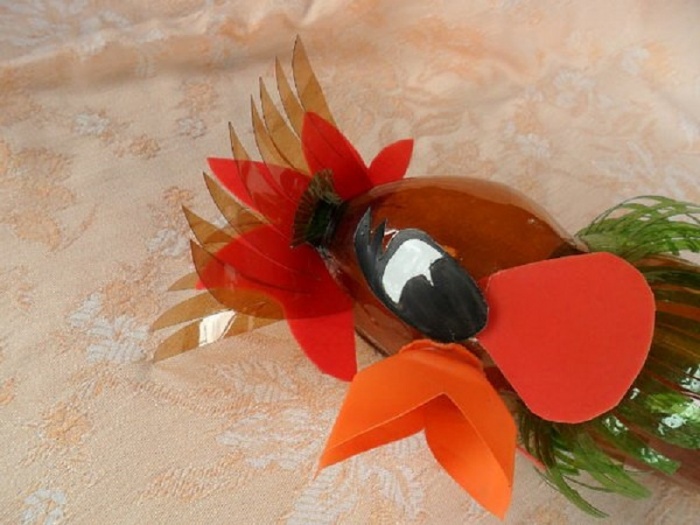
As you know, plastic bottles come in different sizes, shapes and colors. This allows you to create a wide variety of crafts from them: both the simplest, such as vases, targets, blades, and quite voluminous and complex - figurines of animals, birds, even furniture and entire houses. So we came up with the idea to teach you how to create a fairy-tale character - the Firebird craft, a master class will be given in this article.
We must admit that this task is not an easy one. After all, the firebird is a fairy-tale character, he is fictional. You won't find anything like this in nature. She was only seen in pictures in children's books. This is how she is in our imagination.
Firebird made from plastic bottles: master class
But we are not used to retreating from our intended goal. In nature there is a bird very similar to this fairy-tale character. This is a peacock. We will take this as a basis. So, the lesson begins: how to make a firebird from plastic bottles.
As an example, we decided to take the process of making a white peacock. Let this be like a framework or outline that will help you implement your idea. After all, the white peacock differs from the firebird only in color. All you have to do is color your bird of happiness so that it finally looks like a character from our childhood.
Take thick foam and cut out the base of the bird's body from it.

Cut off the neck and bottom from the painted bottle.

Cut the resulting cylinder into two parts.

We divide each part into two more equal ones. As a result, we get four parts of the same size. They need to be slightly rounded on the top side.


Let's start working on the tail. The basis for it is a sheet of linoleum. Sheet size: 1.2x1.4 m.

Now we begin to fill the space of the tail with feathers, row by row. To ensure that the feathers stick well to the linoleum, we make punctures with an awl and attach the feathers through these holes using wire.

Look how great the tail turned out.

The tail is attached to our foam base using nails, which are masked with white paint.

We are working on the wings. Cut a small cylinder from the bottle and cut it into two equal parts. Then these parts are cut into teeth and attached to the base with nails.

The process of working on the plumage continues until the entire base is covered with feathers.

Now we are working on the feathers of the crest. Cut out a piece from plastic that is shaped like a spoon.

Cut the upper round part into cloves and bend the leg in the middle.

Paint the ornament.

For the future beak, cut a triangle of the required size from the neck of the bottle.

Paint it with white paint and fold it in half.

Attach the beak to the head first from the bottom, then from the top.

Now we glue the prepared crest feathers to the head and draw beautiful eyes.

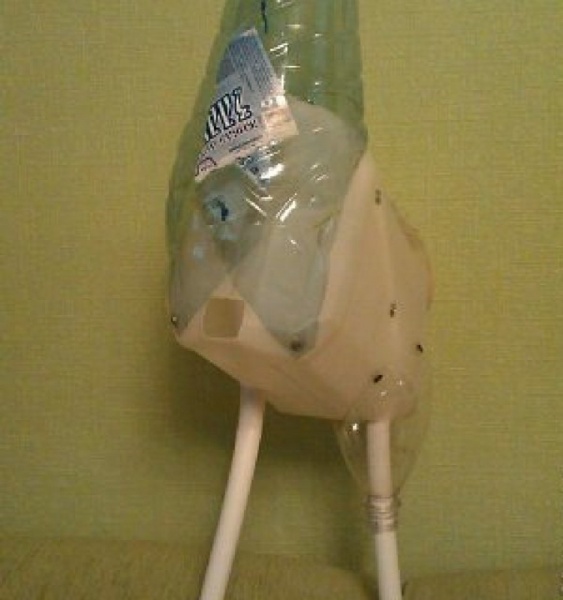
To make the paws we will need two bottles. We attach them to the peacock.

The final chord is to choose the best place in the garden for the bird. For stability, insert two tubes into the bottle legs and dig into the ground. 
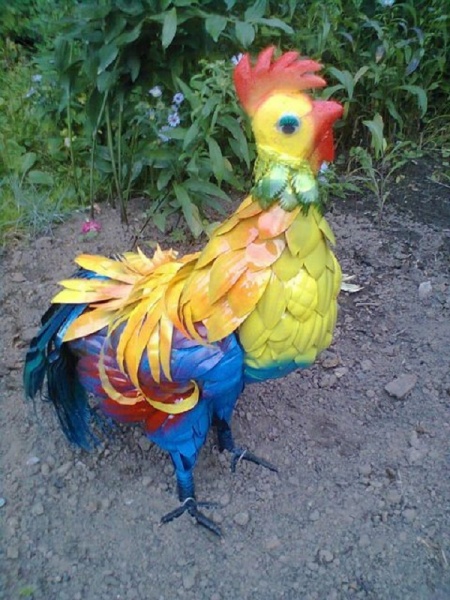
Since this is still a white peacock and not a firebird, all you have to do is color it. As you remember, we have already covered the peacock with paint, it will serve as a base for us. Therefore, you can use spray paint on top. Or any other, to your taste. Here is an example of a firebird coloring by one of the craftsmen.

Below is another idea - a DIY firebird pattern made from plastic bottles. This version of the bird of happiness was made by a needlewoman mother with her children.


Watch the video with detailed lessons below.
Auxiliary video-MK:
You can make an incredible number of different crafts.
In this collection of master classes you can learn how to make various birds from plastic bottles.
Here you will find simple ways to make beautiful birds that you can use to decorate your home, cottage and/or garden.
You can involve children in the process of creating birds from plastic bottles - they will definitely enjoy doing something new and interesting, and you will be glad that you took them away from the computer, tablet or phone.
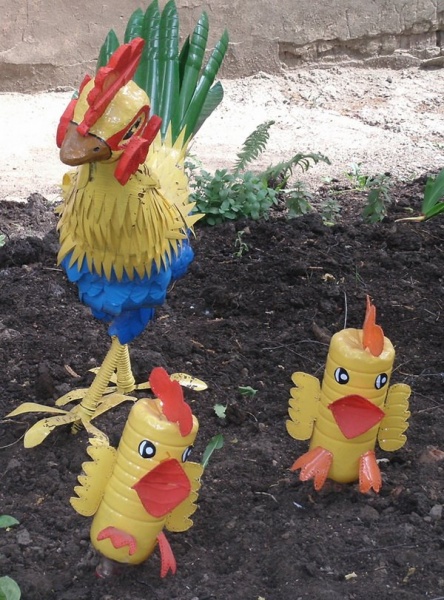
DIY chicken from plastic bottles
There are several ways to create a chicken from a plastic bottle. It all depends on the size of the bottle itself and its shape.
If you turn on your imagination and involve children in this creative work, then there are a lot of options.

Here, for example, is chicken, the base of which requires a 5-6 liter bottle.

1. Paint the bottle yellow (on the inside). You can use regular paint.
2. You can cut out a beak and a comb from other bottles.
3. Use a knife to make holes in the bottle and insert everything you did.
4. Take toy plastic eyes or just plasticine and make eyes. You can also color the chicken's eyes.
How to make chicken from plastic bottles

To make this chicken you will need:
Plastic bottle
Scissors.
DIY peacock made from plastic bottles

You will need:
Scissors;
Plastic bottles;
Synthetic foam;
Glue gun;
Wooden post;
Abrasive mesh;
Metal rod.
At the end of the text instructions you will find video instructions.
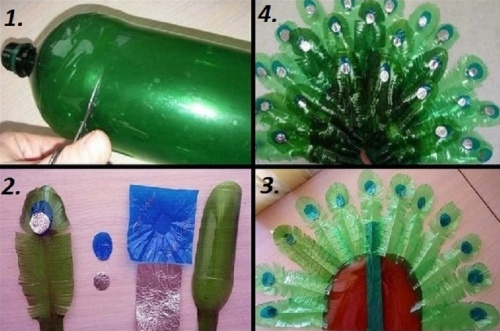
1. We make blanks for feathers.

First you need to make a blank from cardboard;
The feathers should be made semicircular, solid, with cuts of different lengths.
2. We make blanks for the tail. They should be long.
Cut the bottle lengthwise and cut out a strip of the width you need.
* It is advisable to sort feathers by size. Prepare bags and place feathers of the same size in each bag.
* If at the end of creating a peacock there are not enough feathers, just finish it some more.
3. Create a peacock model.

Prepare synthetic foam and cut out several necessary parts from it (torso, neck and head);
Use a glue gun to connect all these parts;
Take a wooden post and insert a metal rod into it;
Secure your bird's body to a metal rod;
Cut a circle from a new plastic bottle (in this case it is a red bottle);
In this circle, make one cut going from the edge to the center, then twist the part into a cone - you will get a peacock’s beak;
Use a glue gun to secure the beak to the foam.
4. Glue the feathers.

It is worth starting at the bottom, where the longest feathers are glued, and the higher you go, the shorter the feathers.

* Glue the feathers overlapping.
* After the breast, go to the back.
5. To make a crest, cut strips from plastic bottles onto which feathers are glued.

6. To create eyes, you can use plastic bottles of a different color, as well as plasticine, paint or toy plastic eyes.
7. To make the wings, use an abrasive mesh. Feathers are glued onto the wings cut from it. The tail is made in the same way.
8. Attach all the remaining parts and you're done!

Video instruction
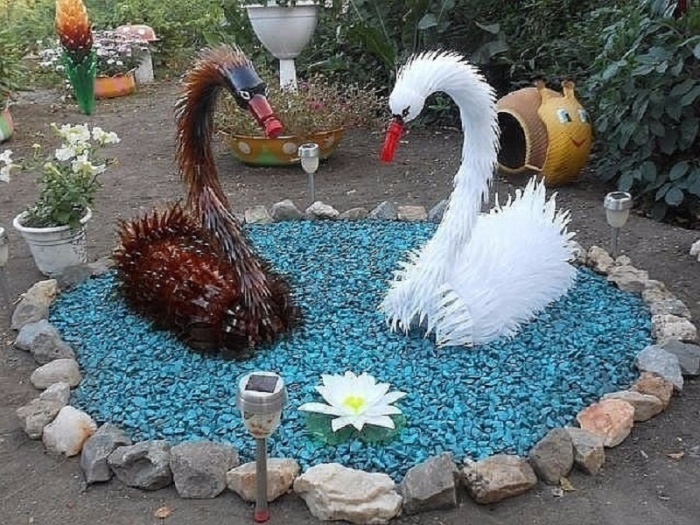
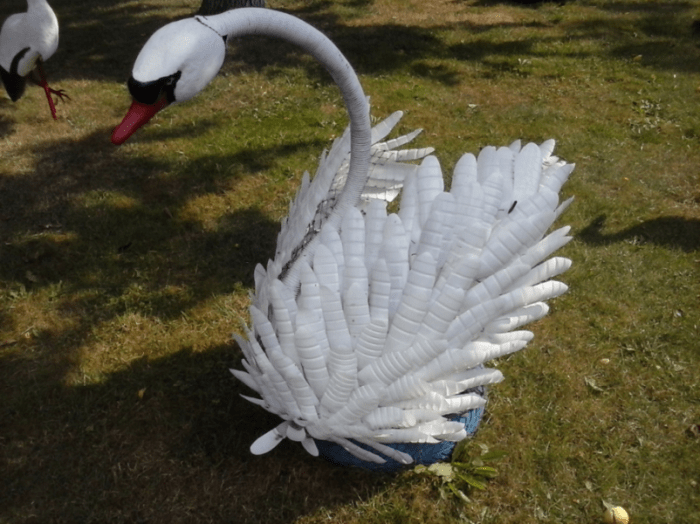
DIY bird made from plastic bottles: swan
This swan will not only decorate your garden, but will also become a beautiful flower bed for one or more flowers.

You will need:
Plastic bottle with a volume of 5 l;
300 ml milk bottles;
Wire;
Scissors;
Black marker;
Lighter;
1. Making the torso.

Take a 5-liter bottle and draw lines on it with a marker as shown in the image;
Cut holes along the lines
Insert a wire into the hose, and insert the hose itself into the bottle through the neck - you will get a neck frame
2. Making the plumage.

Take a white bottle (milk) and cut off the bottom and neck;
Now cut feathers of any shape and size from this bottle;
Small cuts can be made on the edges of the feathers;
Each feather should be carefully treated with a lighter (from the outside);
Now start stringing two feathers onto the wire.
3. Putting everything together.
For the neck, white bottles with the bottom cut off are used (in this example there were 16 of them);
For the head, use the top of a large bottle with the neck cut off;
At the place where the hose ends and the beak begins, make two holes on opposite sides (in the plastic bottle and in the hose), then use wire to secure the entire structure;
Make a beak from a plastic bottle painted with red paint or use a bottle of a matching color;
Start attaching the feathers from top to bottom and in a circle.
How to make a dove with your own hands from plastic bottles

You will need:
Plastic bottles;
Styrofoam;
Scissors;
Wire;
Toy plastic eyes or plasticine.
1. Cut off the neck of the plastic bottle (see image). This blank will serve as the body of the dove. Make the breast.
2. Make cuts on the bottle as shown in the image. Press the cut part inward to form the body of the dove, then tighten the workpiece with wire.
3. Cut out the head of a dove from foam plastic.
4. To make feathers, you should cut the middle part of a plastic bottle. The strips should be of different lengths, and their ends should be rounded.
5. Make 2 holes at the base of each feather.
6. Using wire, screw the feathers to the mesh.
7. Attach the pigeon’s tail to the pigeon’s body.
8. All that remains is to color the dove’s head and make the eyes (glue plastic ones, draw with a marker or use plasticine).
DIY children's crafts from plastic bottles: rooster

You will need:
Plastic bottles
Plastic plates
Plastic glasses
Plastic spoons.
1. Cut off the top of the plastic bottles and secure them with tape as shown in the image.

2. Cut the plastic cups into fringes and place them on the bottle one by one.
*You can use cups of different colors and alternate them.

3. The rooster's tail can be made from plastic plates. After this, attach the tail to the plate.


4. Wings can be made from leftover plastic plates.
5. You can make a rooster's head from a plastic ball. It is attached to a cut cup glued to the bottom of the previous cup.

6. You can cut out a beak and scallop from colored paper. They are attached with tape or hot glue. Eyes can also be made from colored paper, plasticine, or use toy plastic eyes.
Do-it-yourself decorative elements made from plastic bottles will help add bright colors to your summer cottage. Crafts vary in degree of complexity, but always become the subject of attention of others. Many birds made from plastic bottles are made using a similar algorithm, only the outlines and details differ. Options for their manufacture will be discussed further.
Available materials and nuances of the design process
The creative imagination of a master is capable of creating a masterpiece from ordinary things. In addition to bottles, other available materials are used to decorate birds:
- Plastic canisters make an excellent base for the bird's body.
- Polyurethane foam helps to add the required volume.
- Styrofoam will help make the bird's head as close to the original as possible.
- Self-tapping screws, wire or glue are used to connect the parts together.
- The finishing of the bird's legs is carried out with a corrugated pipe, twine, or parts are cut out from plastic containers.
- Small dairy bottles help give the bird's thighs the desired shape.
- Moisture-resistant acrylic paints and anchor varnish transform the nondescript silhouette of the bird beyond recognition.
To cut and connect all this, you will need scissors, a stationery knife, a stapler, and an awl. This is the main list, which changes depending on the selected bird model.
Comment! The beauty of a craft is largely determined by the quality of the plumage. If you want to decorate your area with a spectacular bird, be patient to make a large number of small and large feathers.
For novice craftsmen, we can offer a simple step-by-step guide, where a peacock acts as a bird made from plastic bottles:
Advice! Preliminary filling of the body with sand will help to give stability to the bird's figure.
Making poultry using a rooster as an example
Having gained experience with easy crafts, you can move on to a more complex process. The proposed algorithm for making a rooster from plastic bottles will be an excellent guide for making other birds.
Available materials:
- plastic canister and 5 liter bottle;
- PVC pipe about 40 cm long;
- 1.5 liter containers for thighs - 2 pcs.;
- lots of fletching bottles.
Frame
Process of creation:
- The work begins with the formation of the bird's frame. The side of the plastic canister is cut and moved to the side.
- The pipe is given the desired shape, after which it is screwed with self-tapping screws to the body of the bird.
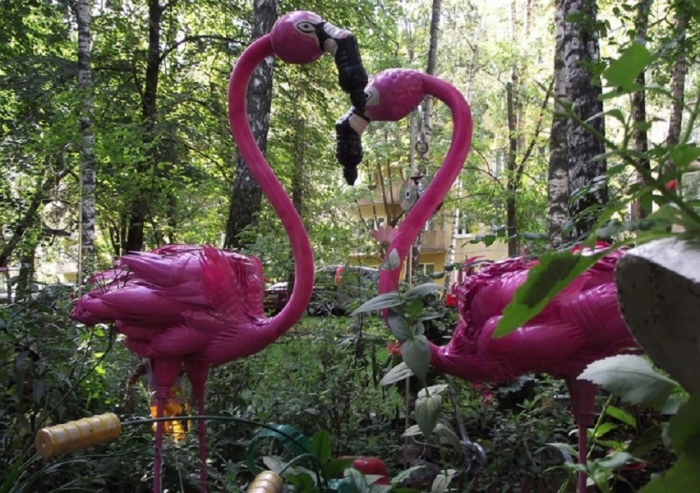
- The rooster's neck is made from a 5 liter plastic bottle rolled into a ball. Depending on the selected bird model, elements can be replaced with other parts. For example, another piece of plastic pipe would be perfect for a flamingo’s neck.
- The rooster's legs have a thickening at the top, bags made from 1.5 liter bottles will serve as thighs. For other birds, the volume of containers is selected in proportion to their figure. The elements put together represent a similar frame:

Head
The rooster's head is cut out of foam plastic. If it is difficult to cut out a whole figure with a comb and beard, you can prepare all the elements separately and then connect them with glue. Sometimes this part is also formed from a plastic bottle. To ensure that the foam blank can be easily painted in the future, the following measures are carried out with it:
- carefully processed with sandpaper;
- covered with acrylic putty;
- after the composition has dried, sand it again to give a smooth surface;
- Apply a layer of PVA glue.
Elements of the bird's head are decorated at the discretion of the artist. Eyes can be painted with paints or finished parts can be fixed. Various crests and scallops are cut out of plastic or foam. The beak is often made from a thick plastic container (usually a shampoo container).

Plumage
The size of feathers varies not only among different birds, but also on the same figure:
- The back, sides and breast are usually decorated with medium-sized feathers.
- Smaller elements are cut out for the neck.
- The wings and tail are most often formed from long feathers.
Comment! Feather bottles are supported in the same color, so that after dyeing you get a uniform shade over the entire figure.
They begin to form the plumage from the thighs, fixing each subsequent row in such a way that the attachment point of the previous one is not visible. The work is carried out using wire, threading it into holes prepared with an awl, or with self-tapping screws.
After the legs, they move on to the rest of the body, leaving the back free, where the bird’s wings will be attached. In order for a rooster made from plastic bottles to stand firmly on its feet, it needs to have its paws made. The frame is made of rigid wire, which is subsequently fixed on a plastic pipe. Then the base is processed with a corrugated tube or twine.
The most difficult stage for many may be the formation of the wings and tail of a bird using plastic bottles. For these purposes, reinforcing mesh is usually used. The size of the base for the wings and tail is selected depending on the species characteristics of the selected bird. For example, peacock tail feathers can be mounted on an oval piece of linoleum. But the grid is a more common option. The elements are fixed with an overlap, each row covers the fastening of the previous parts.
The moment of complete assembly of all elements from plastic bottles can be carried out before or after applying paint. At the finish line they are painting. A bird with the same plumage throughout the body can be decorated after complete assembly. It is more convenient to paint the elements of the frame, tail and head separately, and then connect them using screws and wire.
Review of interesting ideas
The versatility of plastic bottles allows you to make crafts of varying degrees of complexity. The same bird can be presented in different variations, and its production is not always a labor-intensive process.
Bright pink handsome flamingos will help add exoticism to the area. Guided by the algorithm proposed above, you can make a bird in a short time thanks to its large plumage. A variety of options are shown in the photo:


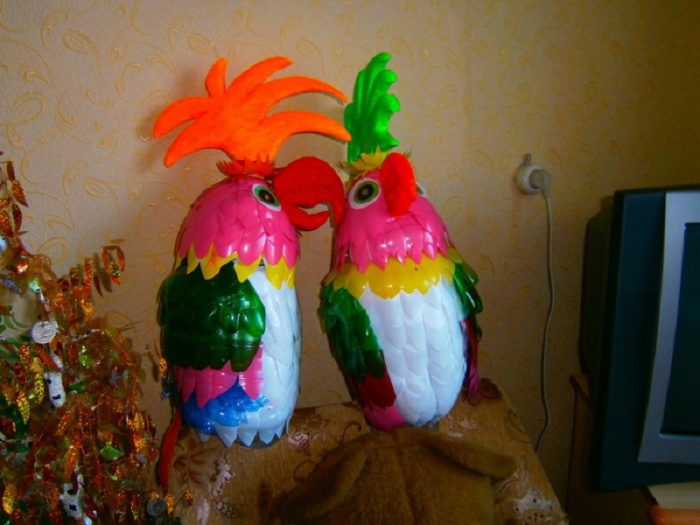
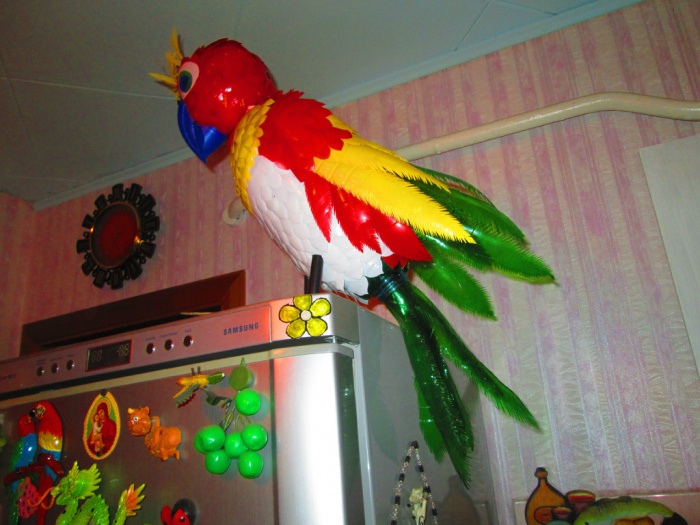
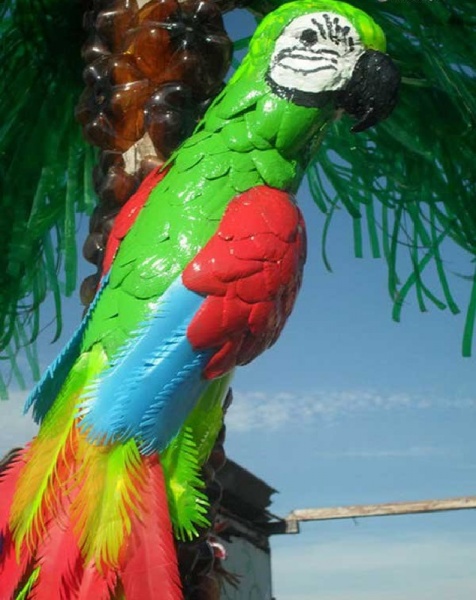
Another pretty bird of hot countries is the parrot. A lot here determines the originality of the coloring. The body made of plastic bottles can be trimmed with feathers or simply covered with paint. The complexity of feathers and tail is chosen at the discretion of the artist. Design methods are shown in the photo:

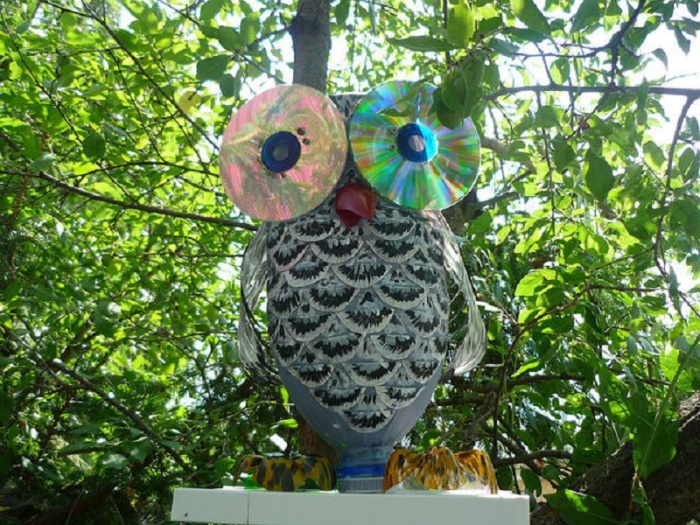
The owl or eagle owl, familiar to our regions, is another worthy garden decoration. An impressive beauty made from plastic bottles can take a lot of time.


For busy people, there is a simplified version of the night bird.
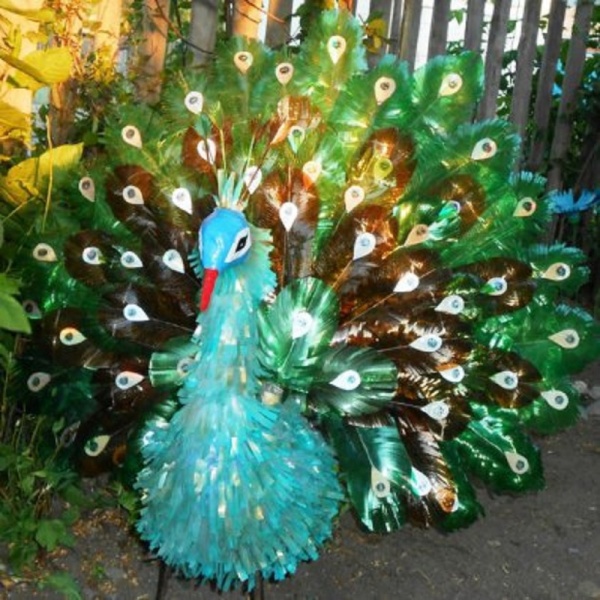
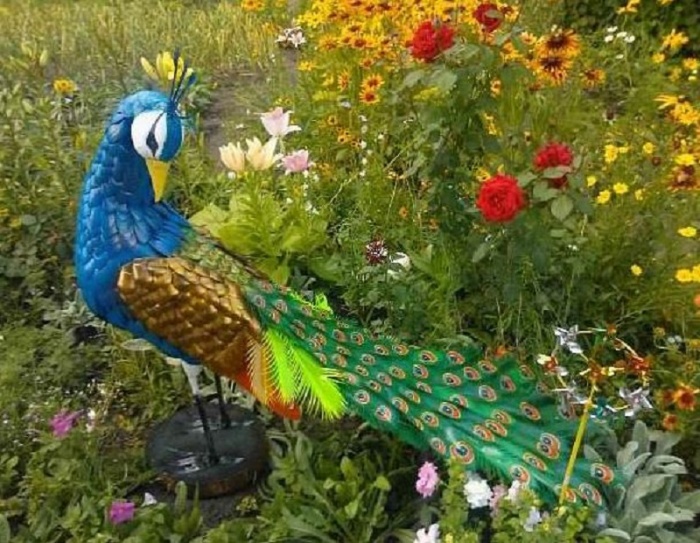
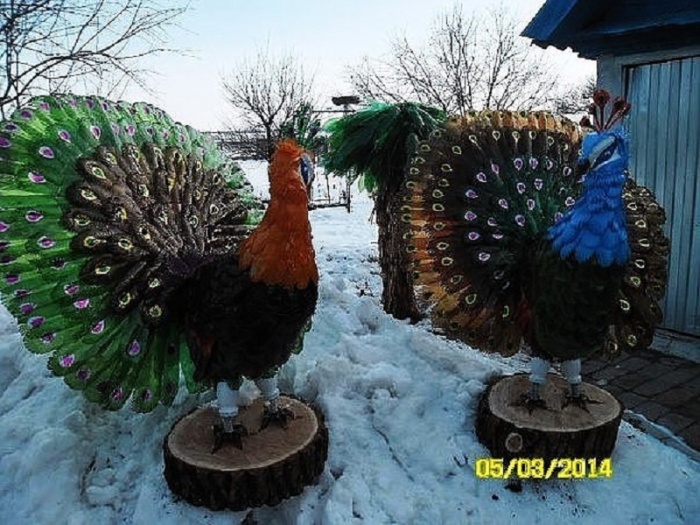
A peacock will help you get closer to the scenery of the royal court. The gorgeous tail of the bird will not leave anyone indifferent. It is up to the owner of the site to decide whether to make the peacock bright or white, to leave the tail folded or straightened. Or maybe you liked this firebird?

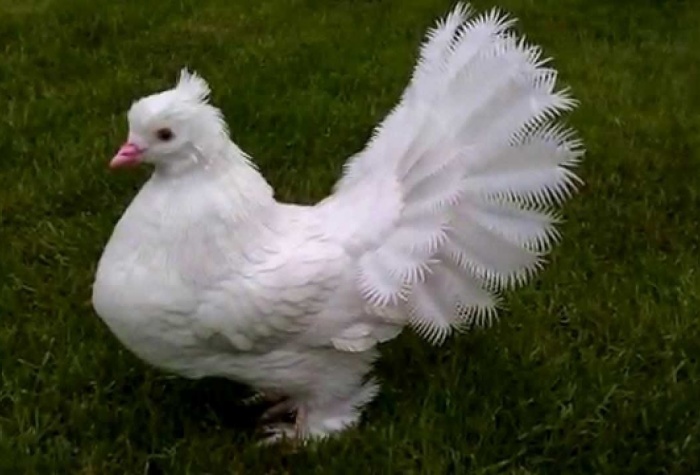
A chic dove will require perseverance and patience, for the production of which white plastic bottles will be useful. It is better to prepare the plumage on long winter evenings, when all work in the garden is suspended, so that by spring the area will be transformed with a new resident.
Which model of bird to choose is up to the craftsman to decide. The process of making any craft can be made easier by replacing jewelry-style parts with simpler elements made from plastic bottles.