Corrugated paper is an excellent material for creativity. This article offers you ideas for beautiful crafts and tips for needlework.
Corrugated paper- a universal material for needlework and creativity. You can make a huge variety of crafts from it: gifts, jewelry, decor, packaging. The advantage of paper is that it holds its shape perfectly and has a huge number of color options that can satisfy everyone.
IMPORTANT: There are two types of corrugated paper: thin and thick. For needlework, it is best to use thick paper, as it can be transformed.
For example, try make a three-dimensional Christmas tree. This craft will come in handy on the eve of the New Year holidays. It can be sent to a children's competition in kindergarten (school) or to decorate the house during the New Year.
There are several basic ways and secrets of creating such a Christmas tree:
In order for you to get a beautiful and voluminous cone-shaped Christmas tree, you must have:
- Sheet of corrugated paper
- Sheet of cardboard
- Scissors
IMPORTANT: When working, use dry glue in the form of a pencil. It does not leave wet spots and the work is neat.
Work step by step:
- Make a cone from a sheet of cardboard. To do this, you need to draw a large and even semicircle.
- Cut out a semicircle, form a cone and secure the edges with glue.
- Corrugated paper should be cut into strips 5 cm wide.
- Each strip should be folded in half and a three-dimensional pattern should be formed on it with your fingers by pulling the paper.
- Now you need to wrap the strip of corrugated paper around the cone and glue it.
- You should start gluing from the base and gradually move to the top.
- You can decorate the finished product with a cardboard star and beads that imitate toys and jewelry.
Realistic Christmas tree made of corrugated paper:
- For this craft you should choose thick corrugated paper dark green color.
- Use thick wire as a base.
- Cut the corrugated paper into strips 10 centimeters thick. Each strip should be cut with scissors for twisting needles.
- Use your fingers to twist each cut strip into a small tube.
- As a result, you will have a base for a Christmas tree branch.
- The base should be wrapped around the wire, secured at the base and the paper coated with dry glue.
- After making a certain number of branches, make a Christmas tree. The craft is ready!

 Realistic Christmas tree made of corrugated paper
 Fluffy Christmas tree made of corrugated paper:
- You will need a pack of thick corrugated paper.
- It should be cut into strips. The bottom layer is the widest. It should be 25 cm wide and 20 cm long.
- With each new layer, you should reduce the base by 2 cm in diameter.
- A sheet of paper should be compressed like an accordion and tied with thread in the middle.
- The edges of the sheet should be torn or cut with a zigzag.
- One layer of the Christmas tree consists of two pieces of corrugated paper, bent like an accordion and tied with thread.
- You can fasten the layers together using a stationery stapler or by stitching with thread.

 How to make a base for a Christmas tree out of paper?
 How to assemble a Christmas tree from corrugated paper?
 Craft - a snow maiden made of corrugated paper, how to make it?
Thick corrugated paper can be useful for those who create New Year's compositions. With its help you can make outfits for the Snow Maiden. The doll itself must be bought in a store or.
Ideas for decorating a doll with corrugated paper:

 Snow Maidens made of corrugated paper
 Craft - snowflakes made of corrugated paper
Corrugated paper works great to create a lush and very beautiful snowflake, which can decorate any room for the New Year. For this you will need:
- Cardboard
- Corrugated paper
- Scissors
- PVA glue
Work step by step:
- Draw a snowflake on cardboard
- Cut it out
- Cut thin strips of corrugated paper; they do not have to be even.
- The cardboard base should be generously coated with glue and a strip of corrugated paper rolled into a rose should be attached to it.
- Do not lift the product into a vertical position until it is completely dry.
IMPORTANT: You can wind each strip of paper onto the tip of a pencil, and then attach it with glue.

 How to attach corrugated paper to a base to make a snowflake?
 Lush snowflakes made of corrugated paper
 Craft – “Mother’s Heart” for Mother’s Day from corrugated paper
"Mother's Heart"- an interesting version of a craft that can be given to a loved one or mother on any occasion. With its large size and incredible volume, the craft conveys your feelings and literally “declares your love.”
In order to make such a heart, you will need base made of thick cardboard and packaging of thin corrugated paper. You need to cut out a heart from the base. Made from corrugated paper - many square-shaped pieces.
PVA glue is applied to the base. Each square of corrugated paper is wound onto the tip of a pencil and thus transferred to the glue. Due to the fact that the edges of each piece are not even, you get a lush and raised pattern on the surface of the heart. A ribbon should be attached to the finished product, on which it is suspended.
 What size should the cut piece of corrugated paper be?
  How to attach corrugated paper to a heart?
 Easy and simple children's crafts from corrugated paper for kindergarten
Corrugated paper can help transform any children's craft. It is very easy to work with and you can buy paper at any art and stationery store at an affordable price.
Craft ideas for children in kindergarten made from corrugated paper:
Eg, make a craft out of cardboard. Cut out flowers, spread with glue and wrap in corrugated paper. Use material of different colors.

 Volumetric craft made from corrugated paper
 Very simple and beautiful ones are made from corrugated paper. butterflies. To do this, you need to cut out two ovals from paper and twist the base for the body, as well as the antennae. The two parts are combined by twisting each other.

 Corrugated paper butterfly
 A children's card can become very tender and elegant if decorate it with a voluminous flower made of corrugated paper, for example, snowdrops. To do this, cut out several white petals and a base for a leaf, as well as a green stem.

 Postcards with voluminous snowdrops made of corrugated paper
 Adult children can do three-dimensional picture from corrugated paper, by gluing various shapes. Such an applique will be very colorful and “lush” due to the lightness of the material.
 Corrugated paper applique "owl"
 Other ideas for crafts made from corrugated paper:
 Christmas tree, flowers and bouquets made of corrugated paper
 Corrugated paper fire truck
 Craft – voluminous rose made of corrugated paper
Corrugated paper roses They turn out very bright, beautiful and realistic. These can be both simple and complex crafts. Children can try a rose made from a twisted tube of corrugated paper. It just needs to be folded into a serpentine and glued to a cardboard surface.
 Simple rose made of corrugated paper
  Heart decorated with corrugated paper roses
 More complex rosette can be made from corrugated paper, cut into circles and rolled into a cone. For such a craft, it is best to choose thin paper, it is more delicate and the petals will seem very realistic.
This rose is attached to a stem - a wooden skewer wrapped in green paper. The stem is decorated with leaves; if desired, you can make thorns.

 Step-by-step creation of a rose from corrugated paper with a photo
 There is another way to create a three-dimensional rose from corrugated paper on a stem. To do this, you should advance cut out some petals, similar to real pink petals and a long stripe. A strip (one or even several) should be wound around the tip of a skewer and glued with PVA.
You will get a unique com, which will be the basis of the bud. Try to give it an oval rather than a round shape. Glue each petal onto the base one by one. Finally, make a stem and leaves from green paper at the base of the bud.
Step-by-step creation of a rose from corrugated paper
 Bouquet of roses made of thick corrugated paper
 Beautiful rose made of corrugated paper with curled petalsINTERESTING: You can also make a three-dimensional rose from one continuous strip of corrugated paper with an edge cut out in semicircles. After you wind the bud, use the tip of a skewer to curl each petal so that it looks nice.
Crafts - DIY corrugated paper flowers
Corrugated paper can make a beautiful chrysanthemum, which is easy to decorate a room if desired. It is being manufactured from several sheets assembled into an accordion and fastened with thread. Such a chrysanthemum is usually attached to a fishing line to hang, or simply glued to the wall.
Corrugated paper chrysanthemumBy folding corrugated paper a tube can produce many beautiful flowers. To do this, you just need to process the edge of the cut corrugated tape: cut out this or that pattern.
 Dandelion, carnation, peony and chrysanthemum made of corrugated paper
  Colorful flower made of multi-colored corrugated paper
 INTERESTING: Craftsmen often use corrugated paper to make bouquets with sweets. One of the most popular flowers is the crocus; it is very easy to make.
 Corrugated paper tulip with candy
 DIY corrugated paper bouquet
A bouquet made of corrugated paper can only be compared in its beauty to a real living bouquet. Try to diversify your usual roses and chrysanthemums with wildflowers, for example, bluebells.
 How to make a bell from corrugated paper?
 Simple and very effective tulips are made from corrugated paper. In order to make them, you will need two pieces of paper 10 cm long and 4 cm thick.
They should be twisted and, in the place where they are twisted, folded in half. The resulting petal has a beautiful inward bend. Place four petals together and secure them onto a skewer to form a bud.

 Corrugated paper tulip
 Bouquet of tulips made of corrugated paper
 Other ideas for creating flowers for a corrugated paper bouquet:

 Orchid made of corrugated paper. The middle is painted with paint - dot pattern
 Small yellow flower made of corrugated paper step by step
  DIY bush rose from corrugated paper in a bouquet
 Craft - a cone made of corrugated paper
An interesting craft made from corrugated paper - a cone. It should be made from thick corrugated paper. You should cut a wide ribbon of dark brown color and hand finish one edge by pulling back the paper and folding it into a pigtail.  The finished product can be decorated with a spruce branch made of corrugated paper
Craft - corrugated paper birthday cake
Corrugated paper cake- This is a kind of packaging for gifts. You can hide a gift for a newborn in it, for example, from diapers, clothes, diapers and other things. In such a box you can also put candies or any other sweets with surprises that will be relevant on your birthday. The cake is decorated with corrugated paper flowers, ribbons and other decorations.
Ideas for creating a cake from corrugated paper:
 Beautiful cake made of corrugated paper
  Colorful crepe paper cakes
  Cake decorated with corrugated paper
 DIY corrugated paper candies
Corrugated paper candy is a beautiful package in which you can “hide” any gift. To make candy you will need a large sheet and some decorative elements: ribbons, beads, serpentine and so on.
 Gift packaging in the form of candy
 Recently, bouquets of sweets made from corrugated paper have become increasingly popular gifts. There are a lot of ideas for creating such flower packages: large, small, different types.

 Bouquet of sweets
 Video: “Christmas tree made of corrugated paper using the cutting technique”
DIY artificial flowers have become increasingly popular lately. Easiest to do corrugated paper flowers, which is very convenient to use. Today in stationery stores you can buy corrugated paper of different colors and make original crafts. Corrugated paper is widely used in suite design, so you can master this type of needlework too.
How to make peonies from corrugated paper
Flowers made from corrugated paper are very similar to real ones, since this paper has a pleasant texture and a variety of colors.
Materials:
- corrugated paper of different colors;
- paper clips;
- scissors;
- wire.
Take a whole sheet of corrugated paper and start folding it like an accordion.

You can choose your own color scheme for the peony and fold each leaf.

After this, lay out all the accordions in a row and cut each one a few centimeters so that it is shorter than the previous one. It is important that the longest leaves are a primary color, such as pink, red or burgundy.

Once you have trimmed each leaf, trim each edge to create a slightly sharp edge.

Then take paper clips and mark the center part on each accordion.

Then lay out the accordions from longest to shortest and start folding like an accordion again, but this time all the sheets at once.

Interesting article: How to make a sweet bouquet with your own hands
Take the wire and tie it in the central part.

All that remains is to gradually fold back the leaves, starting from the smallest ones. Corrugated paper, unlike papyrus paper, stretches well, so you can safely straighten each petal, giving it a certain shape.

You should have a beautiful large crepe paper peony.

These flowers can be used to decorate a room or create a wedding floral arch.

Corrugated paper decorations
Flowers are often used to make hair and clothing decorations. If you need a beautiful accessory for one evening, you can make it from corrugated paper in any color.

First you will need to cut the corrugated paper into strips 3-4 cm wide. Then you will cut it into rectangles to make the petals.

Separately, take yellow or gold paper and cut it into longer strips to make stamens.

Each rectangle needs to be shaped like a petal, and slightly compressed at the bottom. You will need to cut out a circle from cardboard that will act as a base. Glue each petal onto it, starting from the edge and moving towards the central part.

To shape the petals, start stretching them slightly at the edges.
Once you have completely filled the entire circle, you can begin making the stamens. To do this, take a strip 2.5 cm wide and 7.5 cm long. Make cuts on one side and then roll it into a roll and secure it with glue.

Useful article: DIY corrugated paper roses
You can change the shape of the petal by making different cuts. Try making flowers of different shapes and sizes and make beautiful decorations. If you glue a flower to a hairpin using hot glue, you will get an original hairpin.
Volumetric flowers made of corrugated paper
These flowers look beautiful in a vase, so you will need to think about the length of the wire stem in advance and choose the right vase.

Take two pieces of corrugated paper and start folding them in half together 4 times. Once you have a small square, fold it diagonally to form a triangle.

Take this triangle from the corner and cut off its opposite edge from one edge. After you unfold your workpiece, you should end up with 8 round figures with a curly outline.

Also read: DIY crocuses made from sweets and corrugated paper
Each circle will need to be taken by the middle and slightly twisted.

Secure at the bottom with tape. Then gradually glue the parts to the wire, and you should get a three-dimensional spherical figure.

You can come up with new blanks for making different colors from corrugated paper in order to use the products for interior decoration or clothing. You can make simple paper crafts even with children. Spend your leisure time interestingly and then you will be able to develop your creative abilities and take a break from everyday difficulties.
How to make a rosebud from corrugated paper. Master class from Alla-Alushka


No matter how much I resisted doing MK, I still did it, although if I had not taken on one project, I would hardly have mastered it (MK) in the near future. Very often I am asked how I make such flowers. But I don’t even know what to answer. I came to this “recipe” through long attempts and training, although I will show you the features that I came up with today. I will show the example of the “Autumn Waltz” candy, although you can, of course, take any other candy. Here I indicate the sizes using a ruler, but I don’t use it, I do everything by eye. So, I cut 2 strips of corrugation 10 cm and 5 cm wide, respectively, and divide them into blanks about 8.5 cm high. Each strip should yield 5 rectangles + leftovers (we won’t need them).

Take 1 wide piece, fold it in three and cut it. We do the same with another wide blank, but take only one rectangle, put the rest aside, we won’t need them. These are our future narrow petals. We also fold two more wide pieces in half and cut them. As a result, we get one large rectangle, 4 narrow and nine wide blanks for the petals.

Let's start cutting out the petals. First, take the largest piece, fold it in half and round the top. It turns out almost a semicircle. Then we take the petal blank, fold it in half, round the corners on top, and vice versa at the bottom, cut off these corners. We do this with all the petals, both narrow and wide.

We begin to form the petals. First, use the thumbs of both hands to make a depression for the candy, but only in the center of the petal, do not stretch the edges. Then we take a skewer and begin to twist the petal onto it. This is where the “trick” of my rose recipe lies - you need to twist it tightly, almost 1.5-2 turns of the skewer. Then I just pull the skewer out. Thus, we are left with a STRONGLY twisted half of the petal. We do the same on the other side. The photo shows how strongly the edges of the petal are curved. We perform this sequence of actions with all the petals, both narrow and wide.

Let's start assembling the flower. We take our large blank and place the candy on it. As you can see, in this blank I DO NOT make indentations for the candy, but I begin to wrap it very tightly, stretching the corrugation as I work. First I wrap it on one side, then on the other, and tie it with thread at the bottom. After this, you can give the bud a finished look by slightly bending the edges with your fingers.

Then everything is simple: first we work with narrow petals. Add a drop of glue to the very tip and glue it to the bud (all four petals). Next row we glue four wide petals, trying to place them in a checkerboard pattern relative to the narrow petals. We distribute the last five petals in the last row. However, you can not make a row of four wide petals, but distribute five wide ones immediately after the narrow ones. DO make sepals, don't be lazy! After gluing the sepals, you can run a skewer over each one, placing the skewer between the sepal and the flower. In this case, the sepals will seem to press against the flower and flow around it, and not stick out in different directions.

In general, we have made a flower, now you can carefully glue a toothpick, skewer, wire into it and use it at your discretion. But we will continue to work and make a souvenir single rose. My problem with assembling these flowers has always been that they have a fairly wide base, and when using druth it was almost impossible to tap the flower stem beautifully. And since you can’t hide the “ugly” transition in this rose, I do this: I take a flower extension. These are used when, for example, you need to place an orchid in a bouquet. They have a fairly long water reservoir, which I cut off, leaving just a little bit. I cut the base of the rose at an angle, and pour plenty of hot glue into the remaining reservoir and practically “screw” the flower into it. And I leave it until it cools and sets.

We tape the extension, add leaves, beads, any decor you like and admire our rose. You can add a bud (as in the first photo) or several buds.
Since we started talking about roses, I’ll show you how to make a bud, but there are a great many such MKs in SM. We take two small rectangles, literally one turn of the candy. Fold them together and in half. Cut out a semicircle. We slightly move the outer petal down and to the side, literally by 2-3 mm.

We take the candy, tuck the tails (so that the candy is not firmly attached) and wrap the candy, first on the right, then on the left (or vice versa, whichever is more convenient for you, it just depends on which direction to move the outer petal, to the right or left, so that along the entire bud had two petals visible - see in the photo) and tie it with thread. Glue the sepals and twist them with a skewer. Our bud is ready. Now, depending on what it is intended for, we glue in a toothpick, skewer, wire, etc.

Now a little more “boring” theory. The formation of any rose comes down to the fact that we must form a bud and then glue the petals. Any MK contains exactly these steps. In addition, even the petals in any MK are the same - semicircular. And then each master decides for himself what and how he will do with these petals - stretch, twist, twist, trim, or do nothing else at all. You can also make a rose from petals of only one width. Depending on these steps, very different results will be obtained. Don't be afraid to experiment and don't strive to make an "exact copy" of what you want. This is unlikely to work, since making a copy is a boring task. Bring something of your own, good, unique, and then everything will work out for you. I wish you good luck in your creativity!!!
Source stranamasterov.ru/user/198397
0 243 283
The easiest way to feel the approach of any holiday is to start making home decor for the celebration. This time I decided to figure out how to make flowers from corrugated paper - realistic and stylized. Let's figure out together how to make flowers from corrugated paper and what you need for this.
There are many handicraft techniques in the world that allow you to make beautiful flowers with your own hands - today flowers are made from beads and fabric, ordinary paper (quilling, origami, applique, etc.), they are knitted and felted, but still one of the most popular methods of making remains assembly of corrugated flowers. What are these flowers good for:
- they can be either photorealistic or fantasy;
- they are easy to make in a few minutes (unlike felting or beading);
- easy to recycle (relevant for those who want to decorate a large hall with flowers for the holiday);
- very affordable materials - corrugated paper costs a penny, especially if you buy in rolls rather than sheets;
- no special training required;
- there is no need to use any complex tool;
- it’s easy to get an acceptable result without experience (for example, you can do it with sweets - even small bouquets look very presentable);
- the products are bright and expressive (which is very important for children).
Getting ready for work
What you will need to make flowers from corrugated paper with your own hands:- several rolls of paper (it is better to choose matching colors and green for leaves and stems);
- wire, floral sleeve or any other devices for stems;
- cardboard for blanks;
- glue;
- sharp scissors;
- breadboard knife;
- threads and fishing line.
Making flowers
The simplest option:So, making flowers from corrugated paper in more complex versions almost always follows the same scenario. I will describe it so as not to rewrite one by one:
- first you need to make a petal template;
- cut 15-20 petals for each flower (if you want to make a realistic flower, then make petals of different sizes - for example, five small, five medium, five large);
- cut the petals (when cutting, observe the direction of the corrugation);
- collect the central part of the bud (twist 5-7 petals together, tying them at the bottom and gluing them together);
- Next, the petals need to be slightly stretched and bent so that they take the most natural shape for the plant;
- Glue the prepared petals to the bud;
- fix the flower head on the prepared stem.

How to make a stem:
- We take a piece of wire, a floral sleeve, an ordinary twig - at our discretion, measure the required length;
- cut;
- decorate with green corrugation, or fabric, or paper;
- we imitate leaves, shoots and thorns;
- cut on both sides again.

Making realistic roses

To make roses, prepare high-quality paper in the most natural shades. You should not take burgundy or fuchsia, use delicate tones - cool shades of pink, tea tones. Such roses will look very, very natural.

And this is the easiest way to create a rose:
A similar option for twisting a rose flower, but with explanations from the author:
Realistic peonies
A peony is a large flower in itself, so it is better not to try to make small flowers, but to collect several really large and beautiful peonies. To make a large flower from corrugated paper, you will need about twenty minutes.By the way, if you want to achieve a more natural color, you can take white paper and tint it with food coloring - delicate pink and orange flowers will really look like real ones.


Or a more complicated option:
Decorative and stylized flowers
How to make simple flowers from corrugated paper? Step-by-step instructions for making different colors and different methods.Realistic lilies. Photos of creation step by step:

We make large flowers from corrugated paper - roses.

Such elegant and simple flowers made of corrugated paper can be useful for photo shoots or interior decoration, and they can also be used to create various decorative compositions on the street (just keep in mind that the flowers are quite light and can be carried away by a gust of wind). In general, full-size flowers are often used for decoration, but making them according to the same principle as small flowers is not too labor-intensive.
Huge poppies/anemones:
Photos step by step: stylized poppies, but in miniature.
In order to make lush artificial poppies, you will need paper of three colors (black, red, green), wire, thread, glue or stapler, and of course, scissors.
- From a roll of black paper you need to cut a cylinder about ten centimeters long.
- Tie tightly with thread and cut into a fringe along one edge - this will be the middle of our flower.
- You can also make a box in the middle - to do this you need to take scraps and wrap them in black paper to make a ball. The ball is fixed with a thread or a stapler and attached to the center of the fringe.
- The roll of red paper must be unrolled and cut into six parts, each part folded like an accordion.
- Place all the accordions one on top of the other and secure them well with thread.
- The corners of the accordions need to be rounded with scissors.
- All petals need to be well unfolded (we straighten each accordion and it turns out to be a petal).
- Use thick wire or wooden slats as stems - they need to be wrapped in green corrugation, cut out large leaves and attached to the stems.
- Secure the poppy heads to the stems and straighten the petals.
Now you know how to make more flowers from crepe paper. If you want to make giant flowers, then for beginners it will not be very difficult, however, it is worth considering some points:
- use high-quality paper - of course, even from waste paper a master can make something beautiful, but for beginners it is better to rely on good materials;
- huge flowers must have weights, otherwise they will simply fall (or fix them with fishing line to the wall);
- do not smooth the petals completely, leave a slight corrugation;
- It’s better to have a lot of petals than a few (large roses with four petals look very pathetic);
- for a field composition, use several shades of green paper - then ordinary herbs and plants will look natural;
- if a child is making three-dimensional flowers with you, take care that he does not cut himself with paper, scissors, fishing line or threads;
- For decoration, use flowers made in two or three shades - more colors may look awkward.
More ideas and inspiration
Have you already wanted to make beautiful flowers from corrugated paper with your own hands? Great, that means you liked the ideas I proposed and mk. I’ll tell you a little more about what you can create with your own hands from corrugated paper.See how they make crafts from corrugated paper - cute daisies that look better than life!
And in this master class you can learn how to make sweet flowers made of corrugated paper with your own hands. And so, flowers made of corrugated paper with sweets, decorated in the shape of a heart:
A child's birthday party, photo shoot or school exhibition without corrugated paper products would be dull and uninteresting. Bright, pliable material is always at hand for those who love to create. It’s not surprising, because even the most sour look at the sight of corrugated crafts is instantly replaced by a smile.
But using corrugated paper crafts? Yes, easily, I just have a couple of ideas for you.

You can make anything from corrugated paper - a delicate flower, a colorful picture, or even a mischievous one. baby elephant.
A little patience and perseverance - and you have such a cute toy on your table. Beautiful, is not it?

It's not difficult to make. Prepare foam balls and a blank for the trunk, corrugated paper, cardboard (for the ears), paper towel rolls (for the legs), toothpicks, and a glue gun.

Cover the foam base with corrugated paper roses, first tying each of them with thread and inserting a toothpick. Cover the ears and legs with corrugated paper with a figured edge, without folding it into flowers. Make the eyes and mouth from colored cardboard.


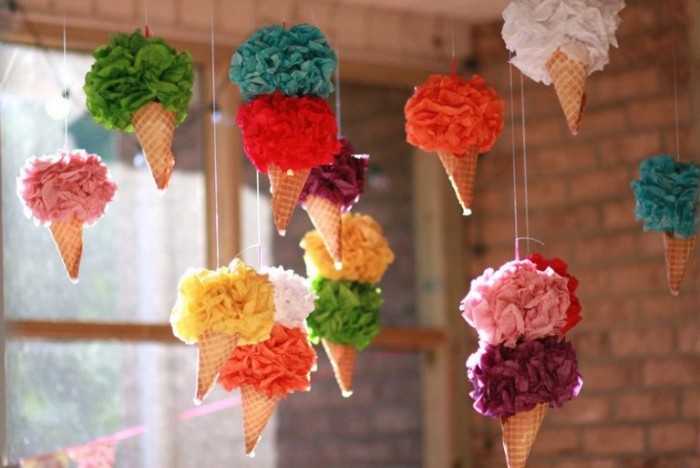
Light, airy, simply unique - corrugated paper ice cream. Unsurpassed decor for a children's party!
Making decorations in the shape of ice cream cones is very simple: fill a paper cone to the top with crumpled newspaper, cover it with corrugated paper, tie it with thread to hold the top, and tie the ice cream to the ceiling.
Another option: simply fill the horn with multi-colored corrugation, rolling it in a spiral and gently stretching the top edge.
Any children's holiday will become even more beautiful and interesting if decorate the walls and ceiling premises with corrugated paper products. All kinds of flowers, pompoms and mobiles will become the highlight of the festive interior.


Garland Probably everyone has made it from corrugated paper: you cut a rolled roll into several wide pieces and make a fringe from both sides. And there’s no need to explain how pompoms are made from corrugated paper.


You can decorate the table for the birthday boy and his friends with your own hands. It is not at all necessary to involve professional decorators.


Using corrugated paper you can create cool images for photo shoots. Any girl will love the idea of turning into a gentle cornflower, Alice in Wonderland or a fairy fairy.


How about an idea to create an original one? photo zone using corrugation? Wander between giant flowers, “manage” time on a huge clock, make faces and laugh at the top of your lungs in the company of friends and family, and then print out all this beauty - this is how the memories will remain!


It’s too much to even mention about numbers and words made of foam plastic and corrugated paper. They are widely used in preparation for children's parties. And here it comes to the rescue. You haven't forgotten what its essence is, have you?


A nautical-themed party wouldn't be complete without something like this: crab. But remember: you have to work! After all, in addition to a bright pompom, you will also need to make his claws and eyes out of cardboard.

Turtle made from corrugated paper - sheer charm! Another idea for creating decorations for a fairy-tale children's show.

By adding paws, ears, horns, a tail and other body parts, a corrugated paper pompom can be transformed into any character. How about Smeshariki or Peppa Pig?

Volumetric paintings made of corrugated paper- the height of perfection! Such work can be made using the trimming technique or by crumpling and gluing individual pieces of corrugation. But first, don’t forget to mark the boundaries of all the details of the picture by drawing an image on a cardboard base.


Crafts made from corrugated paper for the little ones - what could be simpler? The teacher prints out a simple picture from the Internet, and the kids enthusiastically fill it with colorful paper balls.
Pay attention! You need to take just a little bit of glue so that the corrugation does not melt in your hands.


A combination of different techniques when creating an applique is the best option!


Well made ones cannot be distinguished from the real thing. With them you can effectively decorate your room or gift wrapping.


And how nice it will be to receive a corrugated paper bouquet for your mother on her birthday!

Girls can make a luxurious wreath out of bright corrugation, especially since it’s just around the corner. A real wreath will quickly fade (or float away if, according to tradition, you let it fetch water). But a colorful craft made from corrugated paper will delight the eyes of others for a long time.

A bouquet of sweets for your favorite teacher? I have a better idea. Let's make a whole one basket of sweets! Call your classmates for help. , and the delicious craft is ready.

Happy creativity and summer inspiration!