Balloons! It's always a good mood and always a holiday! We are already accustomed to the fact that we can decorate the interior for a home (and not only home) celebration with balloons. But, by the way, balloon flowers can be an excellent alternative to a bouquet of fresh flowers. Of course, if we are not talking about a romantic date or a marriage proposal (although it depends on how you look). But in any case, such a gift will always be original, and in material terms it will be very profitable. In addition, making balloon flowers with your own hands is actually quite simple.
By the way, the art of decorating with balloons is called aerodesign, and the technique of making such decorations is called modeling. Let's learn how to make flowers from balloons to make a bouquet or use them as decoration for a festive interior.
Bouquet of balloons
In order to make a whole bouquet of multi-colored balloons, it is enough to understand the principle of making such flowers and first try to make at least one flower. Shall we get started?
To make one flower, take four bright round or oval balls of the same color, for example, lilac or red, and one round ball of a different color (white, yellow, blue). In addition, we will need a long sausage ball for modeling and, preferably, a special pump for inflating balloons. Of course, you can inflate round balloons with your mouth, but doing this with a long balloon is quite difficult.
So, first we inflate four colored balls - these will be the petals of our flower. Now we connect them in pairs and twist (tie) both pairs together. The petals are ready. For the center of the flower, inflate a fifth round ball. We inflate it so that the size of this ball is two or three times smaller than the previous balls, place it in the middle of the petals and secure it from below. All that remains is to make the stem. To do this, inflate (not very tightly) a green sausage ball and secure it with one end at the bottom of a bunch of round balls.
We make the rest of the flowers in exactly the same way, using multi-colored round balls and green balls for modeling. We collect the balls into a bouquet and tie them with a ribbon in the middle of the bunch of stems. By the way, if such a bouquet, consisting of at least three flowers, is placed on the floor, slightly spreading the “stems” for support, then it will take a strong vertical position and serve as an interior decoration.

Flower made from modeling balls
A more complex technique for making flowers from balloons with your own hands, but also quite accessible to any craftswoman. To do this, we only need two modeling balls and a pump. We will make a flower from one ball, the other will be a stem, so we choose a green ball and a ball of any other color.
First we make a flower, for which we inflate one balloon not too tightly, leaving a pipe tip about three centimeters long. Now we tie the lower end of the ball with a strong knot and tie both ends of the sausage together. Then fold the sausage in half (lengthwise!) and twist it twice in the middle. Next, we press both parts of the ring against each other, visually divide it into three parts and twist it twice again to make three pairs of “sausages”. Now we fold them like an accordion and proceed to the most masterly part of making the flower.
We take the accordion with our left hand and clamp it into a ring made of the index finger and thumb, clasping the ball in places where it twists so that the “sausages” curl into an arc at the top and bottom of the ring of fingers. We grasp the three upper “petals” with our right hand and twist them again. We unclench our fingers and see that the accordion has become a flower.
For the stem, inflate (also not quite tightly) a green ball and tie its tip. Stepping back ten to twelve centimeters from this tip, twist the sausage. Now we bend the short part in half and screw the tail of the ball to the place of the first bend (the first knot). Then we insert the stem into the flower, passing it through the middle and leaving the short part of the stem curled outside above the flower.
Having stepped back about forty centimeters from the base of the flower, we bend the stem first up and then down again. Then, in the middle of the resulting triple part of the stem, we make another twist and get a stem with leaves. Now the whole flower is ready.

Chamomile on the ceiling
This balloon flower is, in general, not a flower, but a ceiling garland. However, this DIY decoration looks like a flower made from balloons. For it we will need four red latex balloons, four white and one gold. Making such a chamomile is as easy as shelling pears.
- We inflate red balloons with a diameter of twenty centimeters and tie them.
- We inflate white balloons with a diameter of about twelve centimeters and also make a bunch of them.
- Inflate a golden ball with a diameter of eight centimeters.
- We tie a golden ball in the center of the red balls.
- We place the white bunch between the red balls and the gold ball, placing the red and white “petals” in a checkerboard pattern. We fix it.
Such a chamomile, placed on the ceilings or walls, will be an excellent decoration for the festive interior! Try it. You will definitely succeed!
Balloons have always brought indescribable joy to children, as well as adults. And if you make an intricate figure out of them, then the joy doubles. That's why our magazine took the liberty teach our readers how to make crafts from sausage balls . Detailed instructions, descriptions, photos and videos that you will find in the article will help in improving this skill.
The main thing in the article
What can you make from sausage balls with your own hands?
Having in your arsenal a pack of colored sausage balls, you can make any figurine with your own hands, ranging from flowers, animals, letters to entire workshop structures in the form of large cars, bicycles, human figures. But it’s too early for beginners to aim at masterpieces, so let’s start learning from the basics and the simplest figures.
How to properly inflate and tie a sausage balloon?
Sausage ball, or as it is correctly called modeling ball, can be inflated in two ways:
Using a pump.
- You can use a special pump to inflate such balloons or, in the absence of one, take a regular pump from a bicycle, but it must be used with a nipple cap.
- Rub the ball itself in your hands and stretch it by the edges several times. This will help “warm up” the surface and prevent the balloon from bursting when inflated.
- Fix the edge of the ball on the pump hose and slowly inflate the ball. It should not be made very dense, since when creating figures the air will need to go somewhere.
Inflate the balloon with the sausage using your mouth.
- Initially, follow the steps described above to warm up the surface of the ball.
- You need to inflate such a balloon with your mouth in parts. Use your fingers to pinch the walls of the ball, moving 5–8 cm from the edge. Then inflate the resulting mini-chamber. Slowly move your hand to the second edge of the sausage, diligently blowing air into the ball.
If you plan to make crafts from an inflated balloon, then leave about 10 cm of uninflated space at the edge. This will allow the air to “escape” from the pinched areas, and the ball will remain intact.
Concerning strings, then regardless of the method of inflation, it is necessary to bleed some air from the “inflating” edge. Wrap the resulting part without air into a loop (on your finger) and pull the edge through the resulting loop. More details in the photo.
How to make a flower from a sausage ball step by step: diagram for beginners
It is believed that flowers- This is the simplest figure that can be folded from modeling balls. Initially, you should get two balls of different colors: green - this will be the stem, red, yellow, blue or any other for the bud itself. The balls need to be inflated, leaving 5 cm of uninflated space. Next, perform the following steps. 
- You need to step back 8-15 cm from the place where the tie is tied, twist it and form two leaves.
- Twist the ball for the bud into a ring, twist it in the center in the form of a figure eight. We repeat the movements several more times.
- We connect the bud and stem to each other.
Chamomile made from sausage balls with photo
To get started, inflate two balloons (the stem and bud of a chamomile), leaving 5 cm of uninflated space at the end. The materials are ready, you can start.

Sausage ball rose
Although it seems that make a rose from a balloon
quite hard 
in fact, it is done quickly and without much effort. For one flower you need to prepare two balls: green and red. They need to be inflated and follow the step-by-step steps shown in the photo. 
Tulip made from sausage balls
Best for making a tulip from sausage balls
The following colors are suitable: green and yellow. 
First, we prepare the material for work - inflate the balloons. Let's start forming the flower.
- We make 5 petals from the yellow ball, so visually it must be divided into the same number of segments.
- We connect the first two segments together by making a loop.
- We fold the long part of the ball along the length of the first two and secure it by inserting it inside the finished loop.
- In this spirit we perform all 5 petals.
- If you have an unused tail, and this happens often, push it inside the bud.
- Attach a green ball to the finished bud. We measure a small piece on it and twist it with a loop. You will get a leaf under the bud.
- You need to make three such leaves. If necessary, twist the leaves in the center of the flower.
Bouquets of sausage balls with photo ideas
Any of the flowers described above can be arranged into original bouquets. We look at the photos and get “charged” with original ideas for making balloons. 


Figurines made from sausage balls: instructions for beginners
Before you start modeling balls and start making intricate figures, you need to learn the basic techniques for rolling sausage balls. 
- Simpleskrlearning. Having determined the required length of the inflated balloon, twist it twice to obtain a small bubble.
- Lock. Do three twists as described above. You should get four bubble segments. Take the middle two to the side and twist three times. This technique is used to fix and create ears with a muzzle.
- Twisting with bending. Do a simple twist at one end of the inflated ball. Afterwards, measure the required length on the long part of the ball and bend it in half without twisting. Wrap the outermost bubble around the bent structure.
Master classes on creating animals from sausage balls with simple diagrams
Modeling balls of size 260 are considered ideal for making figurines. Such balls are long and perfectly retain their ability to stretch without bursting.
It will not be possible to make animals from ordinary latex balloons. When working, remember that the ball must be squeezed firmly enough, but at the same time be careful so that it does not burst. Don’t forget not to blow the balloons out 5–8 cm. Now let’s look at how to make animal figures from sausage balloons.
Sausage ball dog

- Inflate the balloon, leaving a 10 cm tail uninflated.
- Next, twist the muzzle from the edge where the ball was tied. It should be 7–10 cm.
- Make two ears 5 cm each and fasten the ears to the muzzle using the locking technique.
- Make the neck about 7 cm.
- Now use a lock to twist the dog’s two front legs. They should be longer than the neck.
- Now measure out the length for the body. Here it all depends on the wishes of the person making the figurine and the availability of the remaining ball.
- Repeat the lock with the hind legs. They must be made the same length as the front ones.
- We leave the tail sticking out on the opposite side of the head, and the dog is ready.
Swan from a sausage ball

Inflate the balloon, leaving a tail. Roll it into a loop with a long end (as in the photo). 
Twist the loop in the middle and insert the resulting two circles into each other. Having straightened it, make wings and a tail. Raise your neck and give it a semi-bent appearance. The swan is ready!
Sausage ball cat
Sausage ball mouse
Even the most inexperienced craftsman in making figures from balls can cope with the task of making a mouse. All you need to do is inflate the balloon, leaving a long, uninflated tail. Next, twist the lock. That's all, all that remains is to paint the figure accordingly. 
You can make a mouse in another way. In the diagram above, the figure is made using twisting with a bend in the area of the ears. This mouse differs from the one described above in having round ears.
Bunny made from sausage balls
Sausage ball horse
A horse made from a long ball turns out to be very cute and children play with it with pleasure. 
To make it, choose two balls of different colors, then the end result will look more impressive. The diagram shows an option on how to make a horse from one ball, but the part that consists of many small circles and is the mane can be replaced with a ball of a different color. Below is an example of how this can be done. 
Teddy bear made from sausage balls
Sausage ball giraffe
A giraffe's technique is no different from a dog's, the only difference being a longer neck. The photo shows a diagram of the giraffe. The master will only have to decorate the resulting figurine. 
The simplest toys made from sausage balls with photos for beginners
From sausage balls you can not only make a whole zoo of figurines, but also make interesting toys that children, especially boys, will enjoy.
Sausage ball sword

Even a small child can handle making such a military accessory, and the diagram below will help him with this. 
Fun games can be played with such paraphernalia. These could be knightly tournaments, pirate battles and others. It is quite possible to make a sword using a different technique. 
Such toys are a great addition to or.
Sausage ball machine
Sausage ball gun
Butterfly or bow made from sausage balls
This craft can not only be played with, but also used as a decoration for a gift or bouquet. Instructions for making a bow:

DIY crafts from sausage balls: master classes for beginners
Sausage balls are a unique thing from which you can make anything you want. We present master classes on all kinds of accessories made from balloons, which are made quickly and bring only a positive mood.
Crown of sausage balls
For the crown you need to prepare two balls of the same color, but different shades. It is done as follows:

Baskets of sausage balls
Sausage ball heart
The heart is very easy to make. Inflate a long balloon and tie its edges. Give it the necessary shape with your hands and the heart is ready. 
Additionally, such a heart can be decorated with a figurine or flower.
Letters made from sausage balls
Do you dream of learning how to make balloon bouquets with your own hands? Learn twisting - the art of making shapes from balloons. Basic rules necessary for such creativity:
- the ball should be soft, there is no need to fill it with air completely;
- you need to start twisting the ball at the base, from the “neck”;
- Twisting can only be done in one direction.
What balls are used in twisting? In addition to the usual latex ones - round or oval - familiar to everyone since childhood, modeling balls (SMBs) are very popular. The ball is a conditional name; when filled, it rather resembles a long stick from which you can create any shapes you like. A bouquet of mylar (foil) balloons looks very piquant. They are not only stronger than latex ones, but they also have an unusual shape - in the form of hearts, stars, and some kind of figures. Such a bouquet on a stand at the entrance to the hall sways as if alive in the slightest breeze (if the flower balloons are filled with helium). And the last squeak - glowing balls. For this type, ordinary latex ones are used, but an LED and a battery are built inside. A stand for a bouquet of such balls will create an interesting color accent. In the master class on making a bouquet of balloons with your own hands on a stand, the simplest and cheapest latex balloons and ShDM are used.
Bouquet of balloons
Tools and materials

Step-by-step instruction
- We start with the red ball. Fill it generously, leaving 3 cm of empty space at the end.
- We tie the ball without a thread: wrap the ring around two fingers (around the middle and index fingers), insert the end of the ball into the resulting loop and tighten the knot.
- We tie the beginning to the end, fold it in half and twist it twice at the fold.

- We twist the ring folded in half in two places to divide it into three equal parts.
- We fold the entire structure in the form of an accordion.
- With one hand we hold the ball in the twisted places, and with the other we twist it in the center and get a flower - a daisy with six petals.

- Let's move on to the stem. Fill the green balloon, leaving a little space at the end, and tie a knot.
- 10 cm from the base of the ball we bend and mark the place of twisting, focusing on the knot in order to hide it in the place of twisting.
- We insert a stem into the middle of the flower (as in the photo) so that the twisted part of the stem is on top.

- If you need to make leaves, measure 10 cm in the middle of the flower, twist the ring and straighten the leaf.
- We perform this operation with each flower.
- When all the flowers have been collected, the bouquet needs to be decorated. We select a modeling ball of a suitable color and fill it with air, leaving 7cm at the end.

- Having tied a knot at the end, step back 5 cm from it and twist the leg, trying to hide the tail in the twist so that you get a ball at the end.
- We connect the ends of the ball into a ring, orienting its size to the thickness of the bouquet.
- The tip of the ball must be cut off right down to the knot so that it does not interfere. The blank for the ribbon is ready, all that remains is to tie a bow.
- For the bow, inflate another identical soft ball almost to the end.

- At a distance of 30 cm from the knot, we twist it in the form of a fairly large loop.
- Next to the first one we twist another similar loop, checking the ends of the ball so that they are at the same level.
- We connect the resulting bow with the first ribbon ball, beautifully wrapping the ends in different directions.

- We insert a bouquet of balloons into a ribbon with a bow. Options for ribbons, as well as bouquets of balloons, can be different. See the ideas in the photo.
- Using flowers from balls without leaves, you can arrange a composition on a stand, for which you need to align the stems and tie the bouquet with thread.
- Having decided on the height of the structure, we twist the entire bouquet. At the place of twisting, the balls must be tied in pairs, releasing air at the ends of the balls. We put the flowers aside and move on to the stand.

- For the stand, we inflate 5 round balloons and connect them to each other in the form of a pair and a triple.
- We perform the same operation with five-inch balls. Pairs and triplets of balls must be twisted together.
- We attach a weight in the form of a five-inch ball to one of the flower stems,
 filled with water, cut off the free ends from the remaining stems.
 - We insert the load into a stand of large balls. Between the large balls and stems in the second tier we put on a stand of small round balls.
- Fill another long ball of the same color as the stand with air. The ball should not be very tight - we will make beads from it, twisting the beads strictly in one direction.
- We connect the beads into a ring already on the bouquet, tie it and cut off the excess. The bouquet on the stand is ready.
- If there are any unclear parts in the description, you can watch the process of making flowers from SDMM on video.

Using this simple technique and your imagination, you can make a variety of compositions to decorate the holidays. A bouquet in a basket of balloons looks beautiful; you can decorate a hall or stage with a garland. There is no greater pleasure than decorating your own wedding with your own hands.
By decorating the hall with bouquets of balloons at a wedding, you will not only save on fresh flowers (which is especially important in winter), but also fill even a very large room with several compositions from balloons.
Mono-groups of one type of flower (daisies, tulips) are considered the most stylish. Such an original non-standard bouquet can be made for the bride’s wedding bouquet (see photo), especially if the wedding is themed. Flower beds are also popular in the design of a banquet hall.
Hand-made bouquets, of course, do not have the aroma of fresh flowers, but they will bring no less joy - both the process of creation and the result. The main thing is to start.
Unique - we create it ourselves. How to make and arrange, read our article.
Do you want to surprise your mother, grandmother, girlfriend or child? Then give a bouquet of balloons! We offer step-by-step instructions with photos for beginners on how to make flowers from balloons with your own hands. In just a few minutes you can make a large bouquet, and then you can learn how to make large figures.
Master class: flowers from balloons
A bouquet of sausage balls will turn out bright and original if you choose balls of different colors and think through their combination. It is better to inflate them with a pump, but if you wish, you can try with your mouth. The disadvantage of long balloons is that they are quite tight, so you can’t inflate them with your mouth much.

Inflate several sausage balls, but not completely, otherwise the simulation will not work. To make flower petals, simply connect the ends of the ball and tie them together.
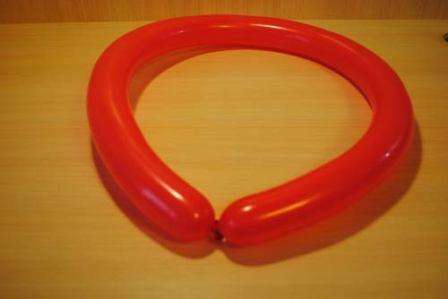
You will get a strong semicircle, which will then need to be twisted so that you get six sausages.

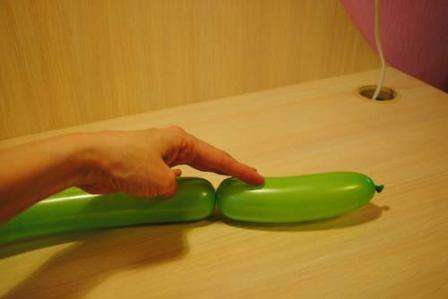
Now fold the sausages so that the folds are in your hand, as in the photo.

Twist them together and unfold them. The result was a simple flower with six petals.

You can start making the flower stem. To do this, inflate a green balloon and make a small sausage at the top.
Pass it through the core of the flower and bend it in half. Secure it from below so that the core does not fall out and the flower stays firmly on it.

All that remains is to twist the stem to form leaves and secure them. You have the simplest flower based on long sausage balls. If you make several of these flowers, you can put them together into a huge bouquet that children and adults will love.

After you have finally mastered the technique of making daisy flowers from balloons, you can proceed to more complex shapes and completely master the art of twisting. Flower modeling is a useful hobby, because you can decorate any holiday in an original way with minimal expense.

Don't know what to do with your children? Try twisting balloons into original shapes and flowers. DIY balloon flowers, step-by-step instructions with photos for beginners, which you found in this article, will help even kids learn how to make full-fledged bouquets.
Do you want to surprise your guests and family at a holiday, but don’t know what you can come up with? This easy balloon flower tutorial will inspire you.
Balloon flower
To make a simple balloon flower, you need to prepare:
- long balls: yellow, red or pink (for petals) - 1 pc.;
- ball for stem and leaves – green or yellow – 2 pcs.;
- pump for inflating balls with air.
Making a flower:
- First you need to inflate the balloons. For the petals you will need one long ball.
- You first need to inflate the pump completely, and then you need to slightly release the tip so that a small, uninflated “tail” (up to 7 cm long) remains at the end.
- The inflated ball takes the shape of a sausage; it should be soft to make it easier to work with.
- We connect the ends of the inflated balloon to form an oval.
- In the middle you need to divide the resulting figure and twist it twice. You should always twist in one direction only. For example, clockwise.
- We twist it once first, then measure the same distance and twist it a second time. There should be 3 equal parts - these are the future petals of the flower. Each part must be the same, otherwise the flower may be crooked.
- Now the most difficult part: you need to fold the resulting figure in a zigzag manner, turn 3 sausages on the right to the three on the left. You should now have petals. And at the place of twisting a tight ring-lock is formed.
- The petals are ready, now you need to make the stem and leaves. To do this, we again pump the yellow balloon with air from the pump, leaving the tip free (the same 7 cm), and tie the inflated balloon.
- And here’s a little secret: carefully push the tip inside the inflated ball with your finger, intercepting it with the fingers of your other hand, twist it so that the tail does not jump out.
- Now you can connect the stem with a beautiful center with petals.
- Make leaves from the remaining ball. We inflate, twist in half, twist the figure in half again so that we get identical twisted segments on each side.
- Then you need to connect these segments together to form a petal: on one side and on the other.
- You need to fold it slightly at an angle so that the leaves are the same.
The balloon flower is ready. Only 3 long balls are needed to make such beauty. And once you get the hang of it, you can make a whole bouquet of bright flowers out of balloons.
How to make a tulip from balloons
A tulip is made as simply as a chamomile, but you need to prepare the following materials:
- long balls: yellow and green, 1 pc.;
- pump.
How to make a tulip from balloons:
- Using a pump, inflate one yellow and one green balloon each. Just leave the tails free, length 7-9 cm.
- We divide the yellow ball into 5 parts, but for now we twist only 2 parts, the length of each is as long as your palm. We fasten the resulting figure into a loop, twisting it.
- We also measure out a segment of the same length and secure it again, screwing it to two petals.
- We slightly knead the remaining tip of the ball and make 2 more petals in the same way. There will be 5 petals in total.
- The result should be a figure of 5 petals and a small remainder of the inflated balloon.
- This remainder needs to be pushed into the middle of the ball; this will make the bud a little more voluminous.
- Screw the inflated green ball to the tip (you can use a knot).
- Twist 3 loops of the same size. They should be evenly distributed around the leg and just cover the junction of the balls.
- The tulip is ready. You can stop here or make a few more of the same beautiful flowers.

