How to congratulate your mother, grandmother, sister, girlfriend, colleague on March 8? What to give for Women's Day so that it will be remembered for a long time and stored carefully? Make a card with your own hands from paper and please your lovely women!
Master class on making original greeting cards
For creativity we will need:
- Sheets of double-sided colored paper.
- Sheets of white office paper.
- Postcard templates printed on a printer.
- Scissors or a craft knife for cutting.
- Patience and perseverance
Of course, a man is unlikely to prepare such a gift. Adults and self-sufficient people have no time to make clippings. It’s better to buy something, cook something, use an easier way.
But paper cards are great for children and women’s hands. Believe me, the result is worth it!
We perform the actions sequentially:
- We print ready-made templates on a printer.
You can do this directly on colored sheets of paper, or you can do it on plain office paper.
The second option is preferable: it will allow you to do the work more accurately and will not leave marks on the paper lining.
2. Whoever printed it on colored paper starts cutting it out.
This can be done with nail scissors or a special breadboard knife.
Whoever printed the templates on white office paper carefully attaches them to the colored blank. This can be done with paper clips or paper clips.
The second option is also good because instead of one postcard, you will receive two: color and white!
3. Fold the white sheet in half and place it in the future postcard. We measure the boundaries, cut off the excess with scissors.
There will be extra “tails” both on the inner part and on the outer, ceremonial “shirt”.
4. We write the words of congratulations by hand or type them in a beautiful font on the computer, and then print them out.
5. Glue the inside.
I used “Dragon” glue: PVA leaves marks and can “distort” our handiwork. Moreover, the paper used for production is not very thick.
6. For beauty, you can outline the cut lines with a felt-tip pen or colored gel pens.
7. The postcard is ready!
Such postcards can be given on March 8 and on birthdays: they are universal in appearance and ideal for these two holidays.
If you are at a loss as to what words to write, choose poetry - the ideal solution for congratulations.
These are the cards I got:
 And this is the second option, made from white office paper. I decorated the cut out edges with gel pens and it turned out beautifully:
 I found some of the templates on the Internet, some I created myself, using various pictures from the same World Wide Web. You can take ready-made solutions, or you can find, invent, draw something yourself. Fantasy, desire, creativity are faithful helpers for creating original gifts.
My DIY greeting card templates:


Women's Day is approaching, and it's time to ask yourself the question: how to surprise and please your beloved mother, teacher, sister, grandmother or godmother? To spur your imagination, check out the ideas for original flower arrangements, voluminous cards, pasta decorations, children's culinary masterpieces and something else interesting!
Paper flower arrangements
For the smallest craftsmen, making your own postcards or flower stands is suitable. We cut out circles of various diameters from colored paper, without using a stencil. We glue the circles one on top of the other in the shape of a flower, fold the flat stem, attach the flower head to the stem with tape, and connect the flowers together with a stapler. We make a pocket on the card and insert a spring bouquet into it.


Another easy-to-make flower is made from colored paper and cocktail tubes. We collect several colored flower blanks of different sizes together, put them on a tube, make cuts at its tip and open them outward.


Let's make another bouquet. We make a flower head from squares of colored double-sided paper and attach the stem. Next, the bouquet can be used for direct appliqué on a card or panel, or you can make a secret pocket inside the card and surprise your mother with an unexpected bouquet inside!


Do you love tulips? Then let's start producing them! Fold a square of double-sided colored paper into eight pieces and make cuts as shown in the diagram. We bend the tulip petals and fix them with glue. We make a round stem out of paper and fix it with glue. We make cuts on one side of the stem and attach the stem to the flower using them.


Flowers made from crepe paper turn out to be very delicate and translucent. We cut out the base and connect it to the stem, which is based on wire covered with fabric or nylon.


An unusual flower can be made from... a toilet paper roll. Why not! We bend the cardboard base, secure it with a stapler, paint it with paint and attach it to the stem.

Little Chef: Breakfast for Mom
Mom will certainly be delighted with the breakfast prepared especially for her, and moreover, if it is made in the cute and touching form of a bouquet of sunny flowers. Fry the scrambled eggs inside the cut of the pepper, garnish with green cucumbers, green beans, parsley, onions and dill, green peas or corn.


Pasta extravaganza
We make pasta decorations for mom, sister, or godmother. To do this, we select specimens with an unusual shape and texture. We paint the pasta in separate bags using acrylic paint or gouache. Dry and thread.


For variety, you can add narrow cornflake “beads”.

A frame for family photographs, decorated with colored textured pasta, beads, shells and pebbles, will long remind you of a joyful spring day.


Paper bracelet
We make an unusual decoration from paper curls and secure them with glue. We collect our beads on a thread, and the bracelet is ready!


Vytynanka on March 8
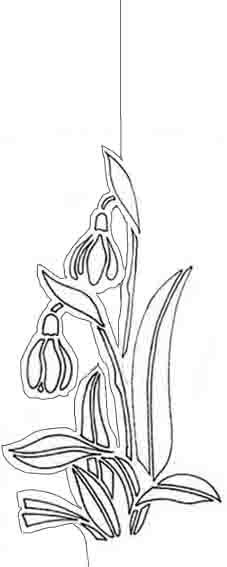
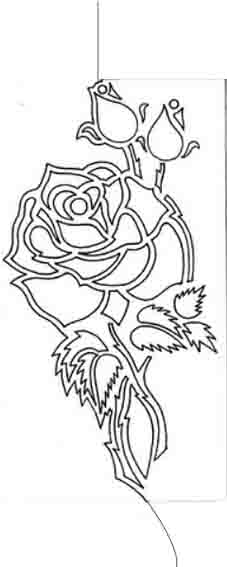
The silhouette paper cutting, beloved by many, can be successfully used in works for March 8th.
We design cards with a carved insert of flowers. To do this, draw or print a stencil, cut it out with a stationery knife or scissors, and glue it to the base.


Flowers can unexpectedly bloom inside a card. To do this, cut them out separately and insert them into the card.


You can decorate it with your own hands as a panel on the wall or a gift box. Look how fresh and cheerful the flower arrangement turned out!

Arrange a whole bouquet of flowers for congratulations. It can stand on its own or be attached to a gift box.


For such bouquets, you can cut out a special basket from colored paper.


And a bouquet of fresh flowers can be decorated with lace butterflies!
The holiday is approaching - let's get to work!
When writing this article, photographs were used from the sites: mashustic.com, krokotak.com
Master class on a spring card using the vytynanka technique.
Target: Making a spring card using the vytynanka technique.Tasks:
- to develop children’s skills in working with paper, a stationery knife, and glue;
- develop a sense of color, shape and composition;
- cultivate the desire to bring joy to others by making gifts with your own hands.
It's May, it's warm and summer is coming.
Everything and everyone is dressed in green.
Like a fiery fountain -
A tulip is opening...(what?)!
Today I propose to make a beautiful spring card with tulips. We will carry out the work using the vytynanka technique. The term “vytynanka” comes from the Ukrainian word “vytynat”, which defines the action of cutting. Paper vytynanki is one of the directions of Ukrainian applied decorative art, cutting out beautiful patterns, ornaments, images, figures, landscapes and other subjects on paper. One of the simplest types of vytynanka is a New Year's snowflake, cut out of any paper material. Well, today we will cut out spring tulips. For work we will need: a cutting template, a colored background for the card, a stationery knife, scissors and glue.


Do not forget about safety precautions when working with cutting and piercing objects. We begin to cut, focusing on the finished postcard sample.

For beauty, tulips can have stamens inside the buds.

After everything is cut out, this composition must be glued onto the selected colored background (the base for the postcard).

As a design option, tulips can be cut out from the frame and also glued onto a colored base, you will get a slightly different card.
Good luck to everyone!
How to make a stencil of a bird on a branch for cutting paper, bullfinch, beautiful butterflies for windows.
Butterflies are such gentle and amazing creatures that, observing them in nature, a person invariably feels incredible delight and admiration.
These beautiful insects are credited with magical and magical properties, making them mysterious characters in fairy tales, legends, and myths. Wonderful creatures do not leave anyone indifferent.
If you are in love with these fabulous, beautiful insects and decide to “settle” them in your home, then you have several simple and affordable methods at your disposal. Decor using the image of a beautiful butterfly is done using a stencil.
In this article you will find a selection of spectacular butterfly stencils that are perfect for decorating interiors and windows. Read the article and choose the option that suits you best.
Cutting paper butterflies for windows: stencils and templates
Today you can often see beautiful drawings on windows. Such images are applied using a stencil or the contours are drawn directly on the glass.
Using butterfly stencils, you can create amazingly fabulous pictures that will be appropriate not only during the holiday, but also on weekdays.
- Using stencils you can decorate not only windows. Butterflies floating in the air will decorate the walls and ceiling in the bedroom and nursery.
- The background can be discreet, in various pastel shades or painted in a contrasting color.
- You can apply images of butterflies in one color or create a real riot of colors and shades.
- Paints with various effects are also suitable (paint with luminous particles, with glitter, to age the image).
- If desired, you can also use the fashionable method of decorating with three-dimensional figures. Flocks of butterflies will look beautiful and original on the window glass, giving a special zest to the room. It is better to cut out such butterflies from thick paper.


The background can be discreet, in various pastel shades or painted in a contrasting color
The volumetric butterfly is performed in several stages:
- select a stencil and paper of the desired color (you can also use thick felt fabric)
- mark the place where the butterflies will be glued
- the image of a butterfly is transferred to paper using a stencil
- butterfly cut out
- A small square of double-sided tape is glued to the abdomen
- butterfly sticks to window glass


A bright ornament on a window or wall can be a vytynanka - an openwork or silhouette figure cut out of paper. To make the vytynanka, paper of a suitable color is selected.
- The figures are cut out and glued directly onto the window glass. Such decor will ideally complement the festive atmosphere of the room, making it elegant and cozy. A positive mood from contemplating such beauty is guaranteed!
- Each butterfly can be made unique by cutting out an original pattern on the wings. You can approach this process creatively and cut out patterns like snowflakes.
- The vytynankas made in this way will be a wonderful home decoration during the New Year holidays or the birthday of a child or an adult.
- By decorating the windows with butterflies, you can easily change the overall look of the interior. With the onset of the new season, the issue of adding bright accents becomes relevant. Using our tips, you can do this in just one evening, because the decor is simple and does not require large financial investments.

Wall design options


By choosing the most suitable templates presented in our article, you can print them and create real masterpieces for handmade windows.

Butterfly vytynanki on windows: templates
Simple silhouettes of butterflies can be cut out of colored double-sided cardboard. Thick colored paper will also work. With butterflies glued to the windows, the room will simply shine with new colors!
You can also use corrugated paper to cut out butterflies. From this material, butterflies are voluminous and look original.

How to make winged beauties? Making decorations in the form of butterflies for windows includes several stages:
- prepare materials for cutting out butterflies (cardboard from which we will cut a stencil, base material from which we will cut out insects and glue them to the window, a sharp utility knife or thin scissors)
- cut out the stencil printed on cardboard
- transfer the image onto any material using a stencil
- at the beginning we pay attention to small details and only after that we cut the butterfly along the contour
Butterfly patterns:

Butterfly pattern No. 1

Butterfly pattern No. 2

Butterfly pattern No. 3

Butterfly pattern no. 4

Butterfly pattern no. 5

Butterfly pattern No. 6

Butterfly pattern No. 7

Butterfly pattern no. 8

Butterfly pattern no. 9
To cut out butterflies you can also use:
- thin tin cans for drinks (butterflies made of this material will look interesting if you turn on a night light or table lamp next to them)
- sheets of cardboard
- pages of glossy bright magazines
- colorful pages from old printed publications (they will look artificially aged)


Butterfly pattern no. 10

Butterfly pattern no. 11

Butterfly pattern no. 12
If you decide to decorate your windows with protrusions in winter, it is better to use white paper for this, since the figures will look good against a contrasting background. In summer and spring, figures cut out of dark paper will look good on light-colored windows.
Video: DIY: ROOM DECOR/ROOM DECOR/ROOM DECORATION for SPRING/SUMMER (with your own hands)
Every home has a particularly cozy place where the whole family sits in the evenings. Paper decor will help calm your nerves and relax.
- Openwork butterfly patterns are suitable not only for a nursery or for a room in which a young girl lives.
- A similar decor will transform the parents’ bedroom if the flocks of winged insects are few in number and chosen tastefully.
- A small panel with a flock of winged insects on it will fit well into any interior.
Below are patterns of protrusions that can be used to decorate the interior:

Vytynanka butterfly


You will learn how to cut a stencil by watching the video.
Video: How to make a stencil with your own hands quickly and easily!
Cutting out paper birds for windows: stencils and templates
- Designers also often use beautiful bird silhouettes as decoration for walls and ceilings. We suggest you cut out birds from paper to stick them on your windows.
- Birds will become an inexhaustible source of good mood and add positivity. Your household will love such decorations, especially if you make them with luminous paint or apply sparkles to bird figures.

Stencils and patterns of birds for windows:


Birds: cutting stencil


Cutting a bullfinch out of paper for windows: stencils and templates
- When we hear the word winter, our imagination pictures snow-covered streets outside the window, children on sleds, bird feeders filled with grain and bread.
- Near the feeders, the bird brethren chirp and swear. Among the tits and sparrows there is always one or more bullfinches.
- When you want to bring the onset of the merry New Year holidays closer, you can decorate your room with an image of bullfinches.
- Cut them out of paper and stick them on the windows - what could be simpler? A festive mood is guaranteed not only to you, but also to everyone who will contemplate the result of your labors with you.
Bullfinch stencils for cutting:


Cut out a bird on a branch from paper for windows: stencils and templates
Bird figures cut out of paper and glued to the windows will help bring the onset of spring closer, at least in your own apartment.
- Multi-colored paper birds will lift your spirits and bring a feeling of spring lightness and freshness, as if the first flowers have bloomed outside the window, and fluffy lumps of “seals” have blossomed on the willow tree.
- The tradition of decorating windows with protrusions has long roots. In addition, such decor was popular not only in our country.
- Many peoples even today decorate windows and walls with openwork patterns cut from paper of different colors. You don’t have to wait until the New Year holidays for this.
Stencils and patterns of birds on branches:


Bird on a branch: stencil


How to make window decor? The process of making “feathered birds” for window decoration is no different from that described above.
- We print or transfer the drawing onto paper in another accessible way
- Carefully cut out the birds
- Glue it to the window glass using a piece of double-sided tape
- If you want to attach the birds to the curtains, then use small safety pins for this.
- Together with your children, you can come up with an interesting story of birds and place them on the branches of a paper tree.
Sticking birds on windows: templates


How to beautifully decorate windows with butterflies and birds for the New Year: photo
- If you are a creative person, then from time to time you just need to change something in your environment. There is not always enough money to make drastic changes.
- However, there is a way out: you can create interesting decor with your own hands, or try to do something with your children.
- Such joint creativity will not only please the baby. He will be very proud of the creation he made with his mother.
- Birds can be cut out of paper of the same color or a “feathered” masquerade can be arranged on the windows.
- Carved birds will look great as wall decor. They can decorate interior doors and curtains. Above the door you can hang a kind of mobile phone made of paper birds or hang figurines of birds on a string in the form of a garland.

