The master class is intended for children of senior preschool age (5-7 years old).
Isothread- this is embroidery on thick material (paper, cardboard, velvet paper, sandpaper, etc.). Works using this technique turn out to be unusual and exquisite. Using embroidery using this technique, you can decorate a wall panel, postcard, or packaging box. In this master class we will embroider a picture on the theme “Cockerel”; such a picture can be used as a gift for any holiday.
Target: Strengthen the ability to create images with thread.
Tasks: Develop fine motor skills of the hands. To cultivate children's aesthetic perception and independent drawing with thread.
We will need a ready-made drawing diagram or draw it ourselves.
For this embroidery we will need:
sewing threads (blue, yellow, orange, red);
sewing needle;
sheet of cardboard (green);
graphite pencil;
push pins;
a piece of foam for lining while piercing with a push pin.
Description:
On a sheet of colored cardboard on the reverse side we apply a drawing of the Cockerel (circles, triangles) and I use stencils.
Along the lines on the wrong side we apply markings for the holes (using a stencil). The number of holes on both sides of the corner should be the same.
.jpg)
Having placed a plate of foam plastic, we use a pushpin to pierce holes according to the markings. There will be holes on the front side that repeat the pattern on the back.
.jpg)
We thread the needle and begin to embroider the corner on either side according to the pattern. We embroider all the corners in the picture.
.jpg)
We embroider all the circles according to the pattern.
.jpg)
.jpg)
.jpg)
The picture “Cockerel” is ready.
.jpg)
In the same way, you can embroider the following pictures (photo 9 - “Bunny”, 10 - “Cat”, 11 - “Sun”, 12 - “Soap Bubbles”, 13 - “Fireworks”).
.jpg)
.jpg)
.jpg)
.jpg)
.jpg)
Learn about the isothread technique, with which you can create beautiful paintings from threads. See how to make a fabric panel.
For beginners: isothread diagrams

The isothread technique was invented by English weavers. They proposed an interesting way of making panels: nails were driven into the frames, and multi-colored threads had to be pulled on them in a certain sequence. The result was beautiful canvases that decorated the walls.
To make thread paintings, let's first learn 2 fairly simple techniques. Using and combining them, you can create interesting compositions. The first motif is a technique for filling a corner, the second concerns filling a circle.
Here's what you need for this job:
- cardboard;
- pincushion and needle;
- threads: iris, floss, silk;
- awl;
- scissors;
- pencil;
- ruler.

On a sheet of paper, draw a right angle with sides of 8 and 10 cm. Make markings on one and the other side, placing dots every centimeter. Make holes on all these markings with an awl.

If you are just mastering the isothread technique, then number the dots, this will help you avoid getting confused when embroidering with thread.
- Insert the needle from the wrong side into the cardboard (a knot remains on this side) at number 1, pass the thread to the front side, insert the needle into hole number 2.
- Make a puncture from the inside out into hole number 3. The needle is on the face. Move it to 4.
- The next turn of the thread will have a path on the front side equal to the distance from numbers 5 to 6.
- The next straight line has a distance of 7–8.
- Based on this technique, fill in all the segments from one side to the other of the corner.
The second principle is filling the circle.

Draw a circle, number it with dots, placing them at equal distances. The more there are, the tighter the turns will fit together.
If you subsequently make patterns in the shape of a drop or an oval, do them using the design of an angle or a circle.

Get acquainted with another principle of designing elements using the isothread technique. Diagrams will help with this.

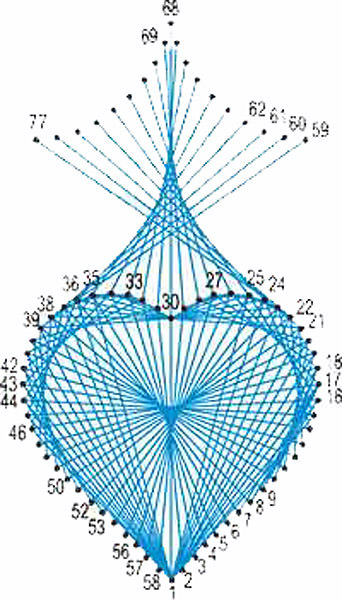
Here are 2 options for filling out the heart.

When you have learned how diagrams help you create paintings using the technique of isonite, and have learned how to perform simple elements, move on to practical work. The Butterfly painting consists of simple patterns that will help you recreate this spectacular insect.

For this thread painting you will need:
- colored cardboard;
- image of a butterfly;
- awl;
- green and yellow floss threads;
- needle;
- thin tape;
- scissors.

The cardboard should be of such a color that the threads used look good on it. For example, bright and light colors look great on dark colors.
Redraw the butterfly onto the cardboard and make holes at equal distances using an awl. For convenience, you can number the segments for the correct movement of the thread.

Let's start with the top wing. Here's how we design it. From the inside out we secure the ends of the threads with tape.

We design the second wing in exactly the same way - symmetrically with respect to the first. This is what happens.

The lower ones will be made from threads of a different color.

To mark the body and antennae of the butterfly with threads, sew them in a straight line and go back. We cover the reverse side with a white sheet of paper or cardboard so that the work looks neat on this side as well.
Such a butterfly can become the front side of a postcard, like the following samples.

Using isothread patterns, you can make a charming dog or heart, flowers to give your creations. You can leave these embroidered items in your home; they will give your home a unique look.
- Use smooth cardboard or thick paper as a base; sometimes velvet cardboard is used for paintings.
- To work you will need an awl, take a sharp and short one. Make punctures on the cardboard from the front to the back so that it is neat.
- To draw a diagram, take a simple, well-sharpened hard pencil.
- Use a needle with a large eye, this will allow the thread to pass through unhindered.
- To avoid damaging the working surface, place a backing under the cardboard; it can be a wooden board or thick foam plastic.
- Watch the thread tension. If you pull it too hard, you may tear the cardboard base. A very weak turn will cause the thread to sag.
- The wrong side will look better if the completed thread painting is glued onto thick cardboard.
- The isothread technique is used to make panels, postcards, paintings, bookmarks, and covers.
Thread paintings
See what other panels you can make from this material. This is how paintings are created from threads and nails (which are used instead of punctures).

The base can be plywood or other similar material into which nails can be driven. They are attached along the boundaries of the contour of the design and wrapped with thread in a certain order, using the isothread technique or in a chaotic manner.

For such a picture of threads and nails you will need:
- painted plywood;
- nails;
- hammer;
- bright threads.
For the next thread and nails painting, take:
- a solid base with a dark background;
- white threads;
- drawing;
- nails;
- hammer.

Attach the selected design to a thick base. Drive nails along its external and internal contours. Decorate the pattern with thread, sequentially winding it either on the outer or on the inner nail.
Since there are fewer heart-shaped nails than those driven along the outer contour, wind the thread on one inner one and several outer ones.
If you don't want to maintain proportion, arrange the thread randomly.
For the next picture of nails, the thread comes out from one point and then, sequentially, rushes to the outer contours of the wings.

And here’s how a randomly wound rope will help you make a beautiful inscription, a heart. Using this technique you can make a sign and save a lot on it.

The master class will help you understand the intricacies of the next work, where threads also play a major role.
You will need little for it:
- cardboard;
- wool threads of various colors;
- pencil, scissors;
- brush;
- glue.
We decorate with threads of different colors, also gluing them on small details: eyes, nose, mouth, face. If there are flowers or other small elements on the panel, also fill them with woven yarn.

Now you can move on to larger elements - the body, tail, and at the end paste over the background of the picture.

Fabric painting
They turn out no less beautiful and original. Fabric paintings can be made together with children, especially those on which they draw with chalk. It will not crumble from the finished canvases, and why, you will learn about this secret very soon.
For artistic creation you need:
- pieces of cotton fabric;
- colored crayons;
- Bowl;
- starch water;
- frying pan or wide plate;
- foil.
You can cut pieces of rectangular or any other shape from cotton fabric. The brighter the colors of the crayons, the more colorful the picture will be.
Place the shreds in a bowl. Dilute starch with water in a ratio of 1:3, pour this liquid over pieces of fabric, soak them well in the solution.

Wring out the flap and place it on a flat surface on a plate or frying pan. Draw a design with chalk.

Decorate other canvases in the same way. Now you need to lay out fabric paintings on foil, doing it yourself or entrusting it to the kids. After all, they will be very interested in learning about a new type of creativity and trying it out.

That's it, you can frame the panels and hang them on the wall. The starch solution fixed the chalk and it will not fall off. If you don't have ready-made frames, glue them together using PVA from wooden popsicle sticks. Even round hoops, which are used for embroidery, will be used.

Here's how else you can create paintings from wet fabric, using its ability to drape beautifully. For this piece of art you will need:
- plywood or fiberboard;
- thin plain cotton fabric;
- newspapers;
- water;
- flour.

Pour half a glass of flour into a small saucepan, pour in 200 ml of water, mix thoroughly with a whisk. Put the mixture on fire. Stirring occasionally with the same kitchen tool, bring to a boil. Remove from heat, cool.
Spread the fabric, taking the paste with your hands, rub it over the surface of the fabric. Place this side on the plywood.
The fabric should be 5–8 cm wider than the fiberboard on all sides. After all, we will drape it and it will shrink.

- We begin to drape the fabric. Divide the picture into approximately 2 parts. The top one will be smooth, here you will depict the sky and the sun. We drape the bottom one so that the resulting images are: mountains, water, shore, trees.
- Where the sky will be, carefully level the fabric with your palms so that the surface becomes smooth, without air bubbles under the fabric.
- For the relief part of the picture, decorate the fabric with folds of various shapes and sizes.
- If you want to mark a prominent feature, such as a large rock, then use newspaper. Moisten it with flour glue and place it under the canvas where needed.
- Glue small parts onto a wet cloth immediately.
- The finished fabric painting is dried for approximately 10–12 hours.
- If you want to apply a drawing to the panel, then do it when the canvas is completely dry. This could be: a church, a house, a tree, an animal, a person, etc.).
- After you have painted the church and coated its domes with glue, sprinkle millet onto this part of the fabric painting with your own hands. We paint the church with gouache or acrylic spray paints.
- Paint the sky and water with blue paint. The shore is yellow.
- Cover the moss with green paint and let it dry. Wait until the canvas itself dries well. Only after this, glue the moss to the crown of the trees and instead of ground vegetation.
- For this, it is good to use a heat gun or Titan or Dragon glue.

It’s also nice to make paintings from fabric, first cutting out the flaps with your own hands, then putting them in place.

For this use:
- pieces of fabric;
- threads;
- glue;
- braid;
- glitter;
- pencil;
- thick cardboard.
- First draw the future picture in pencil on the cardboard. Let it be a vase with plants.
- Fill the background with braid of various colors, placing it straight or wavy.
- Cut out the flowers using the same template, but also using different fabrics: light blue, dark blue, purple. Glue glitter to the cores.
- Glue a vase onto the canvas and flowers on top, grouping them in several pieces and decorating them with green leaves.
- After the fabric has dried, the painting can be framed and hung on the wall.

Using the patchwork technique, you can create many more fabric paintings. For flight inspiration, watch interesting videos:
Isothread for beginners schemes with numbers flowers step by step
allows you to create true masterpieces. It is so easy to master that even every novice needlewoman will soon be able to become proficient in embroidering beautiful postcards, still lifes, ornaments and even portraits. In order to bring this moment closer, you need to learn how to create beautiful flowers using this technique. 


Necessary equipment
To work with the isothread technique, you will need to prepare the following “ingredients”:
Basic Rules
The pattern with numbers you choose will help you make beautiful flowers, as well as tips for beginners that our master class offers. If you already know how an angle and a circle are worked out, then you will have to act as follows:

Enhancing the effect Once you start working with the isothread technique, you will soon see that it, like no other, is perfect for creating truly luxurious products. If you initially have complex patterns in your hands, then to enhance the decorative effects, act as it tells you. Otherwise, our master class for beginners will help you.
You have to do the following manipulations:

Schemes always indicate each of the stages with Roman numerals.
Petal elaboration 
A flower petal embroidered using the isothread technique should be worked out like incomplete stitching of an oval. You should adhere to the following recommendations:
- work should begin from the sharp end of the embroidered element;
- work should end there;
- choose the distance between 2 points equal to the line that touches the bottom of the embroidered element.
We embroider flowers for the holiday
How about embroidering delicate chamomile, forget-me-not and cornflowers using the iso-thread technique? Choose the schemes that suit you and act boldly!
Chamomile 
To make a chamomile flower using the isothread technique, you will need to perform the following manipulations:
- embroider several petals;
- in the middle of each of the resulting flowers, sew a beautiful bead;
- work out the buds (the diagrams will tell you exactly how to do this);
- work the leaves and stems in the same way.


Forget-me-not You can get a beautiful and delicate forget-me-not that will decorate your interior by following these steps:
- embroider flowers;
- carefully work through the leaves (as indicated in the diagrams);
- draw stems in steps of one to three.


cornflower 
Would you like to have a flower in your home - a symbol of purity, tenderness and holiness? Then, without further delay, start embroidering the cornflower. This wildflower will fit perfectly into the interior or will be an excellent gift for a loved one. And you will need to do the following:
- work out the core of the flower (steps one to ten);
- carefully sew a bead along the contour;
- depict the petals of a plant;
- work through the leaves (steps one to eight);
- embroider the stems (steps one to three);
- finalize the remaining elements.
The work is ready! 

To ensure your work is perfect, try to follow the tips below:
Finally
The finished picture with flowers can be pasted onto a cardboard sheet. If you wish, you can make a frame, and then give it as a gift or hang it on the wall.
Schemes with flowers


Comments
Related posts:
 Isothread for beginners diagrams with butterfly numbers (pictures)
Every mother knows perfectly well that the full development of her baby is a priority. You can train fine motor skills, perseverance, develop imagination and accuracy with the help of applied arts. Embroidery on cardboard, thread weaving - all this has a common name - isothread. You will find her diagrams with numbers for children in today's article.
Learning the basics of string graphics
What needlewomen don’t come up with, trying to surprise with their skills and originality. So, recently, isothread has become very popular. Pictures with patterns can be found without much effort on the global network, but before you start creating a masterpiece, you need to master the technique of embroidery on paper.
Isothread is an ancient art form that was forgotten over time, but today craftswomen are happy to revive traditions. Embroidery with threads on paper allows you to create real masterpieces - three-dimensional paintings.
Mothers who care about the development of their children try to teach their children thread weaving at the age of 5-6 years. This practice allows you to develop fine motor skills, and not only that. The baby will learn to fantasize, become neat, diligent, and will be able to show his talent.
You have already received a general idea of the isothread technique. Before we look at diagrams for beginners and pictures with numbers step by step, let's study the main aspects of modeling crafts in this style:
- The basis of the embroidery is thick cardboard or other paper of appropriate thickness. Some needlewomen use planks.
- You can choose any threads, the main thing is that they are strong and elastic.
- For children, you need to select soft, bendable needles so that the baby does not get hurt while working.
- As you know, threads tend to fray. To avoid this, just rub the thread with wax.
- To make the picture uniform and openwork, you need to make a minimum distance between the points.
- The child can number the puncture sites. It’s easy to do this yourself. It is important to know the rules for applying numbering.
- Almost any masterpiece created in the isothread style is based on three main pillars - filling corners of various types, arcs and circles.
- The drawing must be transferred using carbon paper to the wrong side of the base. First make punctures in accordance with the numbering.
- If you use a base that is too thick, the punctures are made with a large needle, the tip of which must be heated over a fire.
- We fix the threads on the wrong side with office glue.
- For isothreads you can use small carnations. But this method of embroidery is best practiced at an older age, since the baby may get hurt.
Learning the isothread technique with your baby
As already mentioned, embroidery on paper is based on several methods. Before you start creating full-fledged paintings, hone your skills on individual simple elements.
The following methods of string graphics are mainly used in practice:
- contour;

- solid;

- volume;

- combined.

You need to start with small paintings and only after your child has completely mastered the technique of embroidering corners, circles and arcs. If your baby can't count, it doesn't matter. Help him with your tips. Just indicate where you want the thread to go.
To captivate the baby with such an activity, you need to choose interesting pictures, for example, let a boy embroider a boat, and a girl - a butterfly or a flower. Also use different colored threads. The play of colors will not only attract the child, but will also allow him to fully express his imagination and creative thinking.
We create a masterpiece in isothread style
If you have already learned the basic methods of embroidery in the isothread style, then you will need patterns for beginners. You can make pictures with numbers step by step for children yourself or use ready-made templates. Try embroidering a snowman with your child.

You can also embroider an original cockerel. To do this, you just need to learn how to trim the outline and fill the circles with threads.

If you are new to this business, try to make a beautiful, but at the same time very simple picture. Let's together embroider colorful balloons floating in the sky.
Necessary materials:
- thick sheet of paper;
- multi-colored pencils;
- threads;
- needles;
- copy paper;
- scissors;
- glue.
Step-by-step description of the creative process:

String graphics are images created using thread and small nails. This technique is also called isothread. Making a picture using the isothread technique is quite easy. Even children can do it. The main thing is to understand the very principle of winding threads. Completely easy for beginners.
But before you begin your first painting, you need to study the materials needed to create it. It is best to watch a step-by-step master class that will help you understand the principle of winding threads and how to create a shadow effect in paintings. This kind of creativity can be called embroidery, since the work is done with the help of a thread that is wound around nails at a certain angle.
The isothread technique is so simple that it has been included in the creative education program for children. Now there are a lot of ready-made kits that have patterns, threads, a thick base and a set of nails with a hammer. There are many fairly simple and accessible schemes available for children. These sets can also be used by adults who are just starting to learn. Having mastered simple techniques, you can easily make your own for loved ones or come up with your own plot for any other celebration.
This master class will be useful for any beginner.


To begin with, before creating a simple painting using the isothread technique, you need to decide whether to buy a ready-made set or whether to choose the right material yourself. Ready-made sets may not be suitable for their price and the range of designs offered. If the picture is intended for children, then you should choose a bright and simple theme. These can be butterflies (photo 1), flowers, ships and airplanes for boys.
Stages of work
- Preparing templates and materials
In any store with creativity kits you can find such a combination as iso-thread patterns for beginners. Thanks to them, you can simply choose the required scheme and, after studying the master class, select the necessary materials yourself.
Thread graphics, or another name for embroidery on cardboard, have simple and accessible patterns. They must have numbers. For beginners, these are the most convenient diagrams, since in the first stages it is easier to navigate using clear instructions with printed numbers. The convenience of this type of creativity lies in the fact that the created picture does not have any special strict rules.
Embroidery on cardboard will be available to children from the age of five or six. It all depends on the perseverance of the child. For children, it is good to choose the smallest patterns, for example, hearts (photo 2), ships (photo 3), suns, and so on. For the base, use cardboard and thin wooden boards.

The isothread technique can be in the form of wound threads on nails or using punctures through a needle (photo 4). The principle and schemes for both options are the same. The embroidery of thread graphics on a velvet surface looks quite unusual. But this type of material is suitable for craftsmen who know how to work with this technique. Nowadays, you can quite often find unusual crafts made on old, damaged CDs, which are embroidered with threads by piercing them with a heated gypsy needle.
For children and their work using the iso-thread technique, it is necessary to take floss threads. They do not irritate children's skin and have a pleasant bright palette of colors. You can also use iris threads for embroidery, which are also made of cotton and have a wonderful shine. For children, you can also use beads, sequins, beads, but these elements are not mandatory when working with this technique.
- Direct work process
When a convenient template for future work and diagram has been selected, you can get to work. If the base is cardboard, then the selected design can be transferred to its surface. When a wooden plank was taken as a base, a design is created on its surface using nails and a hammer.
This kind of embroidery is quite original and interesting, but it is not entirely suitable for children, as there may be certain injuries during the work. This master class will talk about creating a painting in the form of a stork (photo 5).
There are several techniques for cardboard embroidery using the isothread technique - corner filling, triangular filling and making a circle. Begin the isothread technique with the first front stitch. Subsequent stitches come out of the same puncture and are applied in different directions. Depending on the design and pattern, the stitches have different lengths, but they completely follow the contours of the design printed on the cardboard.
The master class will show several types of techniques using the example of a stork. Each of the existing methods is quite convenient for beginners using simple digital circuits. Isothread diagrams with detailed instructions are very convenient and easy to understand. But you can easily do embroidery without marked digital patterns.
The stork's body is based on the example of filling a corner (photo 6). It is done like this:
- outline the area of the stork’s body from one corner. Make markings from the wrong side. Each side of the angle is divided into equal parts by points;
- number the designated points from the top of the drawn angle;
- With a thicker needle, punctures are made at all designated points;
- take a thin needle and thread and fill in the corner from the first number to the next one according to the drawn diagram.
Angles can be of three types: straight, obtuse, acute. Embroidery on cardboard usually involves a combination of two methods - corner filling and circle. In order to make smoother lines when embroidering, make the first stitch with a slight shift from the main point of the corner.
For the second method, embroidering a circle begins with drawing a pattern, just like in the first method. A circle of up to fifty millimeters is drawn on the wrong side. Next, the circle is divided into twelve equal parts. Draw out the puncture sites, marking them with dots. The smaller the distance between the punctures, the more interesting and delicate the pattern will be.
The master class on creating the “Stork” isothread technique provides for an inferior circle, and a semicircle created at the base of the bird’s head. Therefore, the semicircle is filled with threads in the same way as a simple circle, but with a smaller radius and a slightly different inclination of the threads. A needle and thread are inserted into the punctures and the space of the semicircle is filled according to the diagram.
The uniqueness of the isothread technique lies in the fact that you can always increase and decrease both the number of stitches and their inclination. In this technique, the templates are not as important as the result of execution. This master class will allow you to understand the basic principle of filling a pattern with threads. In the future, you will be able to independently decide in which direction to create stitches and how long to make them.
The density of filling with threads depends on the type of pattern and shade that the embroidery of a particular picture involves. At the end of the work, secure the thread by pulling it through other threads on the wrong side.
Schemes for isothread with numbers


