Birds fly high in the sky, they are a symbol of freedom. Due to the fact that they can rise up, they also symbolize victory, divinity and power. All over the world they are considered messengers of the gods. Having a figurine of a bird in the house is considered a good sign; it protects and protects from any adversity. Such a figurine can be made from paper, it will not be expensive and very fast. Which in turn will save your budget and time. Today we will learn how to make an origami bird out of paper with our own hands. Moreover, this technique is becoming more and more popular every day and is gaining momentum. We will make several birds, and then you choose which one you want to make. Also, such a craft can serve as an excellent gift; it can be placed in a bouquet of flowers or put in packaging for the main gift. You will learn very soon how to make a bird from paper.
Let's start with the easy one
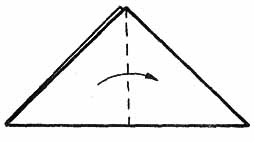
First, we will make a simple paper craft with you, for this we will use the following diagram.
1) For the craft, take a square sheet of paper, fold it diagonally and bend it back.
3) Bend the top corner down. We should end up with an inverted triangle.
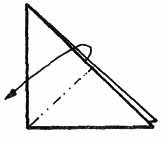
4) Then we bend the upper corners of the workpiece to the sides as shown in the diagram.
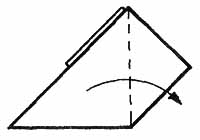
5) After that, on those corners that we bent down, you need to bend the small edges up.
6) Fold the workpiece in half, as in the diagram.
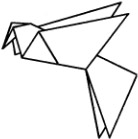
7) Turn it 90 degrees. And we see that this blank is already starting to look like a small bird.
8) Bend the upper corner down a little, this will be the bird’s beak.
9) And fold the tail into a small fold.
10) Now the bird is ready.
They can be made from different colors of paper or they can then be painted and used as decor or decoration for a child’s or adult’s room, it will depend on the color.
Now let's try to make a slightly different bird using this technique.

1) For this craft we will need a square sheet of paper, which we bend and then unbend diagonally.

2) Fold all corners to the center point.

4) Fold the workpiece in half.

5) Fold the upper left corner inward. We make a cut with scissors where indicated in the diagram.

6) Bend the wing.

7) And then we bend the second wing on the other side.

8) This is what our future bird will look like:
9) We also bend part of the tail inward.

10) And now she’s ready!

We have presented you with two diagrams of birds that can be made by someone who is just starting to get involved in this art. If you liked it and want to continue learning this technique, you can start collecting the following birds, the diagrams of which we provide below. It will be a seagull and a flying crane.
Seagull in flight
We will fold the seagull using this diagram:

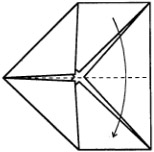
1) For the craft, we need a square sheet of paper, fold it twice diagonally and bend it back.
3) Now we bend it in the opposite direction along the dotted line, as indicated in the diagram.
4) Turn the smaller middle corner back.
5) And from the other corner, the one that is larger, we make a stepped fold.
6) We turn our workpiece over.
7) Fold it in half.
8) We turn the corners on both sides, making wings.
9) Now we bend our wings.
10) All that remains is to finish drawing the wings and our seagull is ready.

Making a crane
1) For this craft you will need a square sheet of paper, which we fold diagonally.

2) Bend the resulting triangle in half.
3) Bend the bottom corner to the top.
4) Now our workpiece needs to be turned over.

5) Fold the bottom corner to the right.
6) Open another corner.

7) Fold the sides to the center line.

8) And turn them back.

9) Bend down the top pocket.

10) Then we turn our workpiece over again.

11) Now you need to outline two side folds.

12) And open our pocket.

13) This is the kind of workpiece we should get.
Sometimes it's hard to imagine how many different things are made from paper. Although, in fact, this material is stronger and more functional than it seems. “Origami” is a wonderful art, for which you do not need special training, talents or special skills. The “origami” paper bird is a clear example of this. In addition, birds are the most popular figures in this area; their diversity gives wide scope for creativity and imagination. The article presents classical methods and modular work. A variety of birds in small lessons with pictures! Grab some colored paper and get creative!


The easiest ways to fold a bird
If you are just a beginner in origami, then practice with simple paper birds. You will find instructions for them in step-by-step photos presented by several methods.
Pigeon
From the pictures everything is clear without descriptions, the only thing is that you need to get used to the fact that if you bend a corner, then in some cases you need to bend it back:
And it should look something like this:
 The second simple way on how to make an “origami” crane, watch it in the video master class.
The next MK will be more detailed, even a child, even a beginner, can easily assemble an origami bird using these step-by-step photos with his own hands.
Bullfinch
Follow all the steps step by step, according to the proposed scheme, to obtain an elegant blue bird. You need two paper squares of different colors, but the same size; you need to select one diagonal from them and put one on top of the other inside out. Choose the color that will be the main one, i.e. on the outside, and fold the squares accordingly. You can vary the colors at your discretion or choose completely different ones:
Bend one of the sides like this. Fold along the other diagonal:


To form the beak, bend the blue side inward. By analogy with “origami” airplanes, we will bend the wings. We round the corner under the tail with scissors:


Now cut out the feathers on the tail. The wings should look like this:


Usually, origami does not use glue, unless it is modular, of course. But for small details, such as eyes, a small exception can be made. And where you then use the finished craft depends only on you!


Video: Origami crane
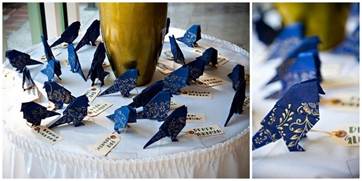
The Bird of Happiness
Origami birds of happiness are very popular.” They are given as gifts for good luck, hung in the room from the ceiling to attract happiness, and simply decorated for holidays for the sake of beauty. For example, white paper birds hung in the hall where a wedding is celebrated are considered a good omen. And if you perform them yourself, on your holiday, then they will clearly be charged with your positive energy, which is synthesized during positive thoughts aimed at the upcoming good event. Accordingly, the holiday will go better, and your mood will doubly improve!
See the assembly diagram for the body of the “origami bird of happiness”:
Here is the simplest option that can work out:

If desired, the “origami” bird can become openwork and airy, although the technique is not complicated, an analogy with snowflakes:
Finished body template:
Everything about the body is clear from the pictures, let's take a closer look at the tail in a small master class.
Make a square out of paper like an accordion. Round the corner and use scissors to cut out a fancy pattern:


If desired, the wings are designed in the same way, but first you need to cut a hole in the body blank and insert a folded accordion there, and then make patterns and straighten them. It is best to attach the tail to a paper clip with a stapler:


Actually, like a scallop. Although glue will work if there are no paper clips.
Modular Firebird
As already mentioned, “origami” can be modular, that is, made up of modules - identical parts, carried out according to simple step-by-step instructions in pictures. An origami bird will look much more attractive and brighter if it is modular. And the Firebird looks the most gorgeous (the peacock, by the way, does exactly the same thing). And now you will understand why. Look - isn't it lovely?
The basic body of the Firebird from non-modular “origami” is created like this:
As for the modular one, look at the video for different ideas, because the modules are assembled in the same way, but the end result is completely different both in the manner of execution and in the assembly.
Video lessons on assembling Firebirds
Step-by-step photo manufacturing instructions
Do you understand how modules are made? Then look further. Let's start with the fact that in volumetric works the parts are arranged in a circle, connecting to each other without glue (at first, then everything is coated together to hold it tighter). Then the individual finished elements are fastened together. The downside of the work is that it takes a very long time to produce the modules, because you need a lot of them, and you still can’t figure out how many of them and what color will be useful. And the assembly itself is a real creative process that requires attention and perseverance. Carry out the first work strictly according to the plan described here. We will build an origami bird in circles.
1 row (P), 21 parts (D). For the body, prepare 189 D:


Directly from the body we form the tail of the bird to increase the elements. Neck – 76 D, decreasing in each row, for the head – separate 7-8 D:


Today, due to its simplicity, paper products are a mandatory element of decor at almost all events. And in this article we will look at how to make an origami bird in just a few steps.
A little history
The history of the process of creating paper products, or as it is also called origami, dates back centuries. This art originated in ancient Japan, where, due to national characteristics, paper was considered practically a shrine, and products made from it carried deep meaning. Years have passed, people's perceptions have changed, and origami has become just one of the styles of needlework, but crafts created using this technique not only have not lost their relevance, but, on the contrary, are becoming more and more popular. For example, probably few of us did not make paper boats or envelopes in childhood. In addition, it is worth noting that this activity developed both the neurohumoral and motor functions of the child’s body. Also, as mentioned above, there is nothing difficult in creating such crafts, so anyone can try to create such a bird.
What is needed for this?
An origami bird is not only a great decoration for any holiday, but the process of making it itself creates an atmosphere of peace and tranquility. So, in order to make it, we only need a square piece of paper, desire and a little imagination. Also, if you wish, you can arm yourself with pencils so that in the future, using them, you can make your product more “alive”.
Let's get started

As a rule, an origami bird is created from a not very thick sheet of A4 paper. Therefore, we take it, cut a square out of it and bend it in half so that in the end we get the shape of a triangle. After this, we fold the resulting triangle again in the same way, not forgetting to align its sides. Next, we bend and straighten the top layer in the formed triangle, aligning the side angle with the one below, thereby forming a square. After that, we turn it over and repeat the same manipulations with it. As a result, we get a double square, from which our origami bird will appear in a few minutes. Next, we bend the sides of the square located at the bottom towards its central part and bend them back. Turn it over again and repeat the same steps. After this, we take the corner of the square located at the bottom, and, using only the layer that is at the top, bend it slightly upward along the intended fold. The result of these actions will be a rhombus.
Origami bird - manufacturing diagram

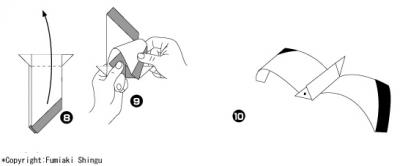
We turn the resulting figure over and repeat the previous steps. What is the result is what origamists call the basic form of the bird, from which most birds are subsequently produced. Therefore, we don’t stop and continue to create. Take one of the legs of the diamond and gently pull it to the side through the layers of paper. This will be the tail of the future bird. We repeat the same with the second leg, thereby forming the future neck. Next, we bend the end of the resulting neck a little down, thereby forming a beak. What's an origami bird without a beak, isn't it? After the beak is ready, bend the wings a little downwards, and then up, but not all the way. With this we can say that our origami bird is ready.
Now all that remains is to grab its front part (the area under the neck) with one hand and pull the bird's tail with the other. As soon as you do this, the figure will begin to flap its wings. As you can see, creating a bird only takes a couple of minutes, but the emotions it gives will last for several hours. In addition, having learned how to make such easy crafts, over time you can move on to more complex ones.
Natalya Oleynik


Example classes.
Abstract classes in the senior group topic:
« Birds immediate environment" (crow)
Job Objectives:
1. Teach children how to make paper to the crow,
conveying its color and characteristic structure.
2. Fix the technique of folding a square diagonally. Towards the middle and in half.
3. Teach foreshadow, consciously apply familiar techniques and methods Images,
use self-learned folding skills paper when making new figures.
4. Continue teaching how to use creative techniques images of birds.
Preliminary work with children:
Getting to know and observing birds while walking; - watching TV shows "8 animal world";
Looking at illustrations with picture of birds living in the immediate environment.
Material to occupation: illustration with picture of birds, illustration with image of a crow, samples manufacturing sequences birds colored paper, scissors.
Progress of the lesson:
1 part classes. -What shown in the painting? Which birds? Why migratory birds? -Now look at this picture, what is it? bird? How did you guess that it was a crow? (by color, beak, structure). Today we will learn how to do paper crow bird. -Which We have already made birds from paper? (tit, rooster, hen). - What technique did we use to make these figurines? birds? (folding a square in half, rectangle - diagonally).
We will make a crow from a square black paper. You need to fold the sides of the square towards the middle, first from one end and then from the other end. Don't forget to smooth the lines with your finger. From the lower bent corner along the fold on both sides we make incision up to half the length and the resulting ends of the top layer paper bend in opposite directions from each other. Then, along the central diagonal line, bend the figure in half so that the bent ends are inside. From the upper sharp corner we bend the large beak, placing it along the fold inward and extending the end. Now all that remains is to decorate our bird. Glue a triangle onto the beak on both sides, which you will cut out from pieces paper(yellow or gray). You need to glue the eyes on both sides. Our crow is ready. Basic Techniques training: use of partial demonstration by the teacher, demonstration sample, explanation, individual assistance to children. (Physical pause.)
part 2 classes. -What technique did we use to make the crow? -How many operations have we performed? (4 operations). Name it. Evaluation of children's work. Playing off children's work (the crows are placed on a pre-prepared tree cut out of cardboard by the teacher together with children).