Let's talk today about a wonderful gift, which each of them can make. Such a little thing will surely interest and delight any woman - and mother, and sister, and girlfriend, and colleague.
What are we talking about? Surely we all saw this picture in childhood: the grandmother is going to bake her signature delicious pies and takes out a greasy notebook with recipes from the desk drawer, or even separate sheets of paper, in which she digs for a long time in search of the desired entry. Admit it, many of us still keep our own culinary "cheat sheets" in this form. So why not arrange them in the form of a stylish and original cookbook with a unique design?
At first glance, this is difficult. Will it be possible to make such a "serious" product, like a real cookbook, with your own hands? We assure you - how it will turn out! You just need to have a little patience, accuracy and imagination. Well, let's get started?
A book for recording culinary recipes: we create miracles with our own hands!
This original craft can be made in country style, for which we will use the techniques of aging and scrapbooking. If your kitchen is designed in a vintage or rural "format", then such a book will fit perfectly into the overall interior. Thanks to the imitation of aged pages, it seems that this is a family heirloom that has been used for several decades. In the meantime, our cookbook is made with our own hands! Scrapbooking is now a fashionable hobby that allows you to use a huge variety of different materials and turn ordinary books, frames, photo albums, etc. into real masterpieces.
What materials should be taken to start creating this exclusive product? How to arrange a culinary if there is not enough experience in such a matter? Don't be scared. First of all, we stock up on sheets of plain white paper for an A4 printer. And also a cover from an old, unnecessary book or a scribbled notebook, a piece of cotton fabric with an attractive pattern, kraft paper, one sheet of special (for scrapbooking) paper with a checkered print.
Additionally, you should stock up a couple of stationery clips, glue (Moment-Crystal is suitable), watercolor paper, ink, threads. And finally, we should take care of the decorative elements with which we will decorate the cover of our book. In this quality, almost everything is suitable: ribbons, paper flowers, eyelets. And also take a silicone stamp "handmade".
DIY cookbook: master class
We start work. We take sheets of paper, which will become the pages of our cookbook, and age them. The easiest way to do this is to place the paper in a strong coffee solution. It is convenient to use a wide shallow dish for this procedure, which will serve as a baking sheet or bath.
We fill the container with warm water, pour out more instant coffee and stir everything gently. The rich brown color of the solution indicates the achievement of the desired consistency. We take each sheet of white paper in turn and dip it into the prepared liquid for a few seconds. We make sure that the wetting and coloring of the sheets occur evenly. Then we take out the page, let it flow around a little and hang it to dry.

When all the sheets are dry, iron them to smooth them out. Then we fold each in half with the combination of corners. If this condition is not met, the pages of the future book will be crooked relative to each other. The fact that our cookbook was created with our own hands is not an excuse for negligence, and therefore we do not rush and do everything right.
Beautifully design pages
The edges of the sheets from the side opposite to the fold are turned into openwork-decorative ones using a figured hole punch. However, if you don’t have such a device, it doesn’t matter - you can carefully cut out the curly (for example, wavy) edge with scissors or even leave the sheets in their original form. This is our personal recipe book! With our own hands, we can give it the shape we want.
Then we collect sheets of several pieces (approximately 3 each) in small books, stacking them in a pile with the corners aligned. Very carefully align all the edges, fasten the sides with clips. In order not to deform the paper under them, we lay pieces of thick cardboard between the sheets and clamps.
We take a ruler, mark the end part of our stack, that is, the place where all the sheets are folded. With a pencil, we draw 6 stripes across the end face (at an equal distance from each other), along which we make small transverse notches with a sharp knife. Now there are 6 small holes on the fold of each sheet.

Binding technique
Making a cookbook with your own hands continues. In the next step, we remove the clips and start stitching our block. The technology of the procedure is as follows: we cut out two fabric strips, wrap the fold of the first of the books of one of them, placing it in the interval from the second to the third hole, and the other between the fourth and fifth. We take a needle and a strong white thread and from the outside we pass it in turn into each hole of our book. At the same time, we try to ensure that in the places where the fabric is located, the thread runs over it.
Having reached the last of the holes, we take another booklet, put it on top of the first one and draw the thread through all its holes. In a similar way, we alternately sew one binding with each subsequent one into a block. Do not forget to pull the thread tightly, leaving no gaps between individual books. At the end of the work, the thread is fixed with a regular knot, as with any sewing.

Now our binding should be glued. Before that, on the sides, we fix it again with clamps on the sides, coat it with "Crystal", put it under the press and leave it to dry for several hours. In the meantime, you can do the cover.
Making a cover
A do-it-yourself cookbook cover is most often made from a ready-made one - from an unnecessary notebook. We separate it from the sheets with a clerical knife and put it with the outer side down on a pre-prepared sheet of kraft paper. Cut off the excess paper around the perimeter of the cover, leaving a margin approximately 4 or 5 centimeters wide. We wrap the protruding edges on the inside of the cover and firmly fix it with double-sided tape or the same glue.
Especially carefully you need to work on the corners. To make everything come out neatly, first tuck the top and bottom fields, then the side ones, which are beveled at an angle of 45 degrees, and then tucked and glued. Such corners will come out the most even.

Now let's decorate it!
How to make a cookbook with your own hands so that it comes out not only durable, but also beautiful? At the next stage of work, the cover needs to be decorated. We take from one sheet we get 2 blanks for decoration. Their size should be slightly smaller than the cover itself (about 0.5 cm on each side). The edges of the paper should be slightly fluffed, wrinkled, slightly torn or treated with sandpaper. So we will give it the effect of aging. An additional vintage effect is added by processing along the perimeter and around it with Distress ink.
In each of the four corners we attach decorative elements in the form of metal brads in the color of aged bronze. In the place where the title of our book will be located, we attach a paper rectangle of a contrasting color (for example, brown). It can be sewn with a large line with hand stitches.
The resulting blanks are glued to each side of the cover - front and back. A special charm will be given to our cookbook by a pair of satin ribbons on which it will be tied. To secure it, install a pair of eyelets in the right places. We fix the ribbon on the cover from the inside and let it out through the eyelets. We do a similar operation with the back of the cover. We securely fasten the ribbons inside with glue.

Joining pages and covers
Now it's time to paste our block of already stitched sheets into the finished cover. To do this, you should cut out a square from kraft paper, one side of which should be folded. As you can see, a do-it-yourself cookbook is not created so quickly, you have to tinker a little. But the result is worth it.
We press the fold smeared with glue to the upper part of the end of our block of paper. We glue fabric strips to the kraft paper, we perform exactly the same operation on the back of the block. Then we take a piece of thick drawing paper (usually intended for pastels or watercolors) and cut out blanks equal to the paper block in height and twice as wide (for endpapers).

We make endpapers
We fold each of the endpapers between the cover and the paper mass, glue one of its sides to the outer sheet, masking the kraft paper, and the other to the inside of the cover. By the way! With endpapers, the same aging procedure should be carried out using Distress ink.
The originality and uniqueness of the finished product will give a tag made for this purpose, on which the inscription: "Handmade" is applied. Such "chips" are made using special ink and stamps. An eyelet is inserted at the edge, through which a satin ribbon is threaded and tied to a bow.
The final stage: decorating our book
A cookbook made with your own hands, of course, requires decoration. A few paper flowers and matched half-beads are glued around the header field for decorative purposes. The heading is printed on the printer, cut out and pasted on the place specially allocated for it. It can consist of just a couple of words, for example: "Favorite recipes." Or it can carry additional information, for example, the name and surname of the hostess. When executing the heading, you should adhere to the general style. That is, choose the appropriate font "antique".

So our recipe book is ready. With our own hands, we made a real little masterpiece! If it was possible to maintain the unity of the composition and carefully complete all the work from start to finish, the result should be a unique gift item. Now you not only know how to make a cookbook with your own hands, but you can also teach this to a friend or sister. Such an exclusive collection of recipes not only has undoubted practical value, but also emphasizes the sense of style, taste and originality of the hostess. Being daily in front of your eyes, for a number of years it will delight you and remind you of the moments of creativity spent with pleasure. We wish you success in mastering this wonderful hobby!
Each hostess has her own secrets - family recipes that are passed down from generation to generation. Such cookbooks with valuable records inside smell in a special way, they exude warmth and comfort, this is the whole story of one family. Opening it, we seem to be transported back to childhood, inhaling the smell of fragrant homemade pastries and delicious dishes. Is such an “assistant” needed if any recipe can be found on the Internet today? Definitely, we need it, because in it we write down little tricks, secrets, important nuances so that cooking brings pleasure, and the result of the hostess's work is no worse than that of eminent chefs.
Such an attribute requires special attention. Not only the content of the pages is important, but also a beautiful design, so we suggest creating a cookbook using the scrapbooking technique.
Scrapbooking is an amazing technique that attracts with its simplicity. Its uniqueness lies in the fact that the most ordinary thing can be turned into a work of art. The technique is used in the creation of family books, notebooks, photo albums. And why not make a decent design for a cookbook? The original product will be a wonderful gift for all lovers of cooking, an indispensable attribute in the kitchen. A gift made with a soul with your own hands will certainly please your friend, grandmother or mother.
Cookbooks for every taste


In a cookbook you can store:
- Recordings of the preparation of dishes with multi-stage cooking.
- Keep preservation recipes that are used no more than once a year.
- Create a section of "golden" dishes, which the hostess always turns out to be a fiver.
- Write down little secrets in working with certain products.
- Make useful cheat sheets - weights, information about spices and aromatic herbs.
Advice! To make it more convenient to use the cooker, you can make several separate sections, marking each with bookmarks. For clippings from magazines, newspapers, you can prepare several pockets to put valuable notes.
The selection of colors, materials, decor for decoration is always the choice of the craftswoman, but the theme is always the same - cooking. A master class will help beginners in creating their first recipe book, where each stage is clearly shown, all the secrets of the amazing scrapbooking technique.
Cookbook in the form of a jar
Cookbook from scratch
Such a scrapbooking master class will help beginners to make an indispensable thing in the kitchen from scratch.
 Very unusual cookbook design
 To create a cookbook from scratch, you will need a small arsenal of tools and materials:
- binding cardboard;
- lined pages for a notebook;
- patches of cotton fabric with a pattern on a culinary theme;
- synthetic winterizer;
- scrapbooking paper;
- a stamp with the inscription "My recipes";
- lace ribbon, buttons, ribbon, cutouts and a metal pendant.
A hole punch, glue, double-sided tape, as well as scrapbooking tools - figured hole punches will help you create an author's masterpiece. The album will be made with separators according to the topic of the records. To do this, beautiful scraplists with a note about the topic of the section must be inserted between simple pages for entries. The product will turn out to be compact, in A5 format, like half of an album sheet.
 Not only is the book very stylish, but it will also become your indispensable assistant in the kitchen.
 The step by step algorithm is as follows:
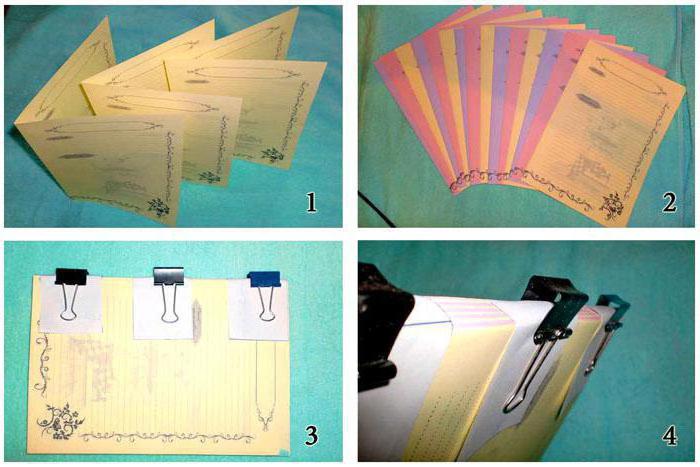
- We measure five separate sheets from scrap paper, make a small margin for bending.
- We fold the printed lined pages in half, shift them with sheets of scrap paper. We will decorate each page with the name of the section with a paper tape processed with a figured hole punch.
- When the individual blocks are ready, we stack them in a pile, fasten them with stationery clothespins to securely fix the sheets.
- We generously lubricate the edge with Crystal glue and leave our workpiece to dry for several hours.
- In the meantime, we will prepare pictures and blanks for separators. Thematic drawings can be printed and cut out, and the edges can be treated with tinting paint.
- Let's start making the cover. From the binding cardboard we cut out three parts: two large and one strip for binding. On the strip on the sides, with a ruler or special creasing, we make bends, to which we glue two large blanks.
- To quickly make a neat cover, lay the fabric on the table in layers, first the fabric, then the synthetic winterizer, and on top of the cardboard blank. The fabric must necessarily have a margin on all sides for a fold. We tuck the fabric, glue it with glue, and sew it on top on a sewing machine for reliability.
- Let's start decorating the cover. Here the fantasy of the craftswoman is not limited. You can sew on a lace ribbon, stick a title card for the book, decorate it if you wish with buttons, beads, cuttings, a metal pendant in the form of a spoon or fork.
- Glue the cover inside with scrap paper, glue a stack of sheets with separators in the middle and let it dry. Divider pages can also be decorated with thematic pictures, and in the middle you can make several envelopes with a secret where you can put clippings.
Such a detailed master class with a step-by-step description of all the stages of creating a recipe book is basic. You can supplement it with author's design ideas.
How to make a DIY cookbook part 1
How to make a DIY cookbook part 1
Culinary album on rings
It is more convenient for many hostesses to use notepads on a spring for notes. Do not think that it is impossible to make such an album with your own hands at home.
 In this book you can write down your favorite homemade recipes.
 We offer a simple master class on creating a recipe book in the form of a notebook on a spring. For work, you will need cardboard for the cover and sheets for notes.
Let's start making:
- To begin with, cut out blanks for the cover from cardboard and round off the corners so that they do not break in the process.
Advice! To shape the corners, a special figured hole punch is traditionally used. You can cut off the excess with a breadboard knife, and to make the edges of the cardboard look neat, you can lightly process them with a nail file.
- We also round the corners of the inner sheets, so the product looks especially impressive. We make a cover. We wrap a sheet of cardboard with scrap paper, bend the edges and glue it. We pay special attention to the corners. If they turned out not very neat, you can fix special metal corners on top. Decorate the second part of the cover in the same way.
- Separately, we make several pages of colored scrapbook paper for individual sections. We glue cut-outs with an inscription on each. We fold all the sheets in an even pile.
- To install the spring, you will need a special tool - a binder. If not, you can make holes with a simple eyelet installer.
- We decorate the cover to your liking with decor, but always on a culinary theme. Now just install the spring in the holes made, clamp the spring rings. The result is a handy and neat recipe book for the hostess.
Cookbook in scrapbooking technique on rings
An original do-it-yourself cookbook is not only a beautiful and useful gift. She will motivate you to pamper your friends and loved ones with delicious treats, and writing down recipes on her pages is a pleasure!
Desktop cookbook MK part 1
Desktop cookbook MK part 2
Any hostess probably has a notebook in which she writes down her favorite recipes for every day, as well as grandmother's most delicious recipes. And many even keep these very grandmother's notebooks, for sure, that earlier they were still old Soviet notebooks, which have the most ordinary and ugly covers, and if such notebooks lie for a year, then it goes without saying that their covers will wear out or tear. And in general, it is rather undignified and ugly for a culinary masterpiece to have a simple, office cover. But there is a very creative and rather simple way out of this situation. You can turn your ordinary culinary notebook into a real cookbook with a very bright and beautiful cover specifically on a culinary theme. We will make such a cover from fabric with a layer of synthetic winterizer so that the book is plump. Our well-known and beloved will help us in the manufacture of such a culinary masterpiece. So, let's not languish for a long time, but let's get started right now.
To sew the cover, we need to take:
- Notebook with recipes, in this master class, a notepad measuring 12 * 18 cm;
- Binding sheet of cardboard 1.5 mm thick;
- Sintepon 100 sheet;
- Fabric thick red cotton with small white polka dots and white cotton with kitchen motifs;
- Two culinary pictures;
- White cotton lace;
- Bronze corners, 4 pcs;
- Brads are red;
- Metal kitchen pendants;
- Flower red fabric;
- Chipboard "Cookbook";
- Scrapbooking paper;
- Curb puncher;
- Satin ribbon with a pattern;
- Red lace doily;
- White cardboard;
- Glue stick, double-sided tape, glue gun;
- Adhesive glass effect;
- Bandage, white paper, scissors, ruler, pencil.

Carefully remove the cover from our already finished notebook.


We take binding cardboard, divide it into the following parts: 2.2 cm * 18.5 cm and two 12.3 * 18.5 cm.


We cut the cardboard, measure out two strips of 4 * 18.5 cm from white cardboard. With these strips we connect all parts of the binding cardboard into one. Glue with glue stick.


We draw the lines of bends with scissors. We glue the synthetic winterizer with strips of double-sided tape.


Now let's take fabric.


We cut off one red cut and two kitchen ones. We also need two strips of lace and two strips of ribbon.


We iron the fabric, then we sew it together, we sew lace at the joints. Now we turn the cloth over, put the binding cover on it, spread the corners and wrap it. Then we smear the edges, wrap tightly and glue.


We fold the cover and try on the pictures and the napkin. Sew along the edge of the cover, then pictures.


Now with the help of brads we need to fix the pendants and the flower.


Now for the main block we need to make endpapers from scrap paper. We cut out rectangles 18 * 24 cm. Divide the side 24 cm in half, 12 cm each and draw a line of bends.


We sew on the pocket on both endpapers.


Now the edge of the block is well smeared with a glue stick. We attach and glue one flyleaf, now another flyleaf from below.


We cut off white paper, spread the edge of the block, the edge of the block and also spread the endpaper from below. We clasp and glue the block with paper. Fasten with clamps.
Cooking has long been considered a kind of magic. Food can heal, give mood, even return the love of life. Just as every wizard needs his own grimoire, so a cook needs a good book to enter his secrets and secrets of cooking, or to enter recipes borrowed from other masters of cooking. Therefore, a do-it-yourself cookbook is like a good dish, but which is stored for years.
Spring Recipes
The basis for such a collection will be a metal or plastic spring, on which the pages will join. For the book you will need:
- the required number of A5 sheets;
- two cardboard sheets of good density;
- four sheets of scrapbooking paper;
- several thin plastic or cardboard sheets for sections;
- spring;
- stickers with the names of dishes or clippings from magazines, unnecessary books, etc.;
- scissors, pencil, glue, hole punch.
The beginning is to design the cover of the notebook. We apply scrap paper sheets to the cardboard, wrap about 1 cm on each side and glue it.
We also seal the inside with paper so that its edges do not reach the edges of the covers by 0.5 cm.


These stickers should be cut out, laminated on one side with adhesive tape.
Dividers should be slightly longer than the pages of the notebook and its cover. They need to make protruding bookmarks, drawing in front of this pencil. Each edge of the separator is marked with a protrusion line with a pencil, after which, depending on their number, the extreme strip is divided by marks for this same number, equal to each other in length. The final step will be cutting off the unnecessary strip to the place of the tag. You should get approximately the same separators as in the photo:

Labels with inscriptions corresponding in size are glued to them.

After what has been done, you need to fold the notebook in the future sequence and proceed to work with the hole punch. The holes should line up with the coils of the spring, so the rule here is: measure seven times, cut once, in the case of a book, pierce once. In this case, it is worth practicing on a draft sheet.
You can add a gripping elastic band to the notebook by making two holes in the back cover at the top and bottom, passing an elastic band through them, fixing the tails in the inside with tape or tying them together.
Notepad will look something like this:

You can also use the following page binders:
- metal two rings for albums;
- laces, rope or ties, threaded into the holes of the sheets;
- clerical stitching of sheets - 4-5 holes, which, after stitching with a thread, are covered with a fold of the first sheet of the book;
- folder.
The cover can be made soft by sticking it on cardboard and wrapping polypropylene film with scrap paper or cloth. Instead of ties, you can use a button-button, a magnetic button, or a regular button with a satin or crocheted eyelet.
Volumetric option
If the notebook type does not suit the cook, he should get acquainted with the master class on making a real book. This will require:
- sheets in the required quantity, A4 format;
- cover from an unnecessary book, notebook, album, etc.;
- scrap paper for wrapping the cover;
- kraft paper;
- figured hole punch;
- scissors, stationery knife, strong thread with a needle;
- two stationery clips, glue, pencil;
- decoration elements;
- instant coffee;
- ink;
- tape and 4 eyelets.
Coffee is necessary for coloring sheets of paper, giving them the effect of old age. To do this, a warm solution with coffee is poured into a baking sheet, where sheets of paper are placed in turn until they are completely wet, after which the paper is hung out to dry. After drying, the sheets are leveled with an iron. We evenly bend each sheet in half, make out the edges with a hole punch, making them openwork.

The paper should be folded into an even stack, the top and bottom of the workpiece should be pressed with clerical clips, placing squares of paper under them so as not to spoil the sheets.

On the spine of the workpiece, we make along 6 marks with a pencil, along which shallow notches are made with a clerical knife.
To sew the sheets, you need to take two strips of fabric, place them in the marked areas so that two areas from the edges and the middle one are free.

We thread the thread through the notches of each sheet so that it runs along the top of the areas with fabric stripes. All sheets are stitched in the described way into one tight binding, the end of which is made out by a good strong knot. Having again placed the clamps on the workpiece, we smear the spine with transparent glue, put it under the press, for example, from several heavy books. Drying should take several hours.

We wrap the cover with kraft paper, bending the edges 4 cm into the inside, carefully cutting and gluing the paper.

For the outer decor of the cover, we cut out two fragments from scrap paper half a centimeter less than one turn of the cover. Fragments can be sheathed with a line on a typewriter or manually. We add decorative elements according to our imagination or using pre-prepared ideas.


To tie the book, you need to make holes in the middle of the front and back covers, which we cover with eyelets. We stretch ribbons through the holes, the edges of which are fixed on the inside of the covers with glue and tape.

To combine the cover with the glued sheets, we apply a square of paper to the glue, which, smeared with glue and on the other hand, is put into the cover.

We make book endpapers from ordinary sheets of paper, in size they should be half a centimeter smaller than the edges of the cover. We paste them at the beginning of the book and at the very end.

The title of the book can be printed on a printer or applied by yourself with ink.

Video on the topic of the article
Video on creating a cookbook with your own hands: