Enlarge text
Have you ever seen a rose tree? This is a delightful sight that will not leave indifferent even those who have never had a weakness for flowers and landscape design. A rose bush, shaped like a tree, looks very rich and sophisticated - whether it is in modest solitude or in the company of its own kind.
What is this miracle? – an impatient reader will ask after looking at the photo of rose trees. And for sure he will think about the latest achievements of breeders. But everything is much simpler - this is a man-made beauty called "standard roses", which so easily captivates and conquers with its splendor, making our world more beautiful. By the way, you can easily form a stem with your own hands (we have already written on this topic). So you can achieve an amazing effect on your own, simply by using the information provided in this article.

What are standard roses?
A rose on a trunk is the realization of an old idea that has been successfully implemented in different cultures. They were first received at the end of the 18th century. Currants, gooseberries, raspberries, lilacs, various ornamental and fruit trees are also standard. They are formed according to the same principle, which we will now describe.
The standard rose consists of two parts:
- rootstock base;
- graft part in the form of a varietal rose.
As you already understood, to get standard roses you need to be vaccinated. But don't let that scare you. We wrote in detail about grafting roses, but in general about grafting trees and shrubs - Their principles and rules are similar for different cultures. Therefore, if you have planted something at least once in your life, creating a rose on a bole will not be difficult for you.
If you have only heard about vaccinations, having never tried anything like this, it will be a little more difficult for you (after all, the first experience ...). But in this case, too, there is absolutely nothing to be afraid of. Believe the experience of the author of this article - when you really want, you take it and do it. Imagining the future result and being inspired by the opportunity to create beauty with your own hands, you intuitively do everything right.
Standard roses can have a different crown:
- ordinary (in the form of a bowl or ball);
- weeping (with branches hanging down).
They are created by grafting various types of roses onto wild roses:
- hybrid tea;
- ground cover;
- curly.

Weeping forms are obtained by grafting climbing varieties. Their branches naturally fall down without requiring additional work for this (unlike ordinary trees, which are forcibly given this shape - we wrote about this here ...).
In terms of height, standard roses can belong to one of four groups:
- to miniature - the shortest of the boles, also called dwarf (40-50 cm);
- to semi-standard ones - they represent an average height option (60-70-80 cm);
- to standard ones - tall standard forms (100-110 cm);
- to weeping - the highest of the standard forms, which are also called cascading (120-170 cm).
Each of the groups involves grafting a certain type of roses. So, dwarf ones can be obtained by taking miniature and small ground cover varieties for grafting. Semi standard - having picked up representatives of the floribunda or patio group. Standard - using hybrid tea varieties, and weeping - weaving or ground cover roses.
How to form standard roses with your own hands?
Getting a rootstock
The most economical way is, of course, self-cultivation of the rootstock. They, as a rule, are two types of wild rose familiar to us: Rose wrinkled and Rosa canina (more common name - dog). A relatively long and painstaking journey involves sowing seeds of wild rose, growing it up to three years, cutting off all the extra shoots, except for the strongest, and grafting a rose of the selected variety on it (which is done next spring, i.e. in the fourth year). The rootstock can be transplanted to the planned place both in the first and in the third year of the rootstock growth.
For the trunk, you need to take only those roses that are distinguished by long or continuous flowering (preferably without pauses or at short intervals). This is the only way to show the full potential of this form and enjoy it to the fullest. The meaning of creating standard roses is to obtain a long-blooming tree that will capture attention and please the eye for a long time.

If you do not have time to wait from sowing to vaccination, you can find an already grown rosehip or buy it in a nursery or in the market. Rosehip may be in the place of a rose that has not overwintered, as well as somewhere nearby - at a neighbor's, in a forest or in a field. Of course, you can buy a ready-made standard rose. But, firstly, it will cost much more than usual; secondly, at the same time, you will not get pleasure from the exciting process of creating a trunk on your own. But, as they say, the owner is a gentleman, which means it's up to you to choose.
When buying a stem stock, you should always look at the root system. It must be powerful - the development of the future rose depends on it. The stronger the bush is, the more resistant it will be to any adverse factors and the more powerful the tree will become.
For 3 years, wild rose develops rather high shoots that can reach up to 2 m. Self-sowing of seeds should be done at a distance of about 30 cm in a row and 1 m between rows. To obtain a bole, not all plants are usually taken, choosing only the strongest of them. Before transplanting to a new place, on the best shoot that was left for grafting, the lateral branches are cut off, leaving about 20 cm each.
Rose grafting on wild rose
Standard roses are an example of ideality and perfection. These are the requirements for the stock and scion, which should be a successful tandem. To do this, they take only an absolutely even bole, because it will be the trunk of the future rosewood. The splendor of properly formed roses does not allow for something crooked and sloppy.
By the way, roses that are taken as a scion must necessarily have a suitable habit. So, varieties with straight shoots directed in one direction, which are good for bouquets, are absolutely unacceptable in a trunk. The size of the leaves, their color and healthy condition are also important components that are always paid attention to. Standard roses are a real masterpiece of landscape art, so there are no secondary moments when creating them, almost everything is important here.
As you already understood, the height of the stem part and the location of the grafting site depend on what you will graft and what you want to get in the end (what is the height of the tree). The vaccination is done with eyes (i.e., kidneys), which are taken, as a rule, in the amount of two or three pieces and are grafted from different sides. This allows, if desired, to plant two or three varieties at once, getting a pink tree with different colors, which is beautiful, unusual and spectacular.
Before the start of the event, you need to be prepared for the fact that not all vaccinations take root even among professionals. Therefore, to get a rosewood, it is better to play it safe and stock up on several rootstocks and scions. If the procedure is 100% successful, you can always plant an extra tree somewhere or even give it to one of your friends or relatives. Any hostess will be happy with such a valuable gift.
You can do such a vaccination not only in the spring (in April-May), but also in the summer (in July-August). In the summer, in the absence of rain, the stock should be watered abundantly a week before the scheduled event. The technique of budding roses on a trunk is similar to that used on spray or climbing roses. We talked about it in more detail. The upper part of the stock is cut off with a pruner (about 1-1.5 cm above the grafting site), and all growing points growing on it are removed.
For grafting, well-ripened buds are taken from shoots on which flowers have faded and wood has formed. You can find out if the vaccine has taken root about three weeks after the operation. It will be perfectly visible by the kidney whether it is alive or not (the accustomed one will swell and begin to germinate, and the missing one will darken).

Formation of standard roses
Immediately after grafting, the stem must be tied to a peg of the appropriate length. This will protect it from damage and in the future will become an obligatory attribute, without which the rose tree simply cannot stand (bend over).
It is necessary to form a standard rose next spring before bud break. And before that, a young tree is covered for the winter, bending to the ground and carefully fixing it (with metal arcs or something similar). In the spring, first of all, shoots that have formed on the wild rose are removed. Next, a crown is formed, completely cutting off with a pruner those branches that look inside the bush (the pruner is held at right angles to the shoots).
The gardener's task is to form a cupped or spherical crown. To do this, first shoots of the first order are cut off, leaving 15 cm each and, thereby, creating the skeleton of a tree. Each such shoot should have 2-4 buds (they will grow in the spring and create a magnificent crown). And then the second-order shoots are completely removed. In the future, it is necessary to remove branches that grow in the wrong direction or thicken the crown. By the way, the formation of standard roses is similar to the same event with gooseberries. We wrote about it here...
Weaving roses are cut differently - 15 cm from the end, leaving most of the shoot. The number of shoots that remain is from 3 to 6 pieces. Slices must be treated with garden pitch. By the way, it is advisable to wipe the tools for grafting and pruning with alcohol. This will protect the roses from infection with diseases.
Sheltering standard roses for the winter implies two options:
- bending the trunk and wrapping it with covering material under the arcs on ordinary trunks of different heights;
- covering with spruce branches and other materials without bending over, if they are cascading (weeping forms).
While pruning standard roses, you will see how best to form a bush so that it acquires the necessary shape. There is nothing mysterious in this case, everything is extremely logical and intuitive. Even if grafting and shaping roses will be your debut, do not panic and be afraid of something. Relax and feel like a creator working with live material - you will definitely succeed;)
1. THE ART OF WOOD CARVING. DECORATION WITH HOME-MADE FLOWERS OF PREMISES AND INTERIOR OBJECTS
Once in Rus', such a type of needlework as woodcarving , was one of the most widespread handicraft directions. Today the art of artistic processing wood blanks regaining popularity in our country. Moreover, if earlier this arts and crafts was mainly done by men, now many women are also engaged in the manufacture of jewelry and handicrafts from wood. Fortunately, there is a large selection of tools with which you can easily and accurately carve, cut individual parts and solid figures from wood. Convenient models of special knives-jambs, cutters, chisels and chisels allow you to quickly and efficiently process wooden blanks, create beautiful flowers, animal figures, and interior decorations with your own hands.
Recently, some interior designers have begun to use more handmade wood flowers for decorating platbands, stairs, furniture , walls (in the form of panels or compositions within), as well as individual crafts in the form of bouquets of flowers carved from wood.
It is quite difficult to make various voluminous and geometric crafts from hardwoods, and mainly experienced professionals who are fluent in the technique of wood carving are engaged in such work. But from such soft tree species as linden or wild apple, carving flowers and various figures is not so difficult. Even a novice master, after a few lessons on the technique of processing wooden blanks, will be able to make an elegant rose with his own hands. , big sunflower or other flower. 
There is a very simple way to make petals from shavings (from a pencil sharpener) of branches, and then make pretty roses out of them. Even a child can handle this job. Below you will find a master class on making such flowers from wood with your own hands at home. You can do with your child stylish topiary of such roses, which will decorate the interior of a children's room.
What woodcarving tools will be needed when making flowers (photo):
Stages of making flowers and other wood crafts with your own hands:
Preparatory stage.
As in any business, first an idea is born, an idea appears. You must clearly imagine in your mind what a fully created craft will look like.
After that, you need to make a pencil outline on a piece of paper. If the flower is not very complex and detailed, then you can limit yourself to a schematic sketch in several projections. And if the figure carved from wood is complex, then try to draw a sketch on the sheet indicating all the main proportions;
Sculpting a flower model.
Now you can mold a craft model, guided by sketches or a sketch. Many masters at this stage additionally draw a diagram in 2 or 3 projections. You will need drawing paper, pencil, polymer clay or plasticine, flexible copper wire to form the frame, stacks;
Rough cutting of a piece of wood.
We saw off a piece of wood with a saw with a middle tooth perpendicular to the central axis. Through the center of symmetry we draw 2 lines perpendicular to each other. First, we remove the excess from the projection, which requires deep processing;
Cutting a figure into 4 faces.
On the side, front and back faces, we cut out the figure of the craft, focusing on its outline, which is applied to the workpiece according to the created sketches;
Cutting a figure into 8 faces.
We cut off the corners of the formed blanks. There are 8 edges in total. At this stage, it is important to take into account the relief of the future flower, cutting narrower on convex areas, and wider on concave and sloping ones;
Detailing crafts made of wood, rounding.
Now tools such as jamb knives, chisels with different curvature, and ceramics will be used.
We work out small details, remove unnecessary faces, give shape to the flower petals;
Sanding.
The ideal option is to use a drill with nozzles from different sandpaper for grinding wooden crafts. If you process the surface of a wooden craft with your own hands, then choose fine-grained emery material on a fabric basis (corundum or glass);
Flower carved from wood.
Processing with special means and finishing of the product is necessary to protect it from external environmental influences. The decoration of the flower made of wood helps to emphasize the creative intent of the master.
Tips for beginners:
√ do not choose soft woods if you plan to carve crafts with a lot of small details and fine carving;
√
large flowers (roses, chrysanthemums, lilies) are best made from tree species such as wild apple, linden;
√
if you are a novice craftsman, then first learn how to cut a triangle out of wood using a joint knife. Knowing how to cut even only this figure, you can make simple wooden crafts with your own hands. If you have already learned how to process wood well with different tools, then try to cut a simple three-dimensional or geometric figure out of softwood;
√
To protect wood, various impregnations and varnishes are often used. But if you cover wood crafts with these products, the surface may turn yellow and become less expressive. Therefore, it is best to use wax to treat and protect the structure of the carved wood.
2. HOW TO MAKE YOUR HANDS TOPIARY WITH ROSES FROM WOOD
Step by step master class. This is a pretty tree of happiness even a child can do it by hand. Flowers for decorating a tree are made using a regular pencil sharpener. As a material, you can take branches of any tree (but not too old and brittle).
photo instruction
3. MASTER CLASSES FOR MANUFACTURING CRAFTS FROM WOOD WITH YOUR HANDS
Master class number 1:
HOW TO CUT A BEAUTIFUL VOLUME FLOWER FROM WOOD FOR DECORATION OF INTERIOR OBJECTS. STEP LESSON FOR BEGINNERS. SUCH ARTICLES CAN BE MADE BY SCHOOLCHILDREN AT THE LABOR LESSON IN THE WORKSHOP WHERE THERE ARE TOOLS SUITABLE FOR CREATIVE WORK.
Master class number 2:
ORIGINAL WOODEN CRAFTS FOR INTERIOR DECORATION. WE CUT OUT WITH OUR HANDS FROM A SOFT WOOD WOODEN WOOD (WE CAN TAKE A WILLOW) GEOMETRIC FIGURES AND WE COLLECT A FLOWER IN THE FORM OF A SUNFLOWER FROM THEM. YOU CAN WORK A LITTLE ON THE CRAFTS AND TURN IT INTO A SUN WITH A FACE.
Master class number 3:
WE LEARN WOOD CARVING. THIS PHOTO INSTRUCTION WILL HELP YOU UNDERSTAND THE PRINCIPLE OF WOOD CUTTING AND EDGING.
Master class number 4:
The presented wood carving lessons will introduce beginners to this craft so that you can create objects from natural materials with your own hands.
The history of the craft and types
Wood carving is a type of arts and crafts that originated in antiquity. In Rus', woodcarving was called carving, and the drawing performed in this technique was called a sign, a pattern, or a pattern. In this technique, masters made braids, teeth, grooves, poppy seeds, fungi, etc. on a flat surface. You can see such samples in the Assumption Cathedral by visiting the royal place.
Russia owes the development of woodcarving to the monk Ambrose, a novice of the Trinity-Sergius Lavra, who at the end of the 15th century combined Russian ornament with Western and Eastern in his works.
In 1660, the masters decorated the royal dining room with German carvings, which were figured, with Gothic motifs. This is how German elements appeared in Russian carving, including new tools and terms.
Thread types are conditionally divided into:
- through;
- deaf;
- brownie;
- sculptural;
- chainsaw thread.

Here's how they differ:
- The through thread is subdivided into consignment note and through thread. This includes slotted carving, when through sections are cut with chisels and chisels; and profile carving, where such sections are cut with a jigsaw or saw. If these types of carving are performed using a relief ornament, then this is called openwork.
- If there is not a single through hole in the processed tree, such a thread is called blind.
- Facades of buildings are decorated with house carvings.
- Sculptural - one of the most complex types of carving, requires great skill. In this technique, figures of animals, sculptures of people are made.
- With the help of carving with a chainsaw, global work is performed. This requires strength, therefore it is more suitable for men, while women also successfully master other types of carving.
Woodworking tool, cutting blanks
Beginners can use only 2 tools - a well-honed penknife and a joint knife.
When you learn how to perform simple elements with them, you want to improve, then you can buy wood tools, for example, such a set.

There may be even more tools, but only professional carvers who perform complex work need such a number.

See what types of recesses you can make with semi-circular cutters of different sizes, sharp-angled.

But what set of tools should a cabinetmaker have in order to perform the following types of woodwork:
- carving;
- sawing off;
- splitting and trimming;
- planing;
- turning;
- chiselling.

- Pay attention to the cutters that are used for manual turning of wood. In addition to the semicircular, there is also a flat oblique, angular, detachable, beveled, angular, etc.
- Saws are used to saw off the workpiece. They can be transverse, longitudinal, universal. The teeth of the rip saws are chisel-shaped; in the transverse they are triangular, sharp. Universal are equipped with teeth having a right angle. Such a tool can cut fibers both along and across and at an angle. Each of these saws can be hacksaws, simple, one-handed.
- If the workpiece is made from a ridge, beam or trunk, then axes or cleavers are used. Adze - a kind of ax, the blade here is located perpendicular to the handle, is used to create figured and concave products.
- To remove chips from the workpiece, turning or hand tools are used, planers can be used.

The most popular carving tools are chisels. They usually consist of:
- steel rods;
- cutting blades;
- shank.
- Wide and straight are used for cutting or stripping flat or convex workpieces.
- With round blades - for working with horn knots or hardwood.
- With the help of narrow workpieces are processed in narrow places.
- A chisel with a thick steel rod is used to clean a deep cavity or workpiece with a hollow. Deepen the chisel into the wood with a mallet.
- Cranberries make gutters of various depths and radii.
- Corner chisels make grooves and triangular recesses.
Wood carving: sketches and master classes
After you have learned a lot of useful things, got the necessary, let's try to cut a flower. To make it, you need the following:
- flat wooden blank;
- pencil;
- transparent paper;
- v-shaped chisel-corner;
- narrow and wide semicircular chisels.
If you don't already have a v-shaped chisel, you can use a sharp knife for this pattern.
Attach a sheet of paper to the screen, redraw the diagram.

Then transfer it to a wooden blank. Start by cutting along the outline of the center circle, then cut towards the center from the outer circle using a large semi-circular chisel.

Mark up the flower petals.

Using a v-shaped chisel, cut the petals along the outline.

With the same tool, remove the excess wood between the petals (“triangles”).

Take the next woodworking tool in your hand - a semicircular chisel to cut out the outer contour of the petal. In doing so, it will become similar to the upper part of the heart.

With a large semi-circular chisel, make cuts inside the contour of the petal.

With a small semicircular chisel, make two cuts on this contour from the center of the flower.

To increase the cut area, just cut again.

Unfold the chisel and round the center of the flower.

Now you need to take the next carving tool - a v-shaped chisel and make such cuts in the center of the flower.

Everything, you can admire the result of the work.

If you want to carve a fox, the following sketches will come in handy.

If you want to make butterflies, wood carving sketches are also included.

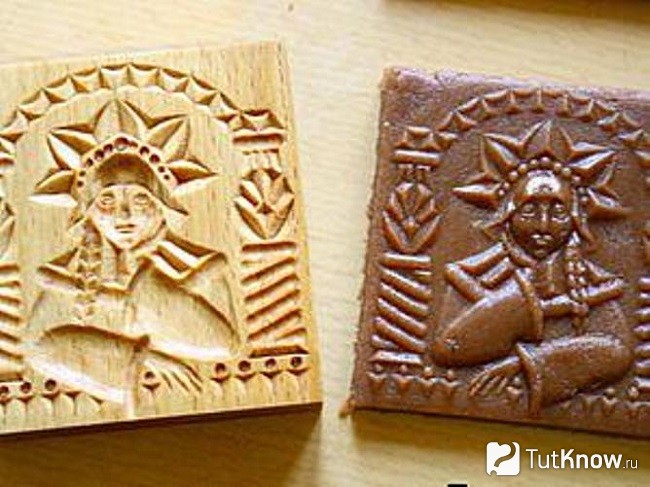
If you want to make a mold for printed cookies with the image of the Snow Maiden, then prepare:
- beech plank;
- ruler;
- jigsaw;
- simple pencil;
- ruler;
- sandpaper;
- eraser;
- linseed oil.
Draw a rectangle on the board. Drink it up.

If you do not have an electric jigsaw, then you can cut the workpiece with a saw or an ordinary manual jigsaw.
Make the surface of the cuts even with sandpaper. If the farm has a grinder, use it for this procedure. Transfer the drawing to the workpiece using a simple pencil.

With the help of a semicircular chisel, we make a recess in place of the face, then we again apply its contours here.

The ongoing wood carving sketches will help you carve out the facial features correctly. At this stage, we also make a cape on the head of the Snow Maiden. Note that it is at a level above the face.

Based on the sketch, cut out other elements of the workpiece.

Now you need to erase the pencil with an eraser-rubber, then with the finest sandpaper. If you immediately do this with sandpaper, then part of the stylus will rub into the tree.
Pour linseed oil into a container, dip our wooden mold into it for an hour. If you are doing a lot of work, then saturate it with oil using a swab or squirrel brush and leave to dry for 3-4 days.

Everything, you can roll out the dough, cut it into rectangles, apply a pattern using a wooden blank and bake.

To prevent the cookies from burning in some places, you need to cut a stamp out of wood so that there are no too prominent elements on it.
How to cut a sign for a bath?
For her, take:
- a board (in this case, a coniferous wood step was used);
- triangular ruler;
- simple pencil;
- saw;
- furniture varnish in a can;
- stain;
- brush;
- sandpaper.

To draw letters, download the letters you like from the Internet, then redraw them on wood. You can use this sample.

Draw oak leaves on the right and left on the plate.

Next, the carving begins. For beginners, such tasks are great, because they do not require long training and a lot of tools. Here, 3 types of cutters were used: a joint-cutter and chisels "Tatyanka". Make cuts according to the pattern with a chisel cutter along the outlined contours, cut it under the contour with a chisel to highlight the pattern above the background.

Next, the carved surface is sanded with sandpaper No. 180 and No. 220. Draw clouds at the top and bottom of the plate, cut them out with a chisel and a chisel, and then sand them.
This soap will be a nice present for friends. After all, manual work is highly valued. In order to make a rose out of soap, you will need a little, namely:
- a piece of soap;
- cutter;
- tassel.

Then you need to cut out the second and subsequent petals. At the same time, move from left to right in a circle.

This is what the job should look like after you make the first circle.

Perform the second and subsequent ones in a checkerboard pattern in relation to the previous ones.

Here's how to decorate soap with your own hands by combining carving and woodcarving.
In conclusion, 3 plots are offered to you. From the first one you will learn in detail about wood carving, about tools for beginners.
After viewing the second, you will be able to carve a spoon with a beautiful carved handle.
From the third, you will learn how to carve a charming rose from wood.
They are more simply called trees of happiness. They got this name because an unusual ensemble of a decorated ball and a trunk conveys the shape of a tree.
Topiary will perfectly fit into any interior and always attracts the eye. It serves not only as an original decor, but also gives a sense of harmony.
To make a topiary we need:
- satin ribbons for roses, 2.5 cm wide. You will need three colors: raspberry, white and pink;
- satin ribbon for the trunk, 1 cm wide;
- hot glue (gun with glue rods);
- about ten sheets of newspaper;
- a branch for the trunk;
- a flower pot, preferably heavy, for example, ceramic;
- a small piece of foam;
- gypsum with water;
- to decorate sisal and decorative ladybugs.
The first stage is the longest and most laborious - this is the twisting of roses. You will need a lot of roses, about 50 pieces. For each rose, cut off 50 cm of ribbon and proceed to twisting. First, fold the edge and make two turns, apply one small drop of glue to each centimeter of the tape to fix it.
Bending the tape away from you every two centimeters, continue to form a rose flower. Do not forget to fix every second turn with glue.

Roses should be even and almost the same size.


At the next stage, we form a ball for the topiary. To do this, we wrap one newspaper in another, crush it with our hands until a round shape is formed. It should form a ball about 15 cm in diameter. So that newspapers do not fall apart, and roses stick more easily - wrap the entire ball with thread, adjusting the shape to a perfect sphere.

Prepare the rest of the items: the pot must be clean, remove the bark from the branch.

We put the ball on the trunk. To do this, it is more convenient to first make a small hole with a knife, and then try on the barrel. If the trunk extends 7-8 cm, then fix it with hot glue.

We begin to wrap the barrel with tape from the ball to the bottom.

Cut off a piece of styrofoam. It will be needed to fix the trunk.

Glue foam to the bottom of the pot, of course inside.


For a strong fixation of the trunk, pour a solution of gypsum into the flower pot. Let it dry for half an hour.

When the plaster has hardened, you can start decorating the topiary with roses. To do this, apply hot glue to each rose.

We first glue the raspberry roses according to the planned pattern. The drawing needs to be thought out in advance. This topiary will have a crimson rose in the middle.

Glue white roses around the first crimson rose.

We make decorations around the neighboring crimson rose from pink roses. We alternate in this sequence the entire drawing.


To decorate the bottom layer of the ball, it is better to turn the work over. Glue with raspberry roses, press them tightly to each other.